4K LCD TV as Productivity Monitor for CG
Honest opinion of Digital Content Creator, 3D Artist and CG Generalist, about how good a regular 4K TV is for professional CG purposes. Conclusions based on 4 years of experience using TV as PC monitor for 3D modeling, 3D rendering, video and image editing, reading and programing. Contains a step-by-step guide on how to make a smart choice of 4K TV for graphic design. You will be able to understand a theory underlying the following record: 4K @ 60Hz @ Y′CBCR 4:4:4 @ 8-bpc and much more.
Contents
Introduction
Hi everyone!
In this article I want to share my long term experience of using a LED TV as a monitor for my everyday professional use to work with computer graphics, i.e. 3D modeling, 3D rendering, 2D image editing. And also for programing, reading, watching videos and sometimes even for PC gaming (a lot of gaming, to be honest). There is no doubt that many of us who are planning or want to buy a new monitor think of this as an option. And not a without reason. Really, what's the point of buying a professional 4K Ultra HD monitor for $1,500 when you can buy a TV panel for only $500 and get the same size, resolution and refresh rate in just a slightly different bezels? Or is there some other difference?
Let's find out.
P.S.: It is a long read, so if you just want to see the brief, you can jump directly to Summary at the bottom of this article. There is a Getting a TV guide, which you can use to make the right choice. Still if you want to know more about 4K TVs as PC monitors, welcome to this article.
You Need a Large Screen
There are two main motivations to have a large screen TV as a monitor for you PC. Those are an actual need for a big screen and a reasonable value for money. In fact, price is the main reason why it makes sense to look at a TV as a monitor, over buying a "conventional" monitor of a large size.
If you really don't see a big difference between $500 and $1,500 for the monitor, it makes no sense to read on, just buy a regular monitor with a large screen size and I'm sure you'll be happy with your choice. But if you only have $500 or you have a better idea of what to spend an extra $1,000 on, my experience may be quite useful to you.
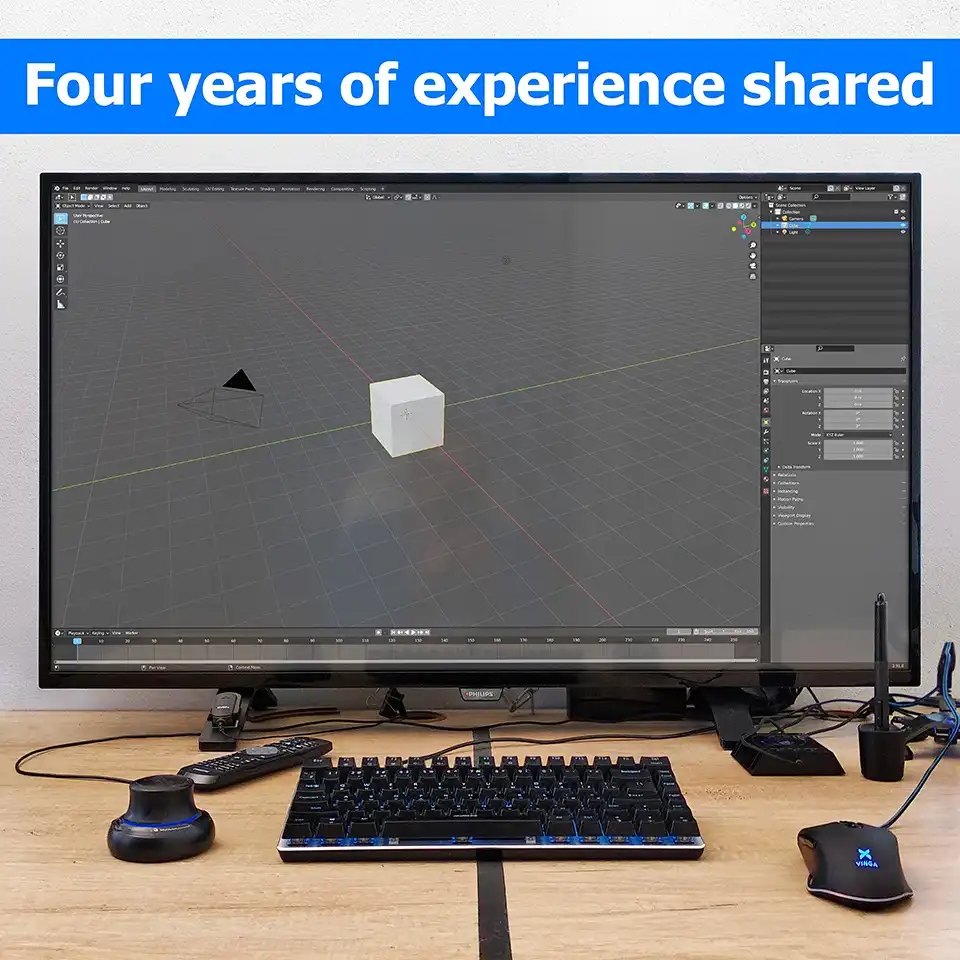
Any CG artist needs a lot of screen space to accommodate complex interfaces of modern 3D software, a lot of reference images, and so on. If you are one of them, or have ever seen a typical 3D artist's workplace, for example from a photo of the interiors of numerous CG studios, you will instantly recall the image with several monitors behind every desktop.
It was 2016, and my work teammate and I needed to buy new, larger monitors for our daily work. Approximately around this time, the boom of affordable 4K LCD TVs began. Previously, big screen TV, or as many people at the time called it - "plasma" (thanks to previously popular plasma display panels), was the luxury for celebrities. But with the development of the technology, big flat TV panels became affordable for professionals and, more important, they operate in 4K UHD instead of more usual Full HD.
What is the Optimal Screen Size
Bellow I will use mixed units. Inches when, describing panel diagonals (since this is an international convention) and centimeters for any other linear dimensions, such as display panel sizes. In case you need help with converting units, here are some interesting sites to play with:
Once we decided that the big screen is a necessity, next question is how big should it really be?
There are plenty of options, from 40" and up to 100+". We cut off extra large screens immediately, due to the unrealistic sizes for desktop usage. The really suitable sizes are somewhere between 40" and 50".
I'll go a little further and say that I bought a 43" TV, but if the TV was a little bigger, say, 46" or even 49", it would be even better. However, this is not a very critical difference, rather a nice bonus, so if you find, say, a cool 43" TV for the best price, it will also be great. But I definitely do not recommend buying a TV smaller than 43 inches and more than 50".
A TV screen larger than 50" is not just a matter of local limitations, for example, depending on how much space you have on your desktop, or on the principle of "the more the better", it is also a geometric, or rather a physiological question. Surely, you are sitting in front of the center of the monitor. The larger the screen, the farther its edges are from your eyes. It is very important for you to be able to see the details on the edges of the screen (especially on the right and left), without straining your eyes and without rotting your head too much. You will definitely do it on a 43" screen, but much less than with a 52" one.
By the way, the monitors with curved screens are designed to solve this problem. The idea of this type of monitors is to keep approximately the same distance between the eyes and any point on the screen, whether it is in the center or the very edge of the display.
Since most affordable TVs are flat, keep this in mind when choosing a size of TV panel.
Why 4K
As you probably know, the most popular monitor aspect ratio is 16:9. TV panels are no exception, so 4K large screen TVs mainly have a resolution of 3840 × 2160 pixels a.k.a. 4K UHD (Ultra High Definition). It is resolution that you need to focus on. But why should you choose a large screen with 4K resolution instead of less expensive, Full HD for example?
This is absolutely crucial, because the large panel will be located not as far as the usual TV set, but rather just in front of you, that is approximately at your arm's length. It is so close that you will be able to see every side of Full HD pixels.
When you have a Full HD (1920x1080 pixels) 24-inch (53 x 30 cm) monitor, this is pretty normal resolution for the screen size, because in this case you have 1920 pixels along 53 centimeters. This makes about 36 pixels per one centimeter. If you have Full HD resolution on a 43-inch (95 x 54 centimeters) monitor, you get the same 1920 pixels but now along 95 cm, or making 20 pixels per each centimeter. That's 16 pixels per centimeter less. Thus you have much larger pixel size. Large Full HD screens actually have much larger pixels compared to smaller screens, but with the same number of pixels.
The pixel size on a 43-inch Full HD TV will be large enough to clearly distinguish them at arm's length. I have a 49-inch Full HD TV in the living room, with a "home theater" computer attached, so believe me, I know what I'm talking about. Therefore, a resolution higher than Full HD is highly recommended for a 40+" panel to use it as a PC monitor.
Obviously, 4K UHD is a natural choice for a large display panel.
60Hz Refresh Rate
The refresh rate is the number of frames you see on the screen in one unit of time. It is measured in Hertz, i.e. of how many changes can happen in one second. In our case, a change is one full frame rendering cycle.
A notation of 60Hz, for the display device, means that it shows you 60 frames per each second. The more frames per second a monitor or TV displays, the smoother motion picture will be. But why exactly 60?
The 60 is a long-term standard. The exact figure 60 is both historical (from the era of CRT TV's) and anatomical.
There is a lot of research on how many frames per second the human eye can see. The brain and the visual system, like any biological entity, rely on chemical reactions that have their own speed limits. This means that human vision also has its own refresh rate, about how many times the brain can read images from the visual system.
Most people perceive a flickering light source as a stable image at a rate of 50 to 60 times per second, some people may detect a slight flicker at more than 60 Hz. Some studies show that the brain can process images every 13 milliseconds, which can be transmitted as 75 frames per second. But on average it is considered that 60 Hz is the highest limit of sensitivity for the average person.
Nevertheless, human vision is a complex system, and the perception of movement depends on where the movement takes place, directly in the center of attention or on the periphery of our vision. In addition, the brain reads images from the vision, not in sync with what is happening on the screen, which means that the brain can read a frame from a vision at a time when the frames are changing on a screen. It can also be perceived by the brain as screen flicker and so on.
Well, if 60 Hz is not enough, why not use, for example, 120 Hz by default? The fact is that the more frames per second the system must generate, transmit and receive, the more powerful and expensive the components of this system should be. Thus, 60 Hz is only a generally accepted compromise between visual comfort and the necessary resources.
What am I trying to say here, is that use of any screen as PC monitor, with a 30 Hz, is almost impossible, regardless of the type of activity. Whether it is dynamic 3D modeling or simple text editing. At the same time, the affordable maximum is 60Hz. You can check this yourself by switching the current display device to 30Hz, and see how slow and unresponsive the whole system became, you can even catch the screen blinking with your own eyes. Therefore, no matter what you do on the computer, you should focus on the refresh rate of 60Hz as the minimum specification for the display device to have a comfortable usage experience. So, 60Hz is not the best possible, but the most optimal value.
HDMI Bandwidth
When you open a box with the a monitor, in addition to the power cord and many other things, you can find a cable for video data transmission, such as DVI or DisplayPort, or other. But when you open a box with the new TV the remote is the only thing apart from TV. The quest of connecting TV to your computer is your call.
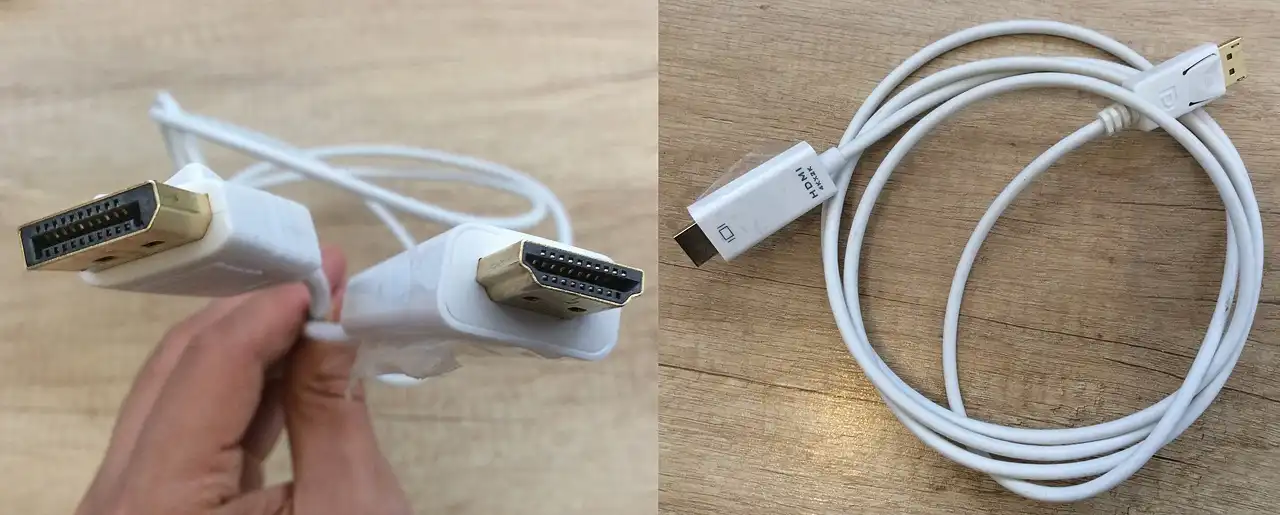
There are several options for how to send a video signal to a TV, but the most popular and versatile is through a High-Definition Multimedia Interface or simply HDMI. Thus we will stick to HDMI option only.
Another part of the quest is choosing the kind of HDMI cable. There are a lot of versions of HDMI available: 1.0 / 1.2 / 1.3 / 2.0 / 2.1 and several sub-versions in between. The main difference between versions of HDMI cables is the cable bandwidth, i.e. what signal frequency the cable materials can withstand without irreversible losses and without interferences, or, more interestingly for us, how many data units a cable can transmit per unit of time.
The data rate of the HDMI cable is measured in Gbit/s (Gigabits per second). But how many Gbit/s does your equipment really require? To answer this question, take a look at the minimum video signal characteristics that a video system should support, below.
4K @ 60Hz @
Y′CBCR4:4:4
@ 8bpc
Where: 4K - resolution, 60Hz - refresh rate, Y′CBCR - color format (color model), 4:4:4 - color compression level, 8bpc - color depth.
If some of these abbreviations and numbers are not yet clear to you, do not worry, they all will be explained in detail later in this article. But for now, just take it for granted that these are the minimum acceptable specifications for a video signal, and to fullfil them, the connection between your PC and the display must be at least 12.54 Gbit/s.
If you look at the main specifications of different versions of HDMI, you will see that you need at least HDMI 2.0, which has a data bandwidth of 14.4 Gbit/s (just right).
HDMI 2.1
If you're lucky enough to have equipment that has excellent video performance, such as 4K with a refresh rate of 120Hz and / or 10-bit color depth or even 8K@120Hz@10bpc, well, then HDMI 2.0 bandwidth will definitely not be enough. So, HDMI 2.1, which provides a significant speed of 42.6 Gbit/s - is the best choice.
HDMI 2.1 cable may be useful for the regular video performance as well for preventing the effect of "bottleneck", I strongly recommend you to just buy an HDMI 2.1 video cable by default. This totally makes sense because the price of HDMI 2.0 and HDMI 2.1 is almost the same. The usual price of a 2 meters long HDMI 2.1 cable is about $10. HDMI 2.1 cables are usually labeled as 8K HDTV 2.1v. They are easy to find.
DisplayPort 1.2 to HDMI 2.0 Active Adapter
Another thing is that older discrete video adapters as well as most laptop video cards do not even support HDMI 2.0. They usually have HDMI 1.2 - 1.4, that is able to transmit data only at rate from 3.96 Gbit/s to 8.16 Gbit/s, which is absolutely not enough to transmit 4K at 60 Hz. You may encounter HDMI 1.4b that is capable of transmitting 4K at 60Hz, but it works only with a lossy 4:2:0 color compression.
At the moment I bought a TV, I had GeForce GTX 660 2GB video card with DVI-I, DVI-D, DisplayPort 1.2 and HDMI 1.4a ports, leaving me with only two options, to make my system run 4K at 60Hz: buy either a new video card with built-in HDMI 2.0, or a special DisplayPort 1.2 to HDMI 2.0 Active Adapter. I have chosen a second option simply because it is much cheaper, $20.
Disadvantages of Active Adapter
It works, but this type of adapters has one huge downside.
You have a video source on one side and a display on the other, and this adapter sits between them. When your display is on, adapter transfers its signature to a video card (Extended Display Identification Data or EDID), so the video card knows which display is behind the adapter.
When display is turned off (you forgot to turn on the TV), adapter does not send TV signature to the video card and video card not knowing what is connected to it, simply resets the operating system resolution to the default 640 x 480 pixels. When you turn on your display, 4K resolution is restored, but all already opened windows remain squeezed into previous resolution of 640x480, and you have nothing to do but resize each opened window back manually. Very annoying thing.
The OS resets resolution only when your display is turned off while the OS is booting or when the OS returns from hibernation. But this does not happen when OS is already loaded and remains active, you can freely turn on and off a display connected to the active adapter, without fear of resetting the desktop resolution.
Advantage of Direct HDMI Connection
Coming back to my example, a little later, I changed my graphics because, first, a GTX 660 is a bit slow at 4K, second, the 2GB of its VRAM is not enough to activate 8K texture mode in Substance Painter, which I use a lot. I have installed the GTX 1660 with 6GB of video memory and, more importantly, with HDMI 2.0b, which is theoretically capable to transfer uncompressed 4K@60Hz@8bpc. Additionally, I bought HDMI 2.0 cable to connect my video card and TV directly. Since then I see a picture with less video artifacts and no resolution resets.
If you already have modern video card, it's likely that it already has at least one HDMI 2+ port. For example, NVIDIA 3000 series graphics cards by default target an 8K resolution and have one or more HDMI 2.1 ports. The previous generation 2000 cards were focused on 4K and are equipped with HDMI 2.0b ports.
I strongly recommend to use a direct HDMI 2+ connection without any adapters.
If you are interested in other technical characteristics of HDMI standard, read the article about HDMI on Wikipedia, to which I have referred several times already. This is a wonderfully written article with lots of useful visuals.
Blind Choice of a TV
So, the technical requirements are defined: 40+", 4K UHD, HDMI 2+, but there are still many outstanding questions remain.
Outstanding Questions
A TV comes with a lot of video enhancement features that are useful for watching videos from a long distance, but at the same time they can be completely destructive for the precise purposes of CG. Can you disable them?
Can you have a good picture on a TV without enhancement features enabled?
What about color accuracy, contrast, gamma?
What color depth does the TV panel really support? Can a particular TV transmit smooth gradients without color banding?
Is my current video card able to provide a required signal, are there any compatibility issues?
Does the input lag worsen a 3D modeling productivity? Will you have an image ghosting during rapid navigation in a viewport?
Can TV be good enough for computer entertainment such as gaming, which is definitely a popular type of activity on a PC apart from serious work.
And last but not least, how does a large TV panel affect your vision? Constantly having a 40+" light source right in front of you sounds scary.
No Convincing Reviews of TVs Available
This may sound strange, but most likely you won't find any information about the installed version of HDMI on most TVs. Neither on TV manufacturer's website, nor on the back-plate of a TV itself. It will just say something like HDMI1 / HDMI2 / HDMI3, where digits are just an HDMI port sequence number, or HDMI ARC (Audio Return Channel) meaning HDMI that is capable of transmitting audio.
Manufacturers inform you about shape and number of the port rather than underlying technical capabilities. Still you can deduct them from other signs. For example, if your TV labeled as 4K with a refresh rate of 60 Hz, this automatically means that TV supports HDMI of 2+ version. Usually it is the most you can get.
The last resort for you are the reviews on the pages of online stores that sell this particular TV, hardware forums, YouTube videos, and so on.
When I was choosing the TV (2016) there were not as many reviews of TV panels as few years later, and TV manufacturers didn't provide enough information to find answers to all my questions before buying.
Most of the "conclusions" on many different hardware and game forums or video reviews sounded like: there is no difference between a monitor and a TV on the same panel, but the TV is definitely not suitable for use with a PC because "trust me".
So I faced a choice between (1) going the "classic" way of buying an incredibly expensive professional monitor with a satisfactory result "out of the box", and (2) risk a $500 buying a regular 4K TV panel hoping to get an excellent price vs quality balance. I chose the second option.
4K TV of My Prior Choice
At that time, the variety of budget 4K TVs was not very diverse and my choice fell on the Philips 4K UHD Slim LED TV 108 cm / 43" (43PUT4900/12). As the name implies, this is 4K UHD 43" TV with a LED backlight. According to detail tech specs, it had HDMI 2.0, capable of a resolution of 3840 x 2160 with a refresh rate of 60 Hz. Its was about $500 while models with larger diagonals and better characteristics were more expensive. If there was a TV with a bigger screen for the same price, I would definitely chose that instead.
Another reason why this TV was cheaper than others is that it's not "smart". This last thing is not really a disadvantage, because if you plan to use a TV with an powerful external computer, the limited built-in one will be of no use.
Workplace with Big Screen TV
After installing TV onto the workplace and setting it up, the "first start" immediately showed that the TV reproduces an images prettier and much more sharper than the same images shown by the professional 24-inch Dell UltraSharp monitor (U2410). By the way, it is the monitor that was to be replaced.
I had the opportunity to compare this monitor and TV on a nearby workstation, so an opinion is not driven by excitement of a new purchase, it is as it is. By the way, on the right you can see both the TV and the monitor for comparison.
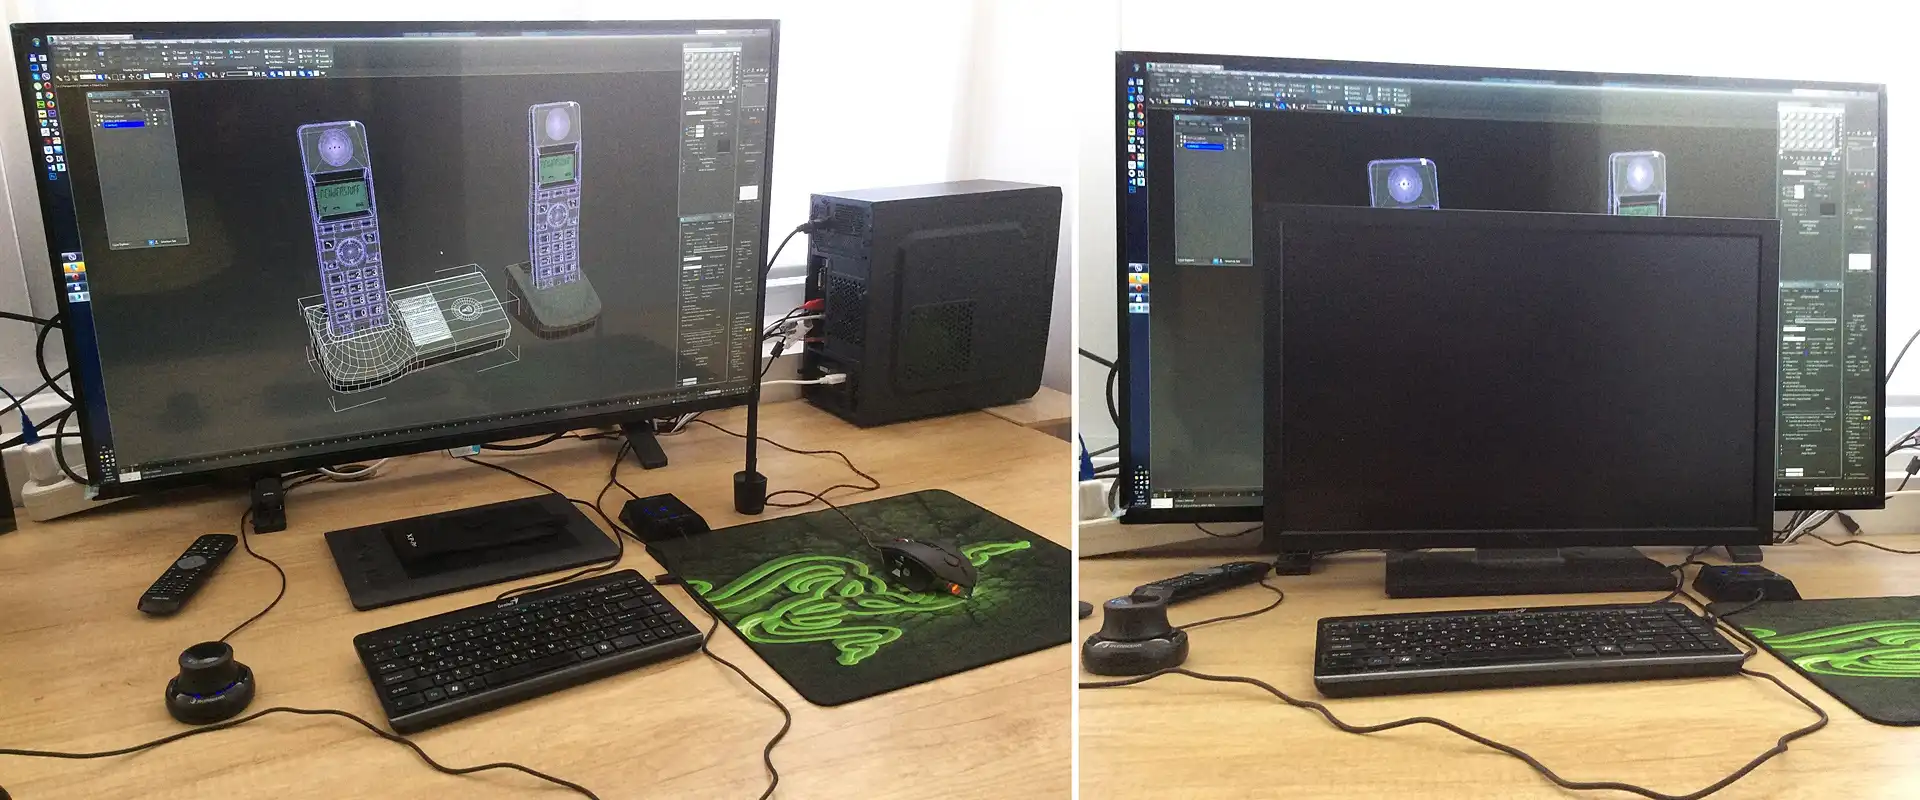
Some may say that previous monitor was "misconfigured", "not calibrated correctly", etc., but the fact is that the difference was obvious to the eyes. The TV panel "out of the box" showed a better image than a professional monitor for graphic design, adjusted to our needs, which has serve us well many years. As you can also see, the flat panel of the TV with a thin bezel looks even less bulky in the workplace than chunky "classic". Also, small benefit of a new TV over the older lamp backlit monitor it that the power consumption of the huge TV panel is several times less, and it generates less heat from the screen, which is especially important on hot summer days.
Just by looking at the size of a mouse or keyboard, you can easily imagine the scale of the TV panel. The screen size is really big. For the first ten minutes, I even thought the screen had a fisheye distortion, like a front door peephole. This is because the edges of the screen are so far away from the center that you can even see some perspective distortion (the farther the object is from the viewpoint, the smaller it appears and vice versa). But the brain adapts in a few minutes, and I never had this feeling ever since.
"Computer Mode"
If you turn on a TV connected to a PC for the first time without any TV settings, you will see an over-saturated soapy picture. This is because a general purpose TV is designed to show videos by default, and to make the videos more attractive, it uses "beautify" technologies, such as picture clarity tweaks, anti-noise filters, contrast enhancers, motion smoothing, and more.
With a TV as a monitor, you don't want all this tricks, you need to see the video signal from the video card "as it is". To achieve this, you need to "tell" the TV that a PC is connected to it so that the TV turns off all video enhancement features and shows the video signal with maximum accuracy. In addition, the TV can also use a default preset brightness, contrast, gamma, etc., which are more suitable for computer.
Fortunately, this can be done with just one setting. Depending on the TV model and manufacturer, there are two main approaches: either you need to switch the activity style for the entire TV to the Computer, or set the Computer as the signal source type in the settings of a specific HDMI port. The Computer may also be referred as PC.
Below are some examples of how to enable Computer mode on a TV.
Philips TVs: Setup > TV settings > Picture > Advanced > Activity Style > Computer
Samsung TVs: Source > HDMI... > PC
LG TVs: Input > All Inputs > HDMI... > Edit Icon > PC
Let the TV know that it has PC on the other end as the first thing of setting it up. An exact location and name of this setting may differ depending on the specific TV model.
DPI Scaling
Pixels Size vs Screen Size
Another interesting fact is that the pixel size on the 4K UHD 43-inch panel is smaller than the pixel size on the 24-inch Full HD monitor.
Bellow is a slider with comparison between pixel areas and comparison between actual sizes of 43-inch 4K UHD and 24-inch Full HD display panels.

To compare the actual size of the panels, you can also look again at the photo above, but keep in mind that the 24-inch display is closer to the camera, so it looks bigger through perspective, and has a very thick frame, so visually it is also perceived as bigger than it actually is.
As you can see, the pixel area of 4K UHD is exactly four times the pixel area of Full HD format. Therefore, to maintain the same pixel size, the area of the 4K UHD panel must be four times the area of the Full HD monitor (53.1 x 29.9 cm) or each respective side is twice as long, i.e. 53*2 x 30*2 cm = 106 x 60 cm or 48-inch panel. This means that if you have a panel smaller than 48 inches, the details of the user interface on the screen will be smaller than usual.
Now, let's perform the same simplified calculation for 4K UHD (3840x2160 pixels) 43-inch panel, as we did before explaining why the big screen should be 4K, now we will get 3840 pixels along 95 cm, or about 40 pixels along one cm. This makes about 4 pixels more along each centimeter of a screen compared to a regular 24-inch monitor. This may be a surprise, because you could expect larger pixels on a larger panel, but in reality, they can be smaller. On modern 8K UHD panels, they are even smaller than small 4K UHD pixels.
So, as you can see, the resolution and the actual size of the TV panel are very related and essentially determine the size of the pixels. Because of smaller physical pixel size, the same UI elements will be physically smaller. You get a bigger screen and end up with a smaller UI. Unexpected, huh?
To get the same real-world size of our imaginary button on the 4K UHD 43-inch panel as on a regular Full HD 24-inch monitor, we need to increase the size of the user interface. That is, increase the size of the button in pixels or upscale it. The good news is that it is a the general need, and it is already resolved at the OS level by using a global pixel scaling.
Display Scaling
The number of pixels that can be placed along a line of a certain length is measured in pixels or "dots" per inch, abbreviated as DPI. In other words, it tells how many dots can be placed along one linear inch. To change an actual size of UI elements, we need to place more or less pixels along the same physical length on a screen, or in other words, change DPI.
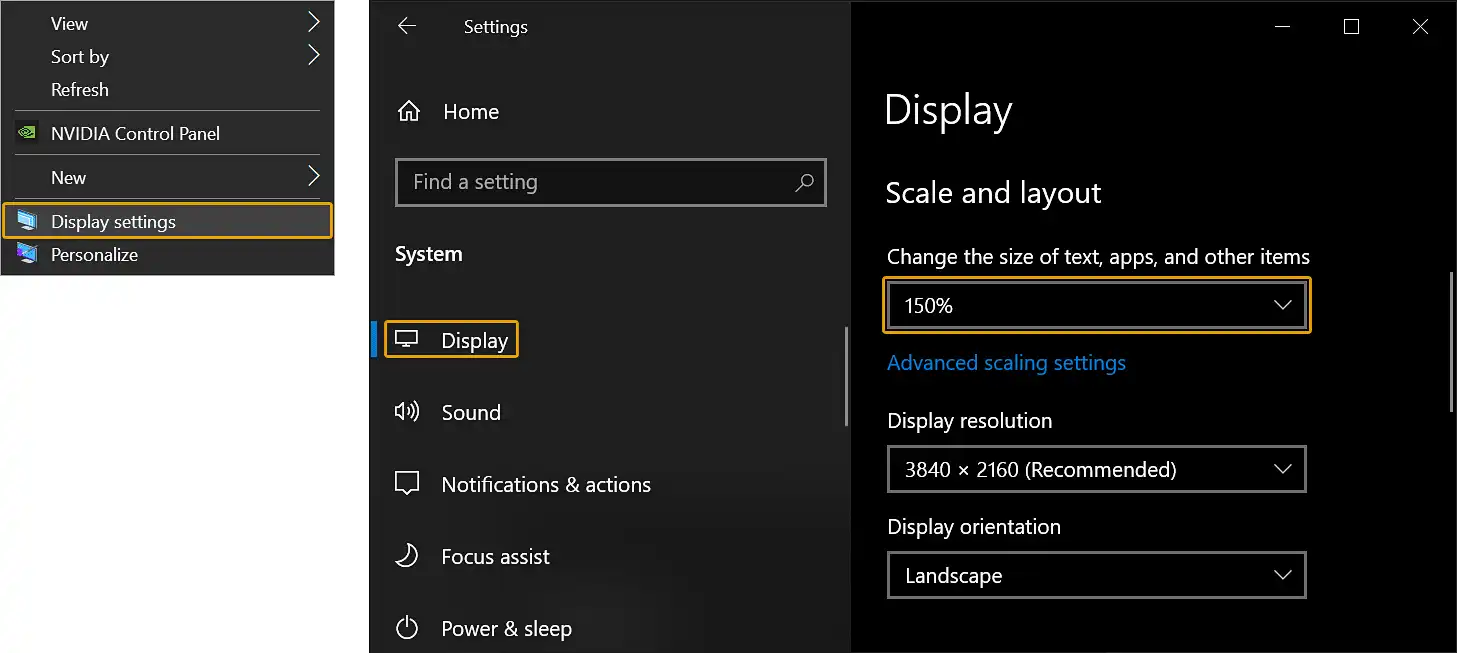
For example, in OS Windows there is a Display Scaling mechanism, that is a way of representing one "virtual" pixel by several hardware pixels. It is designed to adapt program interfaces to work on devices with High DPI. By changing DPI factor or display scaling level, you can zoom all the details of all software user interfaces (which support scaling) without changing the real hardware resolution of the desktop. Simply put, with just one single general setting, you can make "all the buttons bigger".
To access this feature, go to: RMB on Desktop > Display settings > Display > Scale and layout > Select appropriate scale factor from the dropdown.
Windows in particular has several mechanisms for scaling the interfaces of all opened windows. At best, the OS simply informs the programs about the current scaling factor so they could scale their own interfaces. Most modern (2019 and later) design and 3D-related software already supports user interface scaling natively. Most likely, you will not have any related problems at all. But if you're using an old program that doesn't support UI scaling, you'll have two options: either the interface won't be scalable and all the "buttons" will look very small, or OS will render the program interface upscaled, blurred with badly readable fonts.
Exact Scale Factor
You can calculate the display scale to maintain the same DPI as on a regular monitor. To have te same UI elements size as on old 24" monitor, 4K panel with the same size of a pixels, should be of 48" size. I have 43" panel. This means that in order to have the same DPI I had on my old monitor, I need to know how bigger the area of 48" panel compared to the area of 43" panel. That is: (48" panel area) / (43" panel area) = (106 * 60 cm) / (95 * 54 cm) = 1.25, or 125% of the DPI scaling level.
But such calculations aren't necessary. In my case, despite the calculated 125%, I use 150% scaling just because it more comfortable for my workplace setup. Below are the 100% vs 150% DPI scaling levels on 4K UHD.
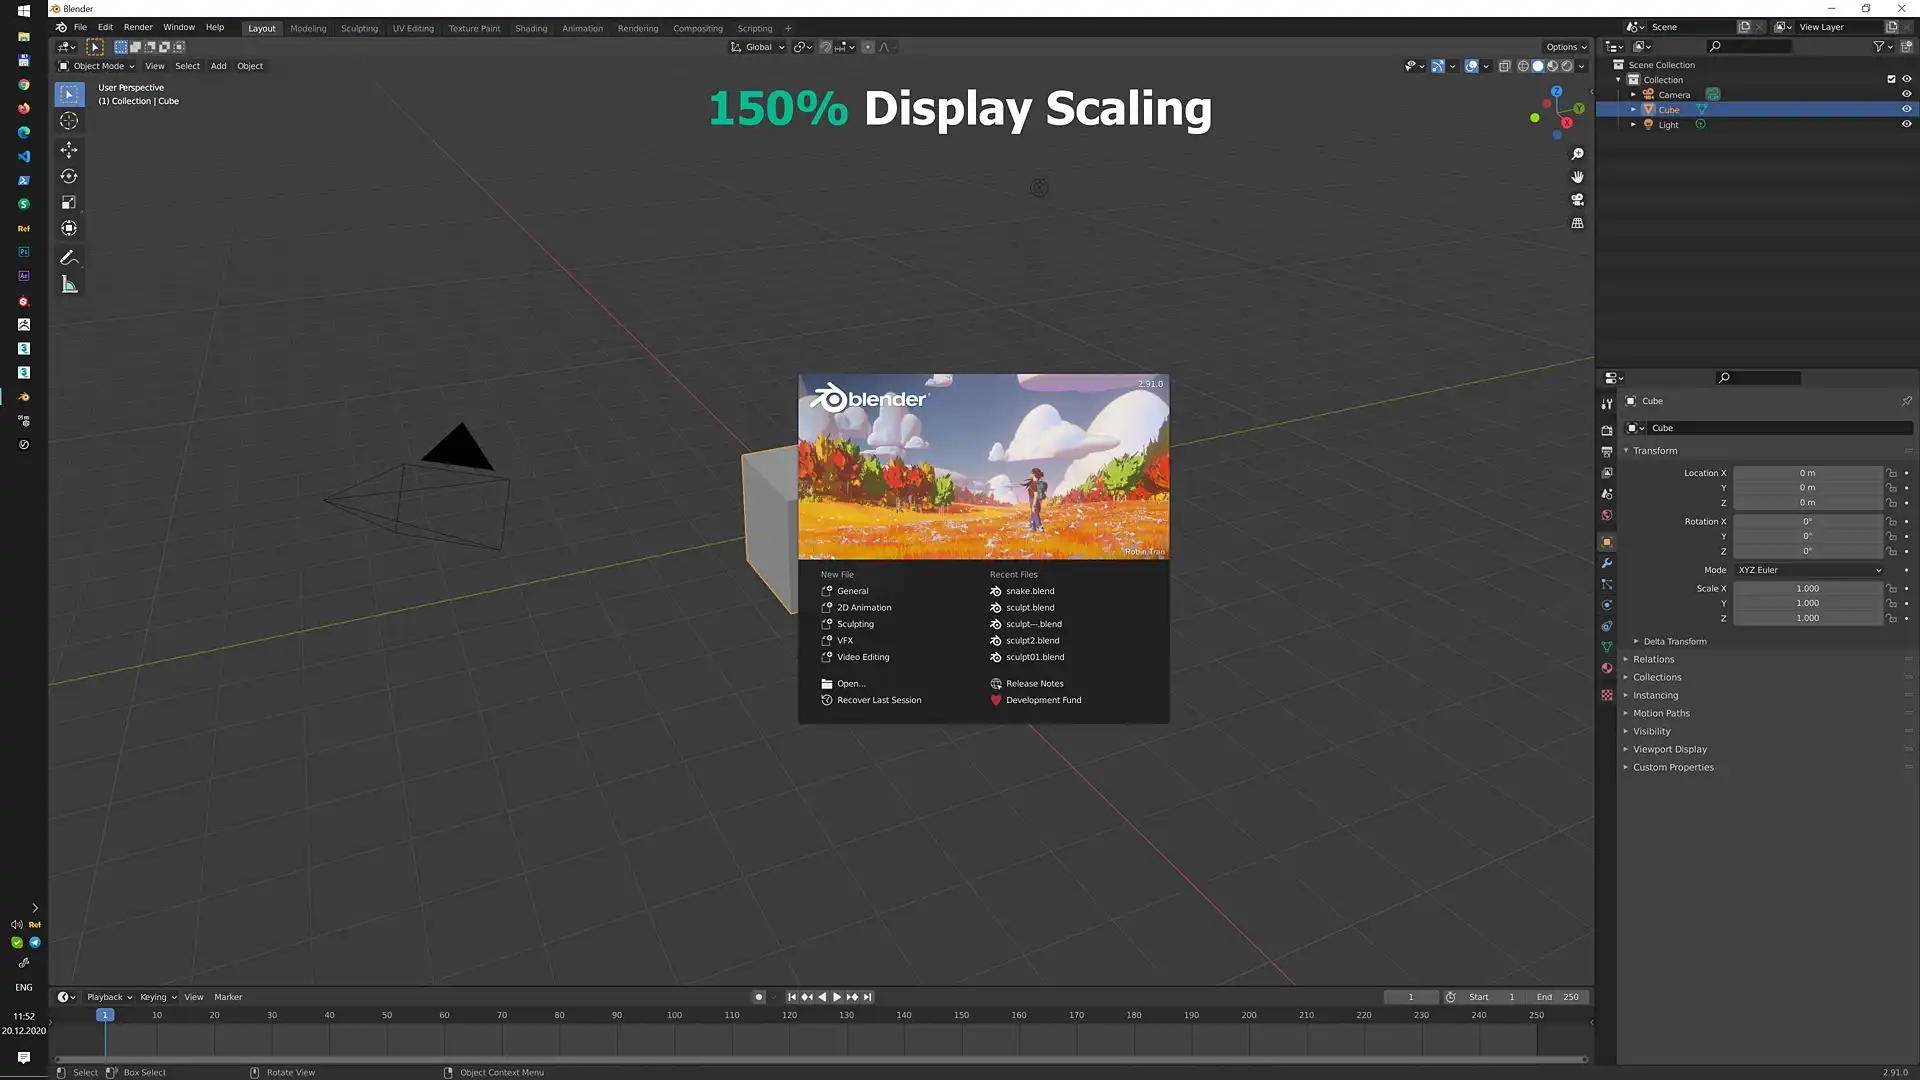
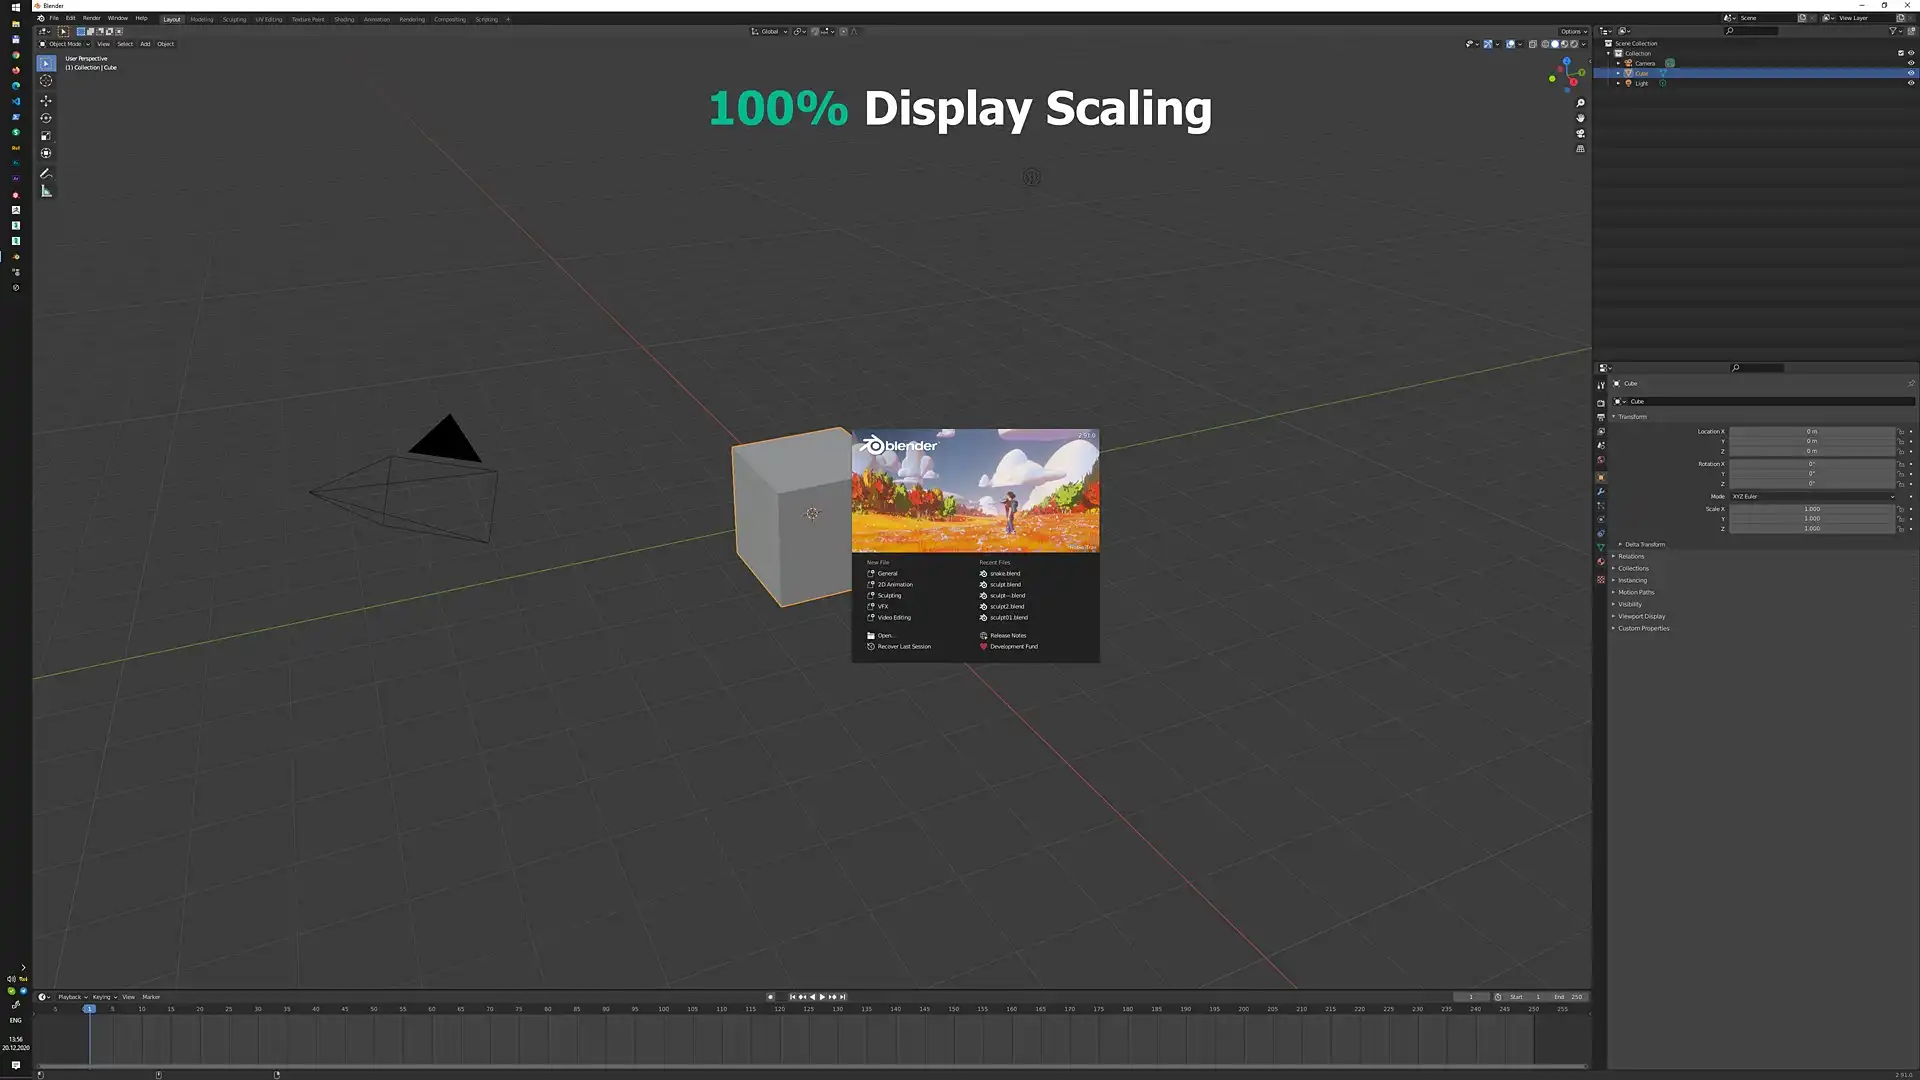
Personal comfort is much more important than calculations. You may start with 125% and change it into a desired side.
Color Precision
When I saw a juicy contrast image on a large 4K @ 60 Hz screen that looks better than on my previous professional monitor, I was excited enough not to notice any flaws for a long time. But eventually, seeing different interfaces and images, I noticed one strange thing: barely noticeable colored halos or glow around the edges of the small colored elements.
Artifacts
This glow effect was especially noticeable on reddish colors. It is about one pixel wide, so after a Full HD monitor, you probably won't notice it at all. But later, when your vision gets used to working with very detailed 4K images and interfaces, you will start to notice that for sure.
Another interesting fact is that this effect is much more noticeable when I use an active DisplayPort - HDMI 2 adapter, but when I switched to direct HDMI 2 - HDMI 2 cable connection with a new video card, the effect became less expressive.
Here is a screenshot of my 4K desktop. You can look at to understand the scale of the details. Try to find the little YouTube button on the right.
Below is approximately how I see that red YouTube button up close (HDMI 2 - HDMI 2 connection).
On the left is a very close photo, a few centimeters from the screen (as close as my phone can focus), on the right is a photo taken with a macro lens, so you can actually see individual pixels.
I hope that gives you an idea of what I'm talking about. This edge blurring glow is especially visible on the right side of the button. It is as if someone smudged the red color from the button to the right. This is more noticeable on the right side, probably because of configuration of the pixel triads on this particular panel.
What is this color glow about?
Chroma Subsampling Compression
This glow or colored blurred edges are the side effect of a special technique for reducing the size of color data to transmit images on a channel with a lower bandwidth. In our case, this type of transmission channel is an HDMI connection between the video card and the TV panel. The described artifact is a result of a special method of signal encoding, or compression, which is called chroma subsampling.
In a nutshell, the chroma subsampling technique is based on fact that human vision is very sensitive to information about brightness (luma), but less sensitive to information about color (chroma). Thus, the luma is transmitted at a full resolution, and the chroma is transmitted at a lower resolution. Later, the low-res chroma is overlaid onto the full-res luma. The pattern of how chroma is applied over the luma is determined by the actual subsampling compression level and is denoted as 4:4:4, 4:2:0, 4:2:2, and so on, where 4:4:4 is the nicer one, with no compression.
So you can imagine this as if a blurred color image (low-resolution chroma interpolated to full resolution) is applied over a full-resolution black-and-white image. Of course, blurred color information creates a blurred halos over the exact edges of the image with brightness information on a full resolution. So that's the reason for the red blurred glowing around little red YouTube button.
In case if you didn't get it from my explanation, please take a look at the quick video about it.
I also recommend you to get yourself familiar with this cool article: Chroma Subsampling 4:4:4 vs 4:2:2 vs 4:2:0. Not only because it contains an in-depth explanation on the topic and contain chroma subsampling test pattern image but it offers a table with a large number of TV models with markings whether they support 4K@60Hz@4:4:4 or not.
Chroma Subsampling Test
To check whether your display device uses chroma subsampling compression on 4K@60Hz, do the following:
-
Open or download the Chroma Subsampling Test Image.
-
Make sure you video device operates in 4K@60Hz.
-
Make sure the image is displayed at 100% scale. By 100% scale I mean the test image, not zoomed in or out. You must see it pixel by pixel, that is, one pixel of the image must be displayed by one pixel of your display device. If you use DPI scaling, you may want to set it temporarily as 100% in order to exclude OS-level pixel scaling.
-
Look closely at the test image without scaling, especially at the last two lines with a blue text on a red background and red text on a blue background.
4.1. If you can't clearly read what a fast brown fox does with a lazy dog, well, then your current video setup definitely has a certain level of chroma subsampling compression.
Bellow is how badly I see it.
You can see the problem immediately. The photo above shows a display that reproduces a compressed signal with a chroma subsampling of certain level.
4.2. If you can clearly read the text in the last two lines on your device, then both, brightness data and color data, are transmitted completely without color compression. Congratulations!
Output Color Format
Now, let's take a look at my color settings located at NVIDIA Settings RMB click > NVIDIA Control Panel > Display > Change Resolution or Desktop RMB click > Display Settings > Advanced display settings. If you have an Graphics Card from other manufacturer, you will find similar settings.
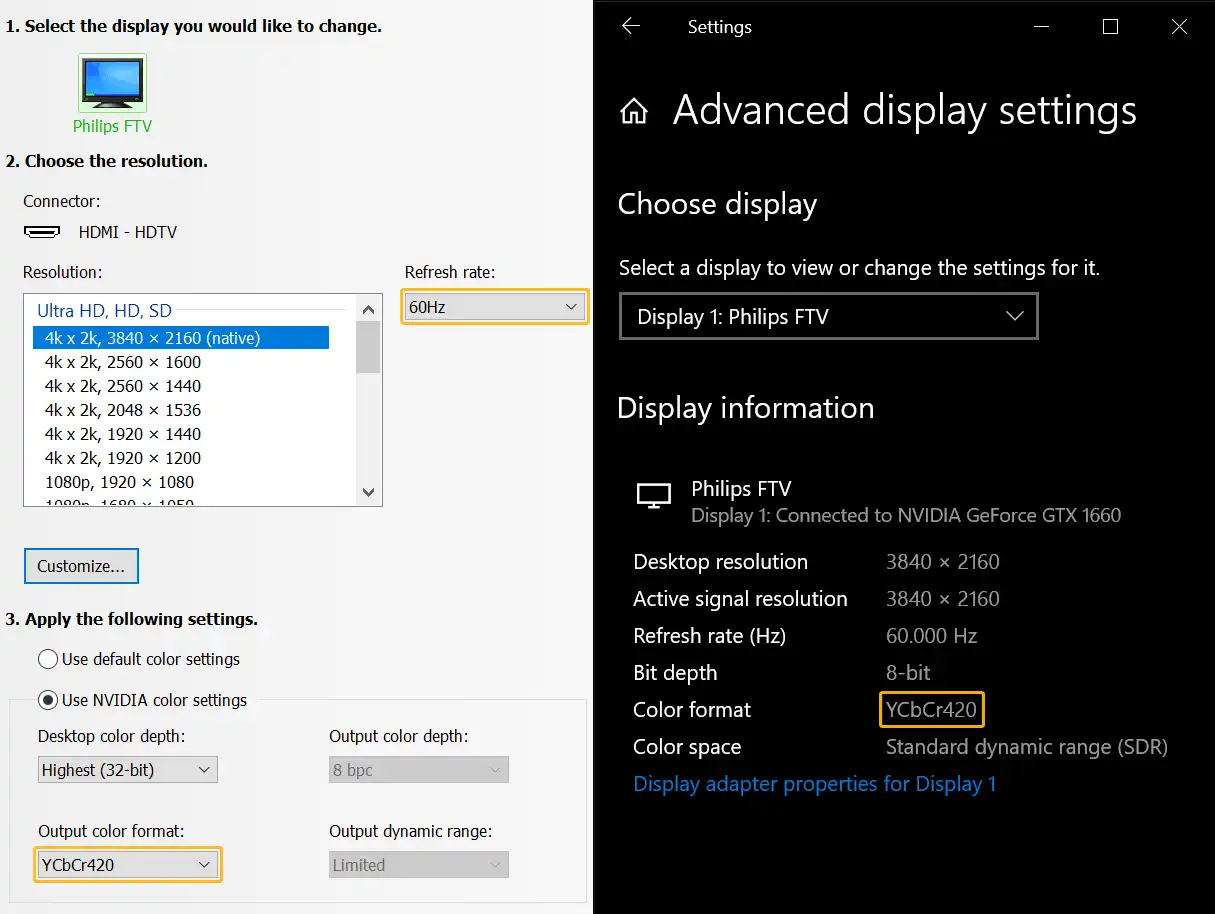
Look at the color format, it says YCbCr420. In YCbCr (Y′CBCR) color model information about brightness and color come separately, making a chroma subsampling implementation possible: it can have a full-res luma and a low-res chroma. As you may guess, the number 420 is actually a 4:2:0 chroma subsampling level.
So my current setup, consisting of a video card, HDMI cable and TV panel, work with a 4:2:0 chroma subsampling, and that's why my TV panel shows blurred color edges on some tiny details. I can actually make it work in 4:4:4 mode, i.e. without compression, by lowering refresh rate to 30Hz.
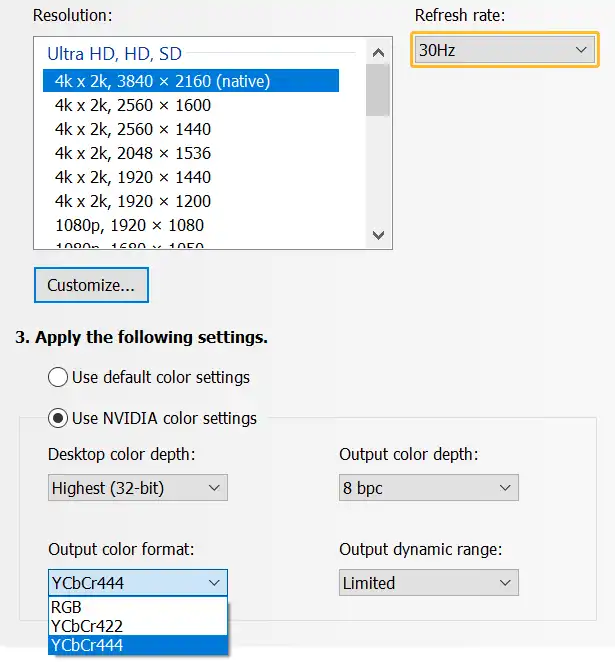
Below is how a chroma subsampling test image looks like in 4k@30Hz@4:4:4 mode on my screen.
Muuuch better, right?
Here's how a well-chosen TV panel should reproduce this test pattern in 4K@60Hz@4:4:4 mode.
As you can see from my experience, I didn't know about this trick to reduce the bandwidth needed to transmit video signal, which is widely used by TV manufacturers, before I bought my first TV panel. Or, to be more precise, I knew about these "weird" numbers, but had no idea how they actually affect the reproduction of images on a TV panel. Now I know, and so do you!
Of course, an impossibility of TV panel exploitation at 30Hz is out of question, so I use my TV in 4K@60Hz@4:2:0 mode. And guess what? I can easily live with that. Mainly due to 150% DPI scaling and a very small size of the pixels themselves. This color artifact, which is only visible at the pixel level, is almost completely washed away. I successfully use this TV every day as a monitor for professional computer graphics. Including fine-tuning and color correction of images.
Another good news is that many modern TVs support 4K at 60Hz with 4:4:4 chroma subsampling. Some of them activate this mode automatically, as soon as you set the "Computer" / "PC" activity mode on the TV, some require you to explicitly activate special mode in the options of a specific HDMI port. This option usually has an meaningless marketing name that does not describe what it really does for the color, for instance: "HDMI ULTRA HD Deep Color" or "Input Signal Plus".
Below are some examples of how to set an 4:4:4 chroma subsampling level on TVs from different manufacturers.
Philips TVs: Settings > General Settings > Input sources > HDMI > HDMI Ultra HD...
Samsung TVs: Settings > Picture > Expert Settings > HDMI UHD Color > HDMI... > On
LG TVs: Settings > Picture > Additional Settings > HDMI ULTRA HD Deep Colour > HDMI...
Of course, different TVs and firmware versions of the same TV may have this option somewhere else in the settings. Finding an exact location of this option for your particular TV model is up to you. Be prepared, that it's nowhere to be found, in official specs, that TV do not support 4:4:4 on 4K at 60Hz. Obviously, manufacturers are trying to hide if 4K device does not support 4:4:4 on 4K at 60Hz. So watch videos, reviews, ratings, forums to find out the truth before you buy. Anyway, I highly recommend you to make sure that 4K@60Hz@4:4:4 option is available on the TV you want to purchase as a PC monitor.
The 4K@60Hz@4:4:4 is definitely a default must-have requirements for a large screen TV as PC monitor in 2021 and later.
Color Bit Depth
The last technical aspect of the TV panel that we look at is the depth of color of the panel. The color depth is a characteristic of how many colors a display panel can reproduce. This directly affects the smoothness of the gradients and, as a result, the overall image quality.
Every pixel on the display panel is a triad of Red, Green, and Blue channel subpixels. There are two types of color depth notation with different relation to the pixel channel triad. One describes the summary for the whole triad (summary color of a pixel), the other describes the characteristics of one color channel, assuming that other two has the same specs.
For example, 24-bit is the same as 8-bpc, where bpc stands for bits per channel or color. That is: 24-bit = (8-bpc R) + (8-bpc G) + (8-bpc B), 30-bit = (10-bpc R) + (10-bpc G) + (10-bpc B) and so on.
Bpc is most widely used as a specification, so we will stick to it.
8-bpc
8-bpc is the industry standard for RGB color devices. This is approximately 16.7 million possible colors (28 x 28 x 28 = 256 x 256 x 256 = 16,777,216).
The average human can distinguish up to ten million different colors. Thus, 8-bpc pretty much covers an average humans need.
Form the other hand, 6-bpc, that is 262 thousands of possible colors (26 x 26 x 26 = 64 x 64 x 64 = 262,144), obviously does not cover the entire visible spectrum, and the lack of accuracy will be noticeable to the human eye.
That is why 8-bpc is the minimum color depth to consider when buying a display panel (TV) for computer graphics.
10-bpc
10-bpc is a very controversial thing for several reasons. By default, the more bpc, the better, right? Ummm yes, and not really.
As you can guess, since 8-bpc covers the visible spectrum, 10-bpc covers it in excess. Why do you need more? Well, if you're a professional print designer and want to make sure you can calibrate your monitor with a surgical precision or you are the super-duper post-production video editor from AAA studio, that shoots very famous actors with thousands of dollars for a minute of shooting, then you probably don't want to lose any bit of color information just in case.
Interesting fact is that although many professional monitors offer a 10-bpc option for a long time, there are not many ways for a monitor to work in 10-bpc mode. For example, Nvidia has only recently unlocked 30-bit or 10-bpc colors in NVIDIA STUDIO DRIVER for non-professional graphics cards. Previously, true 10-bit inputs-outputs were the privilege of professional workstation cards like Nvidia Quadro.
Another thing is that more bpc means more data. In particular, to transmit a video signal in 4K@60Hz@4:4:4@10-bpc mode requires a connection with a bandwidth of 15.68 Gbit/s. So only HDMI 2.1 connection can provide this.
And here we go again. Even if you have a pretty powerful for these days GeForce RTX 2080 Ti, forget about it. Since it only comes with HDMI 2.0b, you should start to think about something from the 3000 series to get your hands on HDMI 2.1 output.
So, the conclusion here: if 10-bpc option (usually labeled as HDR TV / HDR10) comes with the TV of your choice for free, then nothing to think about, this is the case when more bpc - it's not worse. You can temporarily not use it if, for example, you don't have a GeForce RTX 3060 or so yet. But if you have to pay a few hundred dollars extra for this feature, even though I've never used 10-bpc in my practice, I still really doubt it's worth it.
How Big Screen Affects Your Vision
I am not a professional ophthalmologist and I do not have any medical education. Everything described in this chapter is my own opinion only, not an instruction on what you should do to protect your own eyes from the negative effects of a computer screen.
The main purpose of this chapter is only to draw your attention to the subject. Please do your own research before taking any action related to the health of your eyesight. I just shared my opinion with you and that's it.
TV Screen Glare
The biggest complaint I have from the beginning to today about the TV as a monitor, concerns mirroring properties of TV panel's working surface.
If you have any LCD TV at home, then you know instantly what I'm talking about. If you don't have one yet, but are considering using a TV as a monitor, I suggest you to visit any local TV store first and look at any modern flat TV panel. What you will see there is not a deep black nothing, but your face and the interior of the store behind you. I am sure you are a very beautiful, but yourself is definitely not what you want to constantly see on the monitor over user interfaces of different programs. Also you can view the photos of my workplace that I provided above. You can clearly see a reflectivity issue there as well.
It's not like you absolutely can't live with that, but it is that you almost can't remove or ignore completely. To use the TV as a monitor, the TV itself must be the most powerful light source in the room, otherwise instead of useful information on the screen you will see the glares. But still, do not forget about the dimmed ambient light at the workplace, it must be present, because looking at the bright screen in a completely dark room is harmful to your eyes.
I'm not trying to undo all the benefits of TV as a monitor with this one drawback. But I'm trying to warn you. In case you can't control how much light hits the screen outside, then you will not be able to work comfortably with a glossy TV screen. If for example, there's an open window with bright sunlight behind your back at workplace and you can't drape it with the opaque curtains, that's really bad.
In my case, I have a pretty good situation and I can easily control the lighting in my small studio, but I still don't like some small glares. I even looked for a solution, like a large anti-glare film, but so far the market does not offer anything like that. As well, as it doesn't offer any large TVs with a matte screen. Don't believe any marketing specifications, as retailers can indicate that some large flat TVs have a matte screen option, but they don't. Any video review or a real stand in the store immediately refutes the matte of a screen.
This is the moment when conventional monitors get a real big bold +. Most of TV reviewers do not tell about glossiness, like this problem does not exist at all, be aware.
Color Fringing on Fine Text Details with a Chroma Subsampling Compression
Many reviewers complain that text on 4K monitors with a chroma subsampling is impossible to read. As you already know, I have 4:2:0, the worst color compression scenario, and I work with text a lot. I read from this monitor, obviously also what I write, lately I do a lot of programming, and I don't see any significant problems with text smoothing.
The chroma subsampling refers to the color compression. When you are dealing with black text on a white background or vice versa, colors are not directly involved, so you see a great contrasting image mainly formed by full-resolution luma.
Though, there is a color here, because text smoothing or anti-aliasing adds semi-transparent pixels between the text and the background. Those added pixels are usually yellow and blue, intended to beautify the shortcomings of text lines, formed by square pixels. But due to the pixel-level nature of text smoothing and DPI scaling, you probably don't see any problems with monochrome text. You must have a "falcon's eye" to clearly see the individual pixels at arm's length. If you sit closer to the screen, it directly violates the simple rules of safety when using a PC monitor, so reorganize your workplace as soon as possible to protect you sight.
Text smoothing also depends on where it is displayed. For example, different text editors and different browsers make text smoothing different. On some of them I can distinguish a little bluish or reddish glow around the text, as shown in the example on the red YouTube button, some do not give any artifacts at all.
So text anti-aliasing problem with color compressed signal is technically truth, but in practice not really. Anyway, I hope, after reading this article, you find 4:4:4 panel and do not experience yourself this kind of issues in any way.
And finally, here's a hint for you. You can just turn off subpixel rendering feature for the text by Control Panel > Appearance and Personalization > Fonts > Adjust ClearType text > uncheck Turn on ClearType > go trough 5 step wizard... or, hit the Win key > type "cleartype" > select Adjust ClearType text > ...
And there is no text color fringing problem anymore on monochrome text, though colored text or text on color background's will still have a bit of color fringing glow. Alternatively, you can leave "ClearType" feature turned on, but still go through the wizard and select less fringing text options. This will not completely remove fringing, but will greatly reduce it.
Eye Protection Software
Any monitor, conventional or TV, has several problems, they are as follows.
-
Constant staring at the screen without breaks for many hours in a row leads to general eye fatigue.
-
Blue light coming from the screen damages the retinal cells. That is why even a mobile phone has a so-called "reading mode", or "night mode", or "comfort mode". This is when you turn it on and the screen turns orange. In this mode, the blue light is dimmed. Actually, a "computer glasses" is nothing more than a blue light filter (less blue).
-
Prolonged focus at the same distance, i.e. the distance from the eyes to the monitor. It leads to the loss of ability to focus at other distances and reduce eyesight sharpness.
-
Backlight flickering or strobing cause extra eye strain or headaches, but more on that later.
All these common problems can be solved or significantly reduced with the help of so-called eye protection software. Now there are many such programs. I personally use a cool tool for Windows that is capable of all of this, it's called EYE SAVER. You can download EYE SAVER for free.
This type of program is very easy to use, the only thing that is really difficult is to force yourself to obey the instructions in pop-ups and screen locks, especially when you are in the middle of some important work and do not want to interrupt your concentration.
I would not explain all the available options for this program, it has a fairly simple interface, moreover, there is an explanatory video on its website. But one particular thing really needs attention and it is a LED backlight flicker of display devices.
LED Backlight Flicker on LCD Displays
I suggest you to read this article about LCD Displays LED Backlight Flickering to understand the problem a little more. But here is the essence. The Liquid-crystal display technology has two main layers. Light layer behind and dimming layer after it. Light layer is just a light source panel, a dimming layer it is a Liquid-crystal panel. So you get correct brightness at the each pixel because the constantly bright backlight is getting dimmed by a liquid crystal less or more.
But overall brightness of a picture still depends on the brightness of backlight itself. Some older displays use light bulbs backlight, while modern flat panels use LED strips. And the problem is that conventional LEDs lower their brightness in a kind of a bad way: they pulsate the LED, that is turn on and off with some frequency. The longer the "on" phase, the brighter the light.
Having not 100% brightness of the backlight, obtained by a smooth power, means a reduction in the power supplied to the backlight using power strobing method, which in turn leads to flickering of the backlight. The lower the brightness, the higher the flickering. So people come up with a "trick" on how to deal with it. The solution is to turn on the maximum brightness of the monitor, but dim it with software. In this case, you get both: the acceptable screen brightness with no flickering.
Backlight Flickering Test
There is a simple test to determine if you current backlight flickers or not. Set white background on the screen and reduce the brightness of the screen (using the hardware display buttons or using the TV remote control, if it is a TV) to be about 20%. Take any pen. Then "wave" the pen in front of the white screen. If you only see a smooth motion blur transition between the side positions of the pen, then everything is fine, but if you can see a few sharp contours of the pen between the side positions, it means that the backlight of your display device flickers. Below is my experiment.
As you can see, the pen that "waves" in front of the 100% backlight brightness screen, gives almost the same smooth blurring of movement as "waving" in front of just a white wall. But when I reduce the brightness of the backlight, a sharp outlines begin to appear.
This is because when the background behind the object does not change, a very similar "frames" of the moved object are smoothly combined into one soft gradient. But when the background changes again and again from white to black, from black to white, etc., then not all neighboring frames are similar. Some on a white background, some on a black. So, when the effect of "motion blur" is formed from the frames of different brightness, on the formed gradient you see darker frames as the contours of the object itself.
It is also worth noting that in my particular TV, the flicker of the backlight is associated with "energy saving" and is not regulated by the Brightness property, it is regulated by a separately located Setup > TV settings > Picture > Contrast value. This also means that I can prevent the backlight from flickering with Contrast and at the same time set the desired value of Brightness separately without additional software.
Keep in mind that the settings that can do the trick for your display device, can be marked differently and placed elsewhere.
Will increasing the brightness of the backlight to the maximum level cause the TV to fade out quickly? Maybe, I can't confirm or disprove. But your choice is simple - either your replaceable TV or your indispensable eyes. Flicker free is always better!
Speaking of display longevity. I already have four burn-out dots on the screen, as shown below.
Some are pixel-sized, some are a couple of pixels, some are dark, and others are translucent. Not in the exact center, but mostly near the center of the screen. They look like a bit of dirt that got under the protective film on the screen, but most likely that's what the "dead pixels" on this panel look like. Since the LED-backlit layer is behind the liquid crystal layer with a pixel grid, this is not due to the bright permanent backlight. In any case, the appearance of these "dirty" dark spots on the screen began in about the last 1.5 years, and almost certainly later there will be even more. Four years of all-day work is already a good result, even with those shortcomings. Don't take it as TV only flaw. Most of monitors are built on the same technology and have the same problems. The presence of these black spots at similar size $2,000 monitor right after the warranty period will be much more annoying.
The Health of My Eyes After 4 Years of Use
Now I have the answers to previously unresolved questions about the eyes.
Using the TV settings in combination with eye protection software, I set a comfortable screen brightness, so even the high backlight of large LED panel does not burn the eyes. No problem with that.
Eye strain when looking at the far corners and glare of the TV screen did not go away, but because you do not often look at the corners (the main action usually takes place in the center of the screen), and because the excellent controlled lighting conditions in my workplace almost (though not completely) neutralized these problems. How much it will affect your eyes directly depends on your specific activity on the screen and external lighting conditions. So I define this problems as moderate.
I used to have much worse lighting conditions in the office, where I worked as a design studio employee in front of two 24-inch regular professional monitors, and my eyes were much more tired than they are now in front of one but large screen. This means that the actual difference between a conventional monitor screen and a TV as a monitor is insignificant compared to external lighting conditions.
If I work a lot with text, my eyes get tired quickly in front of the TV as well as in front of the monitor, no difference. When I deal with more dynamic activity, such as 3D modeling, I can do more without eye fatigue on both the monitor and the TV. So no magic happened. In front of the TV my eyes do not rest more than in front of the monitor, nor do they get tired more.
I really can't confirm any special affect on my eyes from the TV compared to the monitor.
Getting a TV
TV vs Monitor
In table below, I have listed only those features that really affect my everyday use. Surely, there is a lot of other minor differences, but they all do not really matter. I also compare only 43"+ models having 4K resolution.
| Feature | TV | Professional Monitor |
|---|---|---|
| Entry Price | $500 | $1500 |
| Matte Screen | No | Yes |
| PC-controlled On-Off | No, remote control only | Yes |
| Lossy Signal Compression | Maybe (Y′CBCR 4:4:4 | 4:2:2 | 4:2:0) | Never (RGB) |
| Adjustable Stand | No | Yes |
| Screen Diagonals Available | All Kinds | Limited Choice |
As you can see, the monitor technically has more advantages over the TV. The main reason here is the best value for money. So, if the price of a TV crosses the $1,000 mark, you should probably start looking at 40"+ monitor instead of a TV in this case. But if you can afford to cross another midline *$2,000, things start to change again. For example, you can purchase a productivity display panel of dreams, such as the LG CX 48-inch OLED TV (OLED48CXPUB). This is a flicker-free TV, thanks to OLED (self-lit pixels instead of LED backlight), it has an HDMI 2.1 input and is capable of 4K UHD @ 120Hz @ YCbCr444 / RGB @ 10-bpc (+) at full dynamic range. Plus it is Nvidia G-SYNC and AMD FreeSync Compatible. If you are a gamer, you know what it is. I know it as the best large display on a market.
*You can actually find this model for $1,500, but it's not sold worldwide, and you will pay for an additional retail and shipping fee. This means, on average, you are more likely to pay more than $2,000, depending on where you live.
Before you buy!
It is very important to choose a TV panel virtually, that is know it well before you actually buy it. The main problem here is that most manufacturers skillfully hide any flaws of the product from the buyer. For example, you won't find in any of the specifications the fact that a TV panel can run at 4K at 60 Hz with color compression only. So you have to watch a lot of videos, read a lot of forums or much better, find some professional review of your chosen model. As an example - RTINGS.com. But there is another catch: popular resources mostly review very expensive key models of devices. If, for example, you find a good $300 deal on Amazon, you probably won't find any professional review of it.
As a last resort, you can ask the seller of the TV directly, but most likely the seller also does not know such deep technical details either. So, most likely, you will eventually buy a TV without making sure of all the details you want to know and check them yourself.
That is why it is extremely important to make sure that you can return the TV to the store if it does not meet your expectations, i.e. you will have the official opportunity to replace it with another model or get a refund.
Buying a TV as a monitor for computer graphics with specifications below the minimum required does not make sense, because these days the required technology is much more affordable than when I made my first choice. So don't repeat my mistakes.
Another important thing is to be ready to check all the expected characteristics in advance. In particular:
-
If you choose 4K@60Hz, you need a video card with HDMI 2.0b. This is at least the Nvidia 2000 series graphics card.
-
If you choose 4K@120Hz, you need a video card with HDMI 2.1. This is at least an Nvidia 3000 graphics card.
Of course, you also need a suitable HDMI cable that would not be a "bottleneck" between the graphics card and the TV.
Minimum Specifications for TV as a Monitor:
Checklist:
-
Make sure your video card supports 3840x2160 resolution with a refresh rate of 59Hz at least.
-
Make sure your video card has HDMI port of at least version 2.0b.
-
Choose and buy a TV with at least the minimum required tech specs. Also, make sure that you can return the TV to the store if in reality some characteristics do not really match the desired ones. Do not remove packaging film yet.
-
Connect the new TV to the video card with chosen HDMI cable.
-
Turn on both, PC and TV.
-
Use TV remote control to select an appropriate image source (HDMI port where PC is connected) and set the TV's activity style to
Computer. -
Set the desktop resolution to 4K (3840x2160) with a refresh rate of 60Hz.
-
Make sure, that new TV can operate in 4K@60Hz@8-bpc with NO chroma subsampling compression (4:4:4).
9.1 If YCbCr444 or RGB color formats are available to choose from on 4K@60Hz@8-bpc, and they work (no black screen or constant obvious screen flicker), then congratulations, you've made the right choice and can move on to the next 10th step.
9.2 If YCbCr444 or RGB color formats are not available, go to the advanced HDMI settings (using TV remote control) and activate "HDMI ULTRA HD Deep Color" option (it may be named differently on your specific TV model). Then repeat previous step 9.1.
9.3 If YCbCr444 or RGB color formats are not available, as well as no additional advanced HDMI settings, such as "HDMI ULTRA HD Deep Color" or so, well, then the new TV you selected most likely does not support 4K@60Hz@4:4:4@8-bpc mode. I suggest you consider returning it to the store and choose another model.
-
Finally set comfortable DPI Scaling Level for your TV screen.
-
Enjoy!
Conclusion
4K TV for Gaming
So far, I haven't said anything about gaming on the big screen. This is because it is obvious that 3D games are not much different from what you actually do in 3D editors. Because the 3D editor's viewport is technically a real-time 3D engine, very similar to that used in 3D games. During all this time, I did not notice any problems with my fairly old 4K TV. There are no noticeable input lags or image ghosting, whether I'm working with 3D editors or playing 4K 3D games.
My New Wiser Choice
What would I choose if I had to choose now?
Although, I already mentioned the LG CX OLED 48" that fully meets all the requirements and even more, I personally still consider the price of $2,000 too high for a monitor. An additional argument against such an expensive purchase is the indisputable fact that self-emitting diodes of today OLED panels burn-in with time, especially on still images, which is always the case when you use TV as a monitor such as static position of window controls, static position of software panels, etc. Buying a new monitor every couple of years for $2,000? Nope.
Realistically, I would look for something with these specs: 48-inch flat screen @ 4K UHD @ 60Hz @ 4:4:4 @ 8-bpc for up to $1,000.
Flicker Free LCD
I will definitely look for the flicker free "out of the box" having no PWM dimming of LED-backlight.
It's not like the trick with maximum backlight brightness doesn't work, it works. But this approach has many disadvantages. The first and most noticeable flaw is based on the fact that the dimming layer does not perfectly darken the backlight layer, and by increasing the brightness of the backlight, you shift the whole level of black into the gray side. Gray, instead of black, sounds bad enough for graphic design. The second disadvantage is that the excessive brightness of the backlight creates a faint glow of the pixels. This is especially noticeable around the light details on a dark background.
I intentionally did not mark this option as a minimum requirement, as it does not directly affect the work with computer graphics. It's also not a TV-specific thing. Many (actually most) regular LCD monitors also have this problem, especially in laptop screens.
A backlight "stroboscope" affects different people in different ways, especially in terms of headaches. For example, I didn't experience any headaches related to computer activities, even in front of old CRT monitors. But if you have migraine problems, then you should look for flicker-free feature at all costs.
Additional Features
Technically, options such as a curved screen, OLED, 120Hz, 8K, 10-bpc, HDR and so on, would be great too, but the price could then skyrocket above the mark of $6,000. It is way too much, especially for a high-gloss TV panel. So make your choice wisely.
That's all folks. Hope you find this material useful.
See you in the next articles!
Share
Please share if you like it!