Replacing VRayPhysicalCamera with Standard

Jan 20, 2019 Update
Illustration to the tutorial that explains how to replace a V-Ray specific camera VRayPhysicalCamera with a standard 3ds Max camera.
Advertisements

Typically in most scenes created by using V-Ray renderer, many 3d visualization artists are use specialized camera called VRayPhysicalCamera. It has many settings that simulate similar real camera settings and therefore it is easy to use in it's own way.

However, it is not always possible and convenient to use the camera of this type in practice. For example in the case when it is necessary to perform an orthogonal visualization from the camera, or to create interactive virtual panorama or use any special plug-in/script. In these cases, more preferable and sometimes the only possible is an use of standard 3ds Max camera.

It is important to know how you can go to a standard camera therefore, even if the scene was originally set up to work with V-Ray Camera. This wouldn't take much efforts.

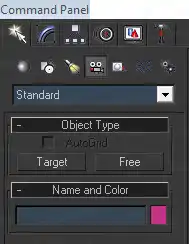
At first the standard camera must be created. It can be done from Create in the Command Panel, in a group Cameras, as well as in the perspective view with hotkey combination Ctrl+C.

Screenshot of 3ds Max 'Command Panel' 'Crate' tab 'Cameras' sub-tab in order to show how to create a standard camera.

In consequence of a significant difference in a controls of the standard 3ds Max camera and a VRayPhysicalCamera, the visualization of the scene from VRayPhysicalCamera will vary in brightness from rendering the same scene from the standard 3ds Max camera.

VRayPhysicalCamera simulates aperture parameter f-number, shutter speed setting and film speed (ISO), which directly affect the brightness of the resulting picture.

There are no similar settings in the standard 3ds Max camera and the brightness of images obtained from it does not depend from camera's settings. Brightness is determined only by settings of the scene, such as lighting conditions, the brightness of light sources, render settings, etc.

There can be assumed that while not being able to adjust the brightness through the camera, it can be carried out through direct changes in the brightness of the light sources.

However, this shouldn't be done because of complexity and irrationality of this approach. It is much easier and more convenient to adjust brightness using a single parameter Multiplier, located in V-Ray tab in the dialog box Render Scene (F10) in the V-Ray: color mapping rollout.

Screenshot of 3ds Max Render Scene dialog showing 'V-Ray:: Color Mapping' rollout with 'Multiplier' property highlighted.

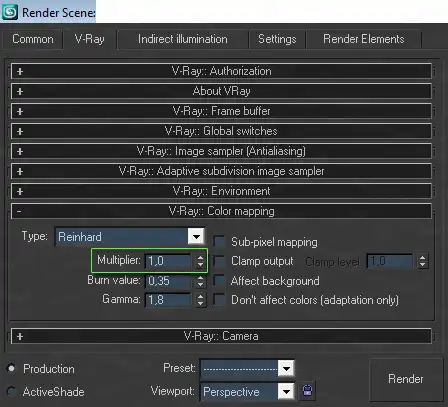
This value is equal to one by default. To alter the brightness, the value of Multiplier should be increased or decreased. This will correspondingly increase or decrease the brightness of the final rendering.

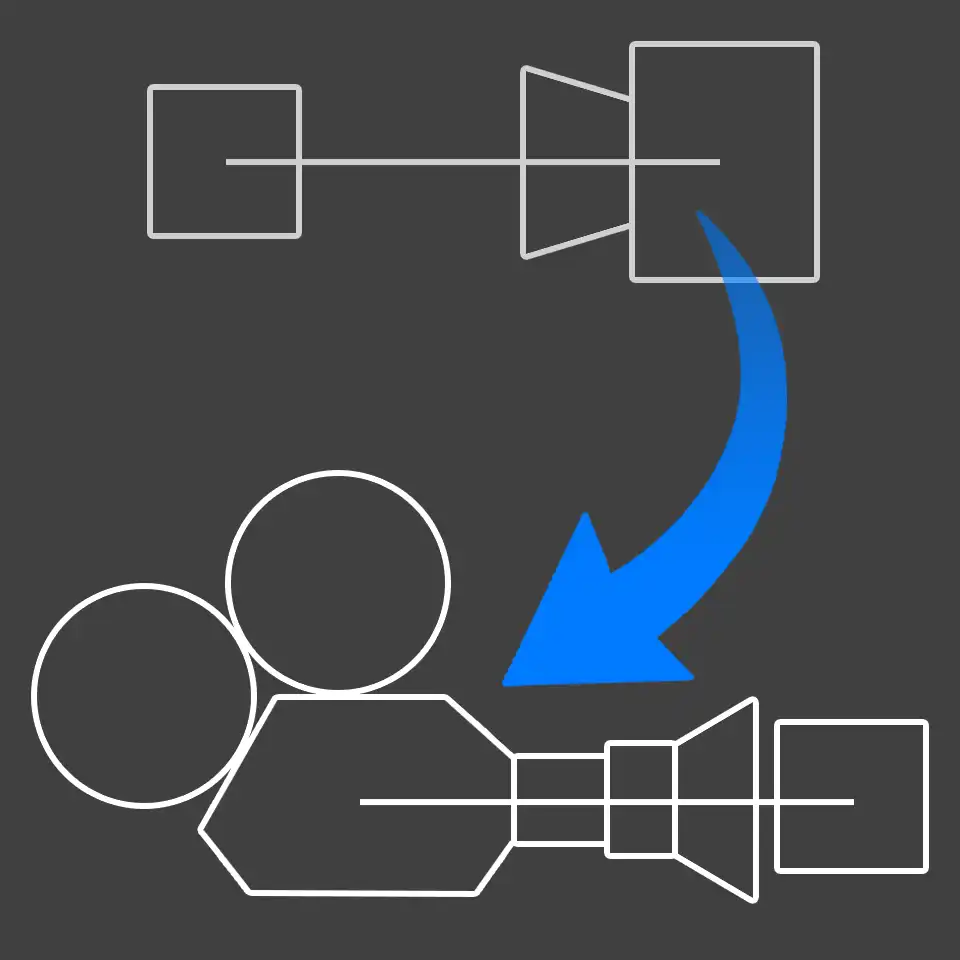
Often you not only need to visualize scenes from the standard 3ds Max cameras, but to replace the VRayPhysicalCamera by the standard for obtaining a similar image of the same angle that was picked up in VRayPhysicalCamera.

Of course you can create a standard 3ds Max camera in the scene and manually pick the same angle, for example through using auto-alignment instrument Align (Alt+A). That is done by aligning a container of standard 3ds Max camera to the VRayPhysicalCamera's container and aligning a Target point of standard camera to the V-Ray's camera point of targeting, adjusting the Lens focal length or FOV angle values of standard 3ds Max camera. By that way you can achieve good similarities of the angles.

However, the substitution of cameras, as well as adjusting the brightness of the scene, should be done in a more rational way.

To do this you first need to switch the view to the V-Ray camera that needs to be replaced in a viewport. After that, being in the view of VRayPhysicalCamera, switch to a Perspective view by pressing P on the keyboard. Thus, the perspective view will match the current camera view.

Now the latest thing to do is use the automatic camera creation based on the perspective view. To do this, press the key combination Ctrl+C and 3ds Max will create a standard 3ds Max camera, automatically picking up the camera position, target and values of Lens / FOV settings.

After those actions, the view from the newly established standard 3ds Max camera will fully match to substituted VRayPhysicalCamera.

As you can see, everything is simple and quite fast ;)

Many people err, that VRayPhysicalCamera was named so because of the physical correctness of the images obtained with it's help. But this is not fully true. The only difference from standard cameras, because of which the VRayPhysicalCamera actually called physical, is the way of its setup, which simulates a real camera setup. In particular, it is handy for those who is familiar with professional SLR camera (Still cam), video (Video cam) or a movie camera (Movie cam) and who is well-versed in theirs settings such as shutter speed, film speed, aperture size, shutter angle, offset latency. It will not be difficult for him to find and correctly configure the appropriate settings of VRayPhysicalCamera, imitating the similar device settings. They will be closer and more comprehensible than abstract parameters of the standard camera. Especially when it need to set up the DOF or Motion blur.

However, the user who is not known or as a rule not familiar with the settings of a real camera at all, the parameters of VRayPhysicalCamera would be even more abstract and misleading.

Surely, anyone who has always used VRayPhysicalCamera, with having no analogies with the real camera, face the routine need of setting at least three parameters to adjust the brightness of the visualization, namely the f-number, shutter speed and* film speed (ISO)*. This is less convenient and requires more time for setting, rather than a single parameter Multiplier in the V-Ray: color mapping rollout. In addition, the use of a standard camera ease the visualization exposure setting, if the scene has multiple cameras. With them there is no need to configure each camera separately. V-Ray: color mapping is a global setting that affects a whole visualization.

Standard camera has a more obvious Clipping Planes containers in a viewport, what saves user from inconvenience of matching the geometry cut-off distance of the camera at guess, as this is in the case with VRayPhysicalCamera.

Please note that there is a default setting that simulates the vignetting in VRayPhysicalCamera, which creates a specific shade on the edges of visualization. However, in practice it has to be shut down in most cases. For static renderings the much controlled vignetting you can get by a post-processing using standard tools of any raster editor.

Of course, we should not completely abandon the VRayPhysicalCamera, because it is a great tool and will be irreplaceable when you need to make the visualization of multiple cameras Have a fast and beautiful renderings!

Questions and opinions regarding this tutorial please leave in comments. We will help as we can :)

Advertisements
Comments
joi
May 9, 2010
Yeap, I also never use physical camera in vray
zero
May 12, 2010
Thanks for the tips, but I still prefer to use a vray physical camera. I love the vray cam's white balance option, it's easier than doing the same in Photoshop.
RenderStuff
May 12, 2010
Hi zero, you're kind of right, white balance is a useful thing. But this is so only in special and very rare cases. By changing the white balance on the camera, you are actually affecting all the colors of your scene. If you just have a lot of color bleeding coming from some light source, it's usually easier to adjust that light localy than to change the colors of the whole scene. It's best to find the right lighting saturation of your scene from the beginning. This is a better approach than applying color correction later, to the entire scene using the white camera balance setting. I would even say, that if you need to do the 'white balance', then you are doing somthing wrong with scene lighting lighting. Anyway, thanks for your feedback!
Rossamahaar
Jun 2, 2010
Respect to you guys! This seems like a trifle, but in fact, all people (myself included) go the hard way by using vray cameras, even if it's completely unnecessary! You tutorials are very easy to read and understand, I have not seen anything like this on other resources!
Dennys
Jun 3, 2010
I agree with everything. It would be great if you created lighting and modeling lessons with the level of same explanation.
Andy
Jun 21, 2010
The lesson did not explain the main thing - how to transfer all the parameters to a standard camera. If you try the composite with alpha and the depth of the standard camera on the vray diffuse, you will immediately understand what I mean. Quite simply, they are not match. This is not a lesson !!!!!!
RenderStuff
Jun 21, 2010
Andron, I'm not quite sure what you're trying to say, but to me the phrase 'composite with alpha and the depth of the standard camera on the vray diffuse', sounds like a meaningless set of words. Sorry dude. Everything described in the in the works great. Please describe your problem clearly and without unnecessary emotions. Thanks!
kenny
Jun 30, 2010
this is one of the greatest aid i've experienced in this field. keep it up guys. you're the bomb
Sa44
Jul 2, 2010
Great, thank you! I closed a lot of questions on camera. I'll try the standard porenderit, I think it will be more convenient.
alex-bestlife
Sep 27, 2010
Thank you very much - learned more, everything works perfectly ... but the question that worries me - how to pay for designer client is happy - say one view of the room - would be happy to answer - thank you !!!
RenderStuff
Sep 28, 2010
Hello, Alex! Oddly enough, there is no unified system of evaluation 3d visualizations. We take panoramas in almost all cases, work with our customers, but previews, checking for compliance with the technical requirements, for approval of the work done before the final rendering, as well as to select the desired camera angle. Only a few customers, end customers that are technically advanced, very positive attitude to the overview 360 3d virtual panoramas. Although, in recent years, with greater and greater spread of computer technology, where even elderly people communicate in social networks, are stationary and portable computers, customers are more and more positive attitude to modern technologies, such as virtual 360 panorama, not limited to only static visualizations, printed on photo paper :) Returning to the issue price, in ordinary cases, we are not chargingit separate fee for the creation of virtual 3d panorama in addition to static rendering. However, the cost of our work fully pays for such bonuses. If the price is initially low, and to work simply can not recoup the cost of rendering the virtual 360 panoramas, it is right to evaluate the creation of panorama 3d separately and take extra fee as for advantage. The specific price called simply impossible, but 20% of the total cost of all the work on creation of 3d visualization as for technological innovation and indeed the original and presentable demonstration pans and designer / decorator or its end customer - it is quite a reasonable allowance. In any case, this discussion is a bit beyond the scope of this tutorial.
3d_marks
Nov 22, 2010
If the option to wind vertical shift in vireevskoy chamber, then by using the above mentioned method for producing a standard camera when it is selected again, we see that it is because of the lack of this option moves down in their settings. Accordingly, to reduce the two images are rendered with these cameras is impossible. Let's find a way to solve this problem.
RenderStuff
Nov 22, 2010
Hey. To control shiftom standard 3ds max camera use the standard modifier Camera Correction. To do this, you highlight the desired standard camera and go to the main menu, 3ds max, there select Modifiers, later in the bottom of the menu, find and Cameras item in the submenu, select the modifier Camera Correction. Incidentally, when the process described in the lesson shift VRayPhysicalCamera well tolerated at standard 3ds Max camera, with the only difference being that the camera automatically applies the shift is not visible on it as a separate option. But it is worth it to apply the Camera Correction modifier and you will immediately see the value of this shift;)
d252
Mar 3, 2011
Excellent lesson well and intelligently written. The rest of your lessons too great, some things that have been made over the years on a whim and were identified at random formed in the big picture. Many thanks to the authors of lessons!
mOPs
Apr 21, 2011
Once again made sure in the proverb "repetition - the mother of learning" I wanted to ask a separate question regarding the alignment of verticals, but re-read all the comments on this lesson, found the answer :) It worked :)
Andy
Jul 5, 2011
Tell me please ! multiplier option is activated only when you put an ordinary camera?
Артем
Jul 5, 2011
Andrew, do not. This global setting, and they are displayed in any cell or viewport) simply differs from the usual, Wray camera can be configured separately without changing the global settings in the book of color maping.
KostYAn
Sep 15, 2011
Hello! I do not know where to ask a question, so I am here. In Vrayphysicalcamera there is such a thing as the exposure, some people claim that it is necessary to remove a tick for proper illumination. Tell me is it right?
Anton (RenderStuff)
Sep 15, 2011
Hello! I will not comment on the other, but simply to tell you what makes a check mark in the Exposure VRayPhysicalCamera. As described in this lesson, nominally via VRayPhysicalCamera can affect the brightness of the final render using tedious and senseless, driving in each new scene, the three numerical values ​​for the f-number, shutter speed, and film speed (ISO): D However, if you disable tick the exposure, then these three parameters will no longer affect the brightness or, as the photographers, the exposure of the final image, that is, in your case, - switched off. In other words, VRayPhysicalCamera simply turn the camera into a standard 3ds Max and cease to lighten or darken the image. That's all ;)
KostYAn
Sep 16, 2011
Ok, thank you * YES *!
Danilo Rios
Nov 14, 2011
Hello all, I believe that is very useful and being used in conjunction with the VRaySun and VRaySky, VrayPhysicalCam to use, no need to adjust the exposure of the camera, not specific values ​​in the source of the sun! Thank you and sorry for my poor English, I am Brazilian and I love this site!
RenderStuff
Nov 15, 2011
Hi Danilo, The level of your English doesn't matter here. Main thing is that we understand each other. Thanks for kind comment! ;)
Dima
Jan 9, 2012
* THUMBS UP * huge human thank you)
Peps
Feb 11, 2012
Standard camera for me on your recommendations are now super option - does not affect the lighting, you can make clean orthogonal angles, clipping panel decided the problem of distorted view points such as facilities such as a toilet and bathroom. And how do the settings for the standard camera with visualization of the interior where the front or back can be slightly blurred?
Anton (RenderStuff)
Feb 13, 2012
Use the scroll DOF effect of V-ray :: Camera tab V-ray: D
Dimon
Feb 22, 2012
Hello I also have a question about the cameras and just such a reason when rendering V-ray-WCSS camera can not see the background set the window (as explained in one of the lessons) and for rendering the usual seen where zasaada :)
Anton (RenderStuff)
Feb 22, 2012
Hello!

Without seeing the scene settings ( the V-Ray the Color mapping ), camera settings (VRayPhysicalCamera), as well as, not knowing what the process of setting the background behind the window in question, for sure answer to your question can not be.

Dimon
Feb 22, 2012
The background was made from Arc + Extrude + Convert to Poly and V-Ray material was assigned. When I move the sun, the VRaySky map still remains the same, I mean that the intensity of VRaySky does not change.
Anton (RenderStuff)
Feb 22, 2012

In general, I understand.

Do not use VRayPhysicalCamera. Read this tutorial why.

Make sure that your background object is excluded from the GI and light sources illumination, including VraySky and VRaySun. Than apply an self-lumnation material to background object, instead of usual one.

When you move the sun, the lightning is change. You just do not see that change on a render because VraySky is too bright.

Affect background Checkmark is forcing to apply exposure of Color mapping and VRayPhysicalCamera to the background image. This may also be the reason why you may not notice the VRaySun's brightness changes. How to adjust Color mapping, read in tutorial about the Color mapping in V-Ray ;)

Dimon
Feb 24, 2012
Thank you for your answer, I also understand about camers
Dimon
Mar 7, 2012
The question about the clipping plane. From what is clear now that the movement of these planes, cuts the geometry in the frame. Why is this feature needed?
Anton (RenderStuff)
Mar 7, 2012
Dimon. As you said, with the camera's clipping planes, you can cut-off geometry that you don't need in the frame. A simple example. You want to visualize a cramped bathroom of a very small size. If you place the camera there incide the room, you will immediately realize that to get a great shot, you need to fly the camera out of the room. That is to shoot a bathroom through the walls. Without clipping you will not be able to see anything but the wall. But if you cut this wall with the help of clipping planes, you will get the frame you need. I hope this example is clear enough.
Dimon
Mar 7, 2012
Anton Respect :)
marcelo Fernandes
Jul 27, 2012
First of all, let me tell you how much i appreciate your tutorials. they are very straightforward and helpfull. Normally, I use vrayphysicalcamera for exterior scenes and normal cameras for interiors. For the exterior scenes i can adjust individually the setting for cameras in different places where there is more or less sun; as for the interiors, its a lot easier to just pan and orbit around and test render any place (everyone knows what a pain in the ass it is to be always cerating and targetting varyphysicalcamers in random places just fot test rendering. and also we cant do panoramas with vrayphysicalcameras, right? Reinhard comor mapping rules, btw. Its just so simple yet effective. Keep up the good qork and bring on more tuts. Greetings from Paris
DogDay
Aug 5, 2012
This trick works just in case you are not using the clipping parameter of vRay Physical Camera. If you use it, when presing P to switch to perspective view before creating the standart camera, you loose the exact view in the viewport. :|
Tayjs
Apr 4, 2013
This is sooo helpful, thanks guys, youve saved me endless hours creating new scenes for elevations!
afsal
Apr 9, 2013
thanks lot for ur tutorial
mani prakash
Jul 18, 2014
This is sooo helpful, thanks guys, youve saved me endless hours creating new scenes :)
Geoffrey
Jan 17, 2019

Thank you very much for the helpful information!

As an update for the people reading this tutorial after 2017, the default camera in this tutorial is '3ds Max Target Camera'. In 2017, 3ds Max changed its default behavior and now its standard camera is the new '3ds Max Physical Camera'. Use the Environment panel to control the exposure of the new camera. Press the '8' key on your keyboard and in the 'Environment and Effects' dialog box that appeared on the screen, navigate to 'Exposure Control' section. This is where all the settings for the new standard 3ds Max camera are located now. This way, you no longer need to change the brightness of the render with the Multiplier in V-Ray's Color Mapping.

The described approach guarantees you 100% match.
This discussion has been closed.