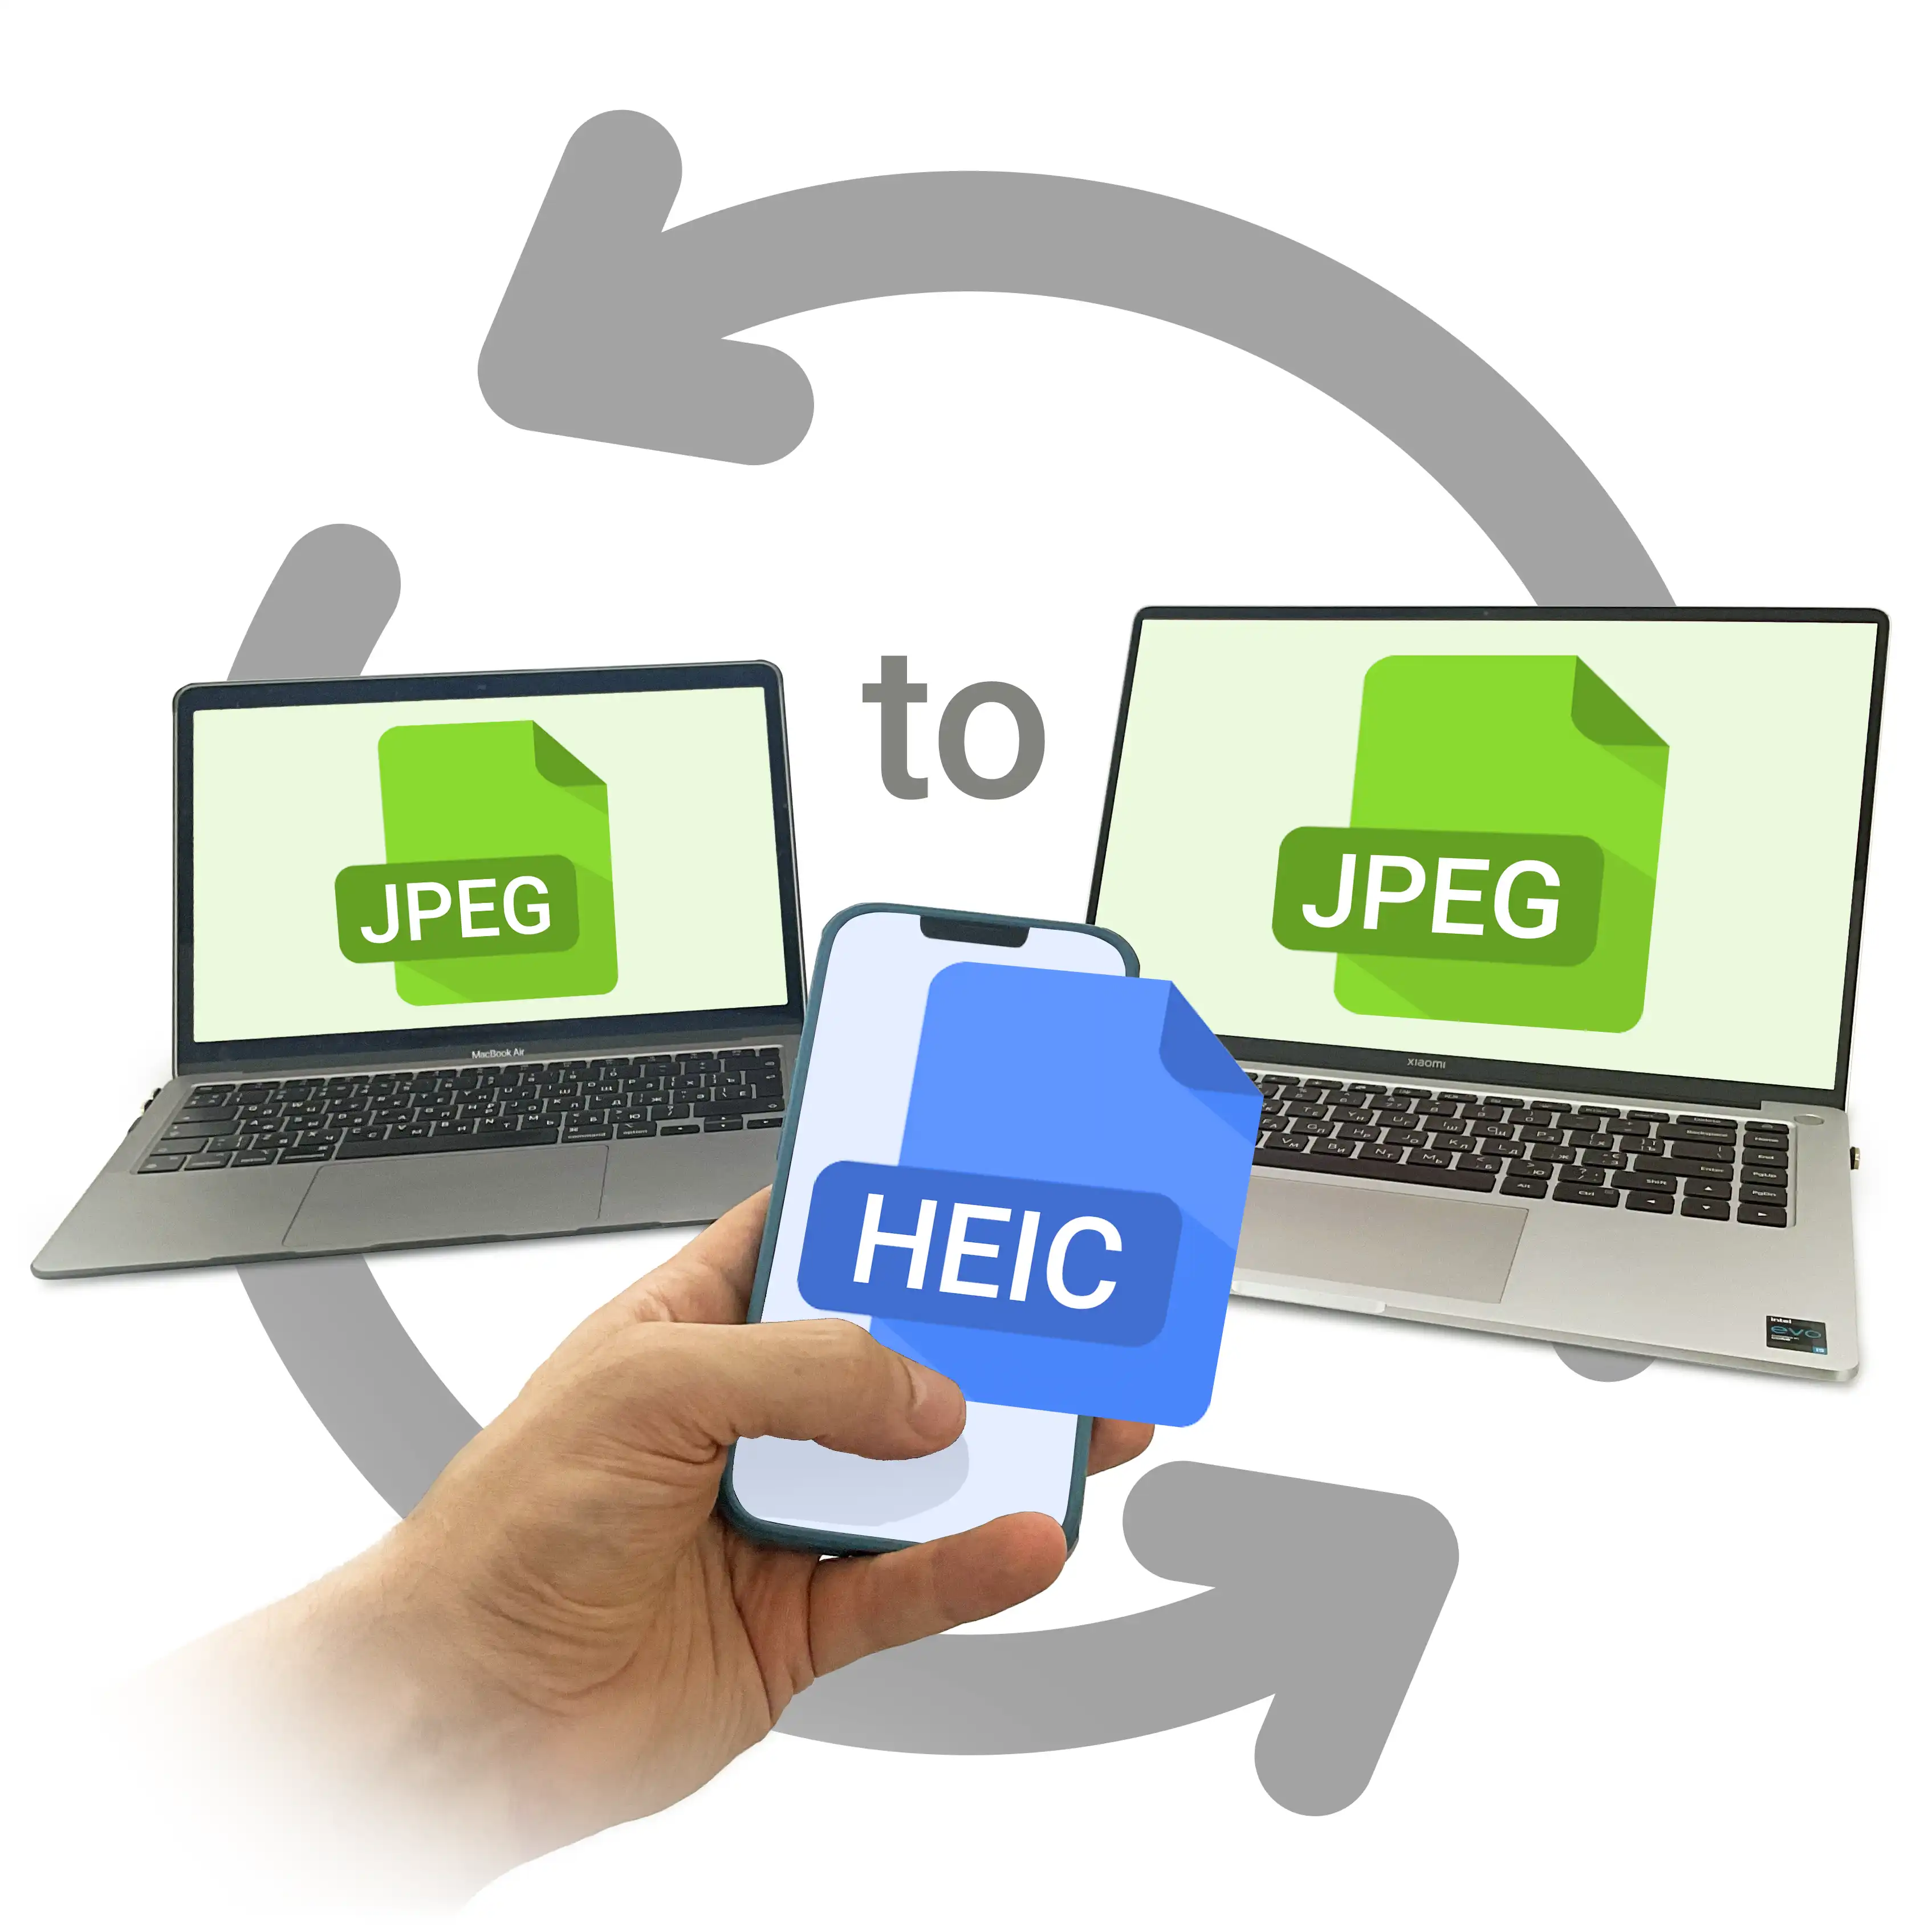
Convert HEIC to JPG on Any Device for Free
Struggling with HEIC files from your iPhone? This comprehensive guide walks you through various methods to convert HEIC to JPG for free on any device. Learn how to transfer photos from your iPhone to your computer. Whether you're using Windows, Mac, or just mobile, I've got you covered. Discover step-by-step instructions, insider tips, and learn about Image Convert Ninja - a versatile online tool that makes HEIC to JPG conversion a breeze. Ideal for smartphone users and anyone needing to work with or share images across different platforms and devices. From seamless photo transfers to quick conversions, this guide has everything you need to master your iPhone photo workflow.
Contents
Why Convert HEIC Photos to JPEG in the First Place?
HEIC Matters
With so many image formats out there, why should HEIC and its conversion to other formats catch your attention?
Simply put, most images you upload to social media, marketplaces, and websites need to be in "web-friendly" formats like JPEG, PNG, or WebP — formats that browsers can "understand" and easily display. HEIC isn't one of them.
When Apple introduced iOS 11 in 2017, they switched from JPEG to HEIC for iPhone photos. Because HEIC is more effective at decreasing file sizes while maintaining quality, it became the default format for iPhones and iPads.
It's important to clarify the terms HEIF and HEIC because they sound similar (like JPEG and JPG) and are even used interchangeably, causing confusion due to their close relationship:
-
HEIF (High Efficiency Image Format): A modern image format known for its superior compression compared to JPEG. It allows for high-quality images to be stored in smaller file sizes, making it more efficient for storage and sharing.
-
HEIC (High Efficiency Image Coding): A specific implementation of the HEIF format that uses the High Efficiency Video Coding (HEVC) codec for image compression.
While HEIF can hold multiple images, image sequences, and additional metadata in a single file, HEIC is commonly used for individual images.
In terms of image quality, both HEIF and HEIC utilize the same underlying HEVC compression technology.
The Need for Conversion
Despite its advantages, HEIC isn’t widely supported online. So, if you’ve taken photos in HEIC, you’ll likely need to convert them to a more compatible format, like JPEG, for easier sharing and use.
I chose JPEG (JPG for short) as the default conversion example because it's the most widely accepted and web-friendly image format, ensuring compatibility across all platforms. You can also convert HEIC files to any other image format that meets your needs!
Both JPG and JPEG refer to the same image compression algorithm, so there is no difference in image quality or content.
What This Tutorial Covers
In this tutorial, I’ll guide you through the process of converting HEIC to JPG on any platform, including Mac, Windows PC, Android, and iOS. The best part? You can do it for free without installing any additional software on your device.
And I'll start by showing you how to transfer HEIC photos from your iPhone to your desktop or laptop computer, both Mac and Windows PC.
How to Transfer HEIC Photos from iPhone to Your Computer
If you're not an Apple device owner and received HEIC photos from someone else, you can skip this section and jump straight to the conversion tutorial at the end, where I'll explain how to convert HEIC photos to JPG.
Step-by-Step: Downloading HEIC Photos from iCloud
Apple devices typically sync all your photos with iCloud. As an iPhone or iPad user, you likely have an iCloud account. To access your photo library on iCloud from your computer (any OS), follow these steps:
-
Log in to your iCloud account via a browser on your computer.
-
In the iCloud dashboard, go to your photo library by clicking on the Photos app icon. You can also directly visit iCloud Photos bypassing dashboard.
-
Find the photo you want to download, click on the three dots icon in the top right corner of the photo, to open it context menu.
-
Select More Download Options... > Unmodified Originals.
-
Your browser will download an iCloud Photos.zip file, which will contain the original HEIC photo along with the accompanying MOV file that includes 1.5 seconds of video before and after you press the shutter button, as part of the Live Photos feature.
This is the easiest way to get the original HEIC photos from your iPhone to your computer, aside from needing to unzip the files.
However, there's a catch! iCloud offers only 5GB of free storage per account, regardless of how many devices are connected. If you have both an iPhone and a MacBook, for example, you’ll likely exceed the 5GB limit quickly. When this happens, iCloud stops syncing your photos. To continue using iCloud Photos, you'll need to subscribe to a paid plan with recurring monthly payments.
Preparing a Cable for HEIC Photo Transfer
If you're like me and prefer to have complete control over your photos and avoid subscriptions, you can store them locally on your computer. Just transfer them with a physical cable whenever you need to.
Here's how to get photos from your iPhone to your computer, whether you're using Mac or Windows. These steps also work for iPads.
For most transfers, your iPhone charging cable will suffice. iPhones before the 15th model use a Lightning connector, while newer models feature small rounded USB-C.
If you're using a laptop, it likely has a USB-C port, making the process straightforward. For desktop computers, which often only have big rectangular USB-A ports, you may need a Lightning to USB-A or USB-C to USB-A cable to complete the transfer.
Step-by-Step: Transfer HEIC Photos to Windows Computer
Windows doesn't natively support HEIC photos, so for seamless compatibility, consider transferring the JPEG versions of your HEIC photos instead. Here's how to adjust your iPhone settings:
Settings > Photos > Transfer to Mac or PC > Automatic (instead of Keep Originals).
The transfer process remains the same as described below, but you'll find JPEG files in Internal Storage instead of HEIC.
What to consider
Switching to JPEGs ensures compatibility, although there's a slight loss in image quality compared to HEIC. If you plan to edit the transferred photos later, sticking with HEIC may be the better option - especially since editors like Photoshop handle HEIC files just fine.
For instance, my wife, an iPhone and Windows laptop user, never uses HEIC photos at all, even when preparing them for markets like Etsy, where she sells her handmade plaster products.
As for me, an iPhone and MacBook user, I never use JPEGs - I always stick with HEIC.
So before you start transferring photos, I suggest you consider what's best for you, especially depending on your intended use and the operating system you're using.
-
Unlock your iPhone to reveal the home screen. This is an essential step; otherwise, your phone will block the cable transfer as an unauthorized connection. Keep it unlocked throughout the entire process.
-
Connect your iPhone to your computer with the appropriate cable.
-
On your phone screen, you'll see a message where you need to select Allow:
- After selecting Allow, you may be prompted to authenticate using Face ID, Touch ID, or your Passcode to finally grant access to your photos.
Once the initial setup is complete, you won't need to authenticate every time you connect your iPhone to the laptop. Your iPhone will remember the laptop as a "trusted computer" and will automatically allow access in the future.
-
Now, your iPhone and computer should be connected. Windows will show you several messages about a new USB device being connected. You can simply ignore these messages.
-
To access your iPhone photos, open File Explorer > This PC > Apple iPhone > Internal Storage.
Inside, you may find a DCIM (Digital Camera Images) folder containing subfolders like 100APPLE, 101APPLE, etc., which hold your photos and videos. Occasionally, alongside or instead of the DCIM folder, you might encounter folders named by the year and month format, such as 202408__.
The specific folder structure for iPhone photos varies depending on the iOS version installed on the device, as Apple has made changes to how photos are organized over time.
- Save the HEIC photos you need to your computer by copying them from the Apple iPhone directory to a folder of your choice on your local or external drive.
Step-by-Step: Transfer HEIC Photos to macOS Computer
Although this tutorial focuses on images, the steps outlined are equally applicable to transferring video files. The only difference is that you'll need to select video files for export instead of photos.
-
Unlock your iPhone to reveal the home screen. This is an essential step; otherwise, your phone will block the cable transfer as an unauthorized connection. Keep it unlocked throughout the entire process.
-
Connect your iPhone to your computer with the appropriate cable.
-
When you connect your iPhone to your Mac with the same Apple ID and iCloud account, both devices should be linked via Wi-Fi, and your iPhone should work right away without additional prompts. However, if they aren't connected or you're using a different Apple ID and iCloud account, you may see the following prompt where you must choose Trust:
Trust This Computer?Your settings and data will be accessible from 'MacBook' when connected wirelessly or using a cable.TrustDon't Trust
You may also be asked to enter your iPhone's passcode to confirm the trust action.
- Now, your iPhone and Mac should be successfully connected. To access photos on macOS, use the
Photosapp. It is preinstalled on all Apple devices, so just launch it.
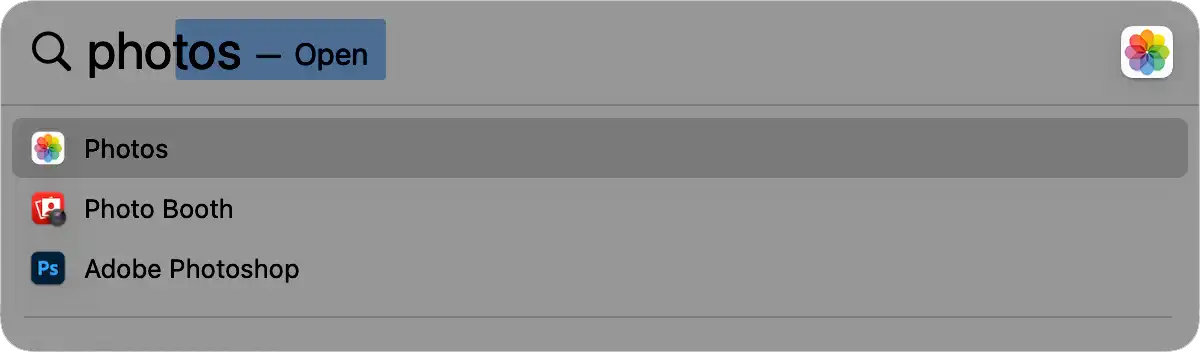
The easiest way is to use Spotlight. Press the Spotlight function key or ⌘ + space to open it, then start typing "Photos":
When you see the Photos icon, launch the app.
- In the
Photosapp, you'll find your connected iPhone in the left-side panel under the Devices section.
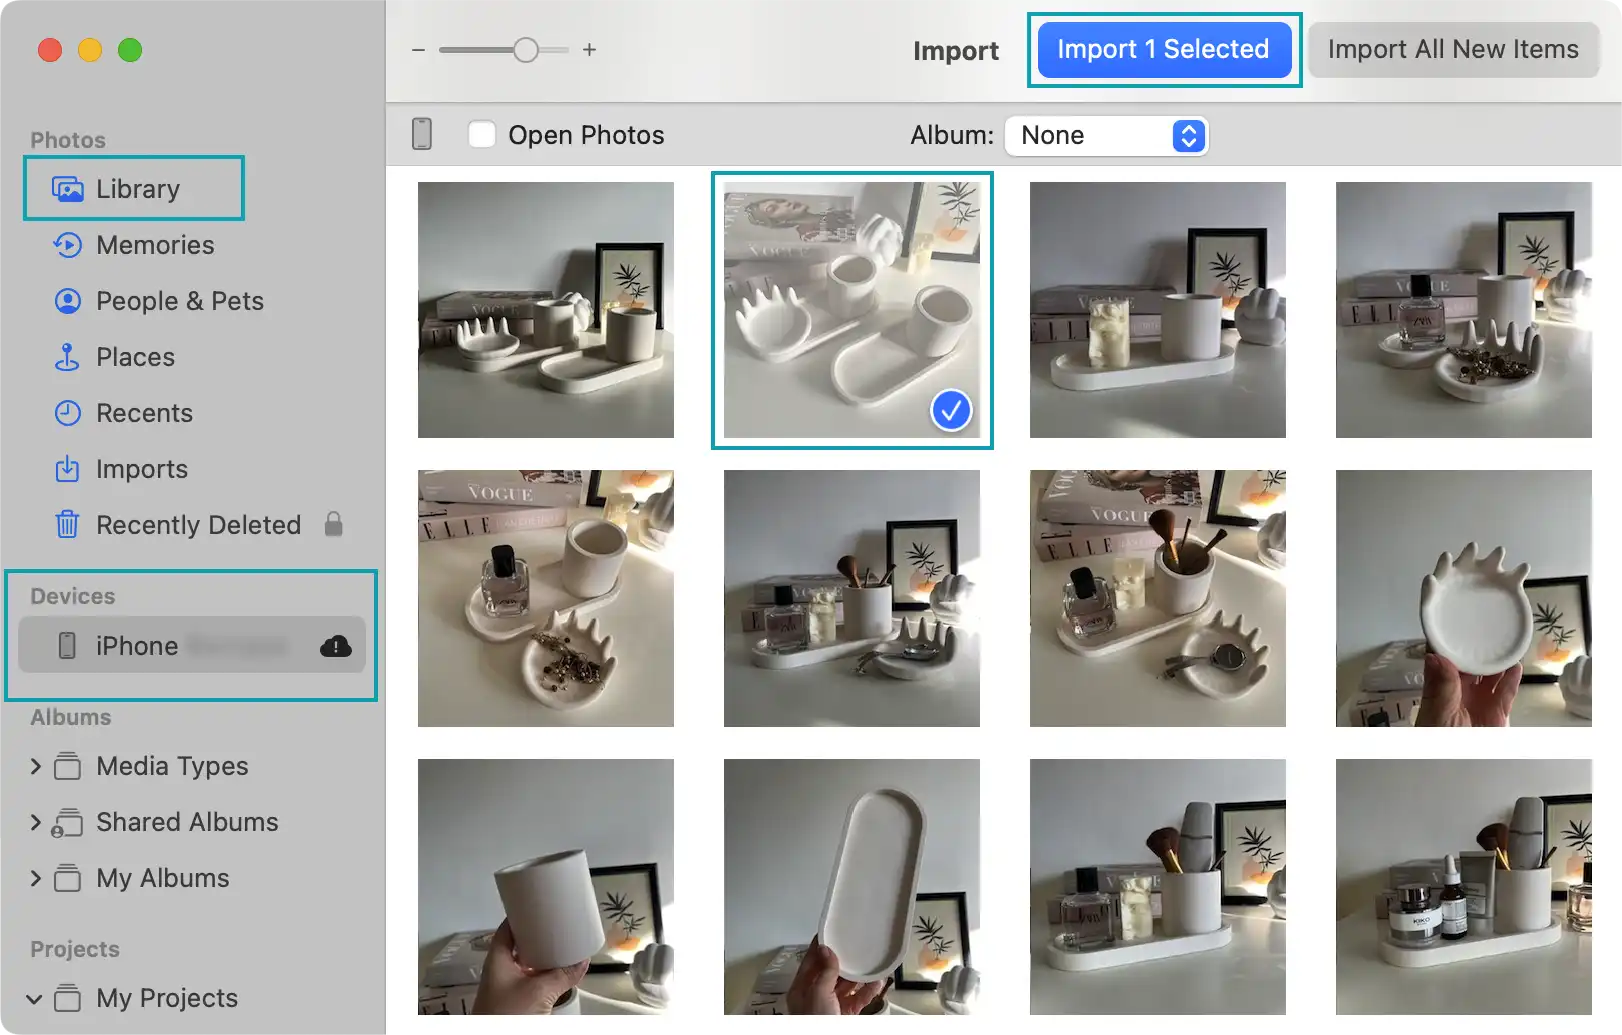
Locate the photo you need on iPhone, checkmark it, and press the Import Selected button:
Devices > iPhone Name > Checkmark the photo(s) > Import (N) Selected
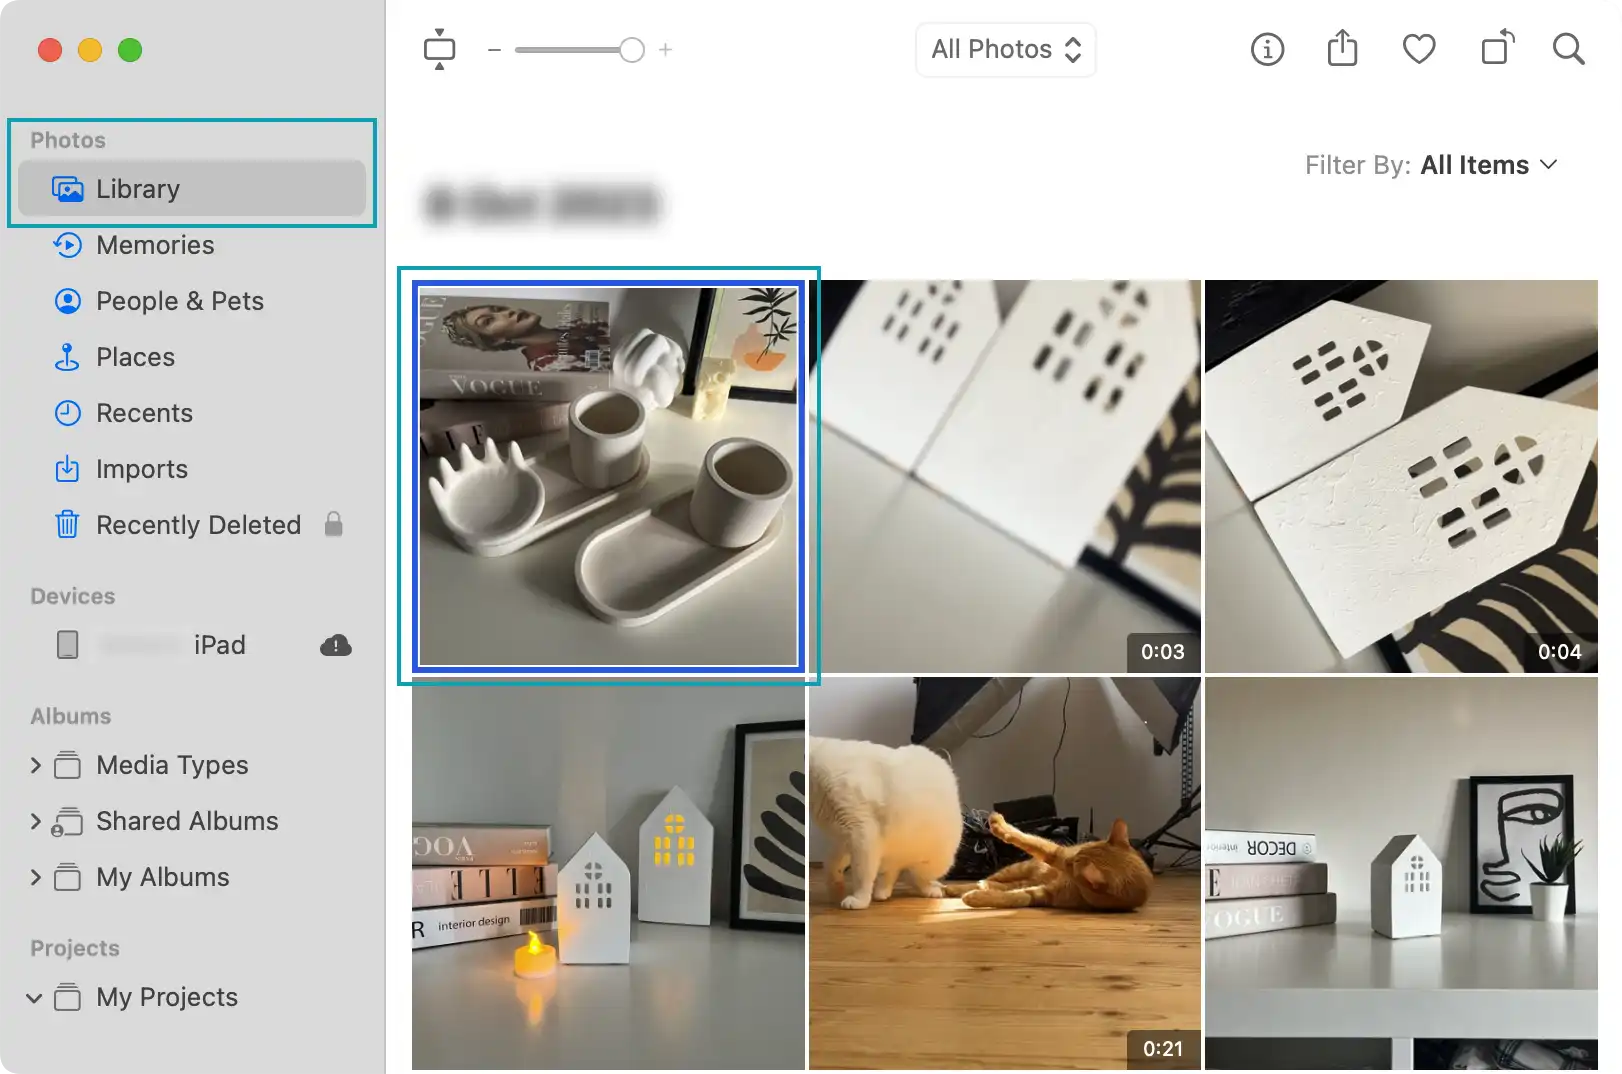
This will transfer all selected photos from your iPhone to your Mac. You can now disconnect your iPhone from your Mac, as all photos are accessible under the Library section.
-
All your photos are now stored locally on your Mac in the
Photosapp under the Library section. To save HEIC photos elsewhere, on your Mac or to an external drive, you must "export" them from thePhotosapp. To do this: -
Open the Library section in the
Photosapp and choose what to export.
Then go to File > Export > Export Unmodified Original For (N) Photo:
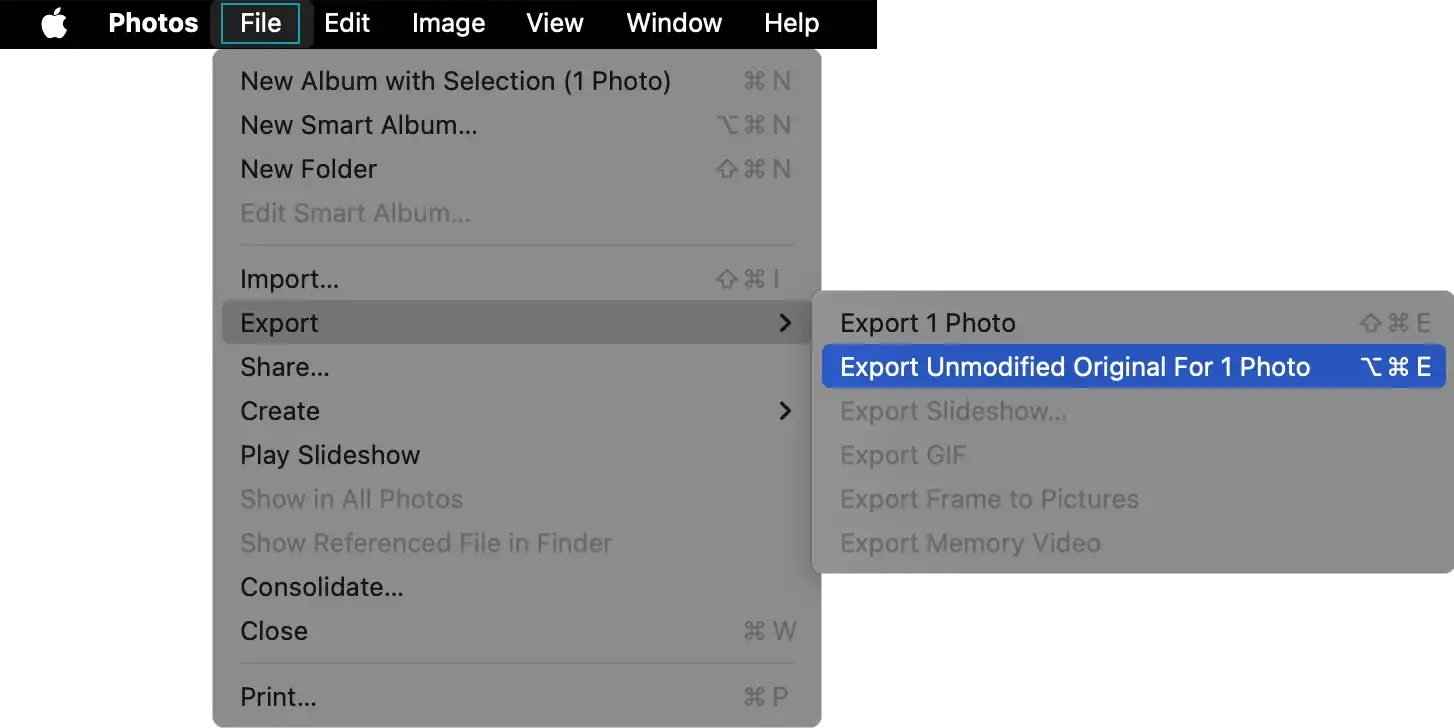
Finally, you'll be prompted to select a location to export the HEIC file(s).
Converting HEIC to JPEG on a Mac Using the Photos App
On a Mac, the Photos app isn't just the default method for transferring unmodified HEIC photos from your iPhone or iPad; it's also the go-to tool for converting these photos to JPEG, PNG, TIFF, or even re-saving them as HEIC with different sizes or color profiles.
Exporting HEIC as JPEG with Photos App
In the Photos app, go to File > Export and instead of choosing Export Unmodified Original For (N) Photo, select Export (N) Photo. This will bring up the following dialog:
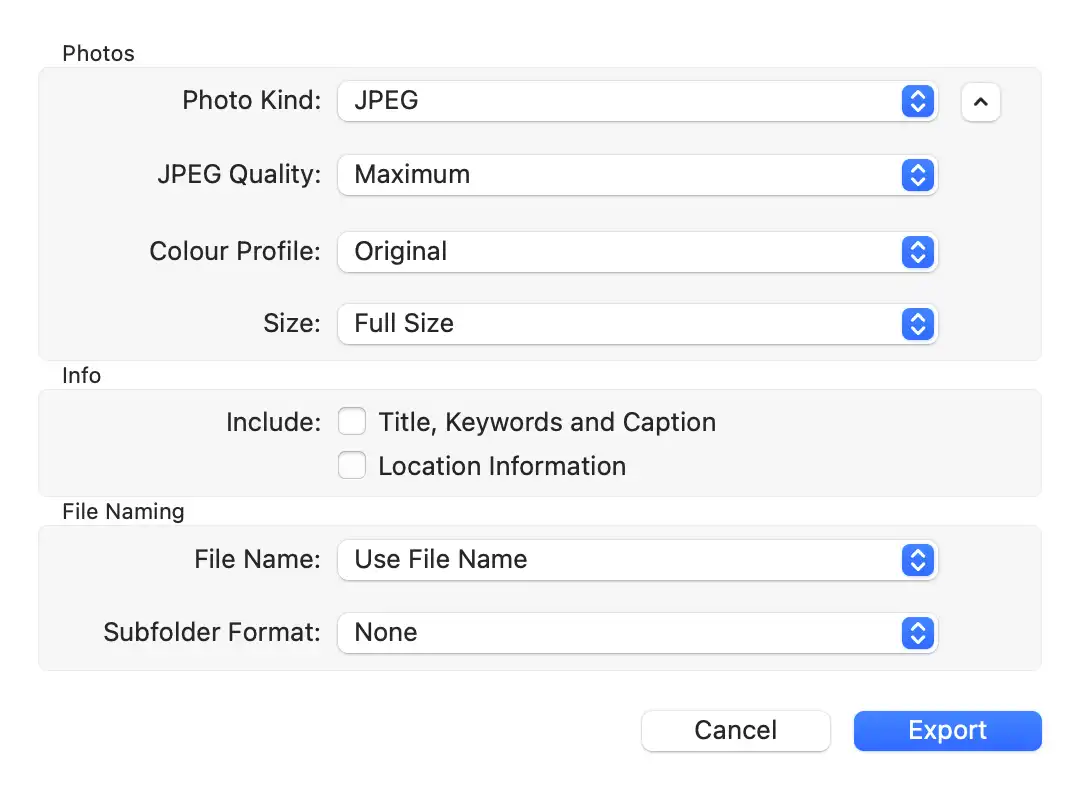
Choose your desired options and click Export. The dialog is straightforward, so I won’t go into detail — you’ll easily figure it out.
Drag and Drop JPEGs from the Photos App to Desktop
As an alternative method for exporting photos from the Photos app, you can simply drag and drop selected images from your Library directly onto your desktop. This action will automatically convert the photos to JPEG format.
Once the images are on your desktop, you can easily move them to your desired location. This is the fastest and most convenient method, but it does not offer any conversion options.
Do you work with DaVinci Resolve and notice that your iPhone videos look washed out when editing? You're not alone! This common issue arises because of the way iPhone's default HDR recording interacts with standard displays.
Specifically, iPhones record videos in Dolby Vision HDR by default, while your LDR (Low Dynamic Range) or SDR (Standard-dynamic-range) monitor likely doesn't support HDR (unlike your iPhone screen). This mismatch results in incorrect gamma and exposure values.
Here's a quick fix that might save you lot of headaches:
- Simply drag your HDR videos from the
Photosapp Library to your desktop. - Your Mac will automatically convert them to a more compatible format.
- Voila! The converted videos should now look great in DaVinci Resolve.
This little workaround is perfect for home videos or vlogs where you don't need the full HDR data. It's the same trick that works for HEIC photos!
If you find yourself doing this often, you might want to consider turning off HDR video recording on your iPhone. Just hop into:
Settings > Camera > Record Video and toggle off HDR Video.
From that point on, all new videos will be recorded in LDR format and will look the same in DaVinci Resolve as they do on your iPhone.
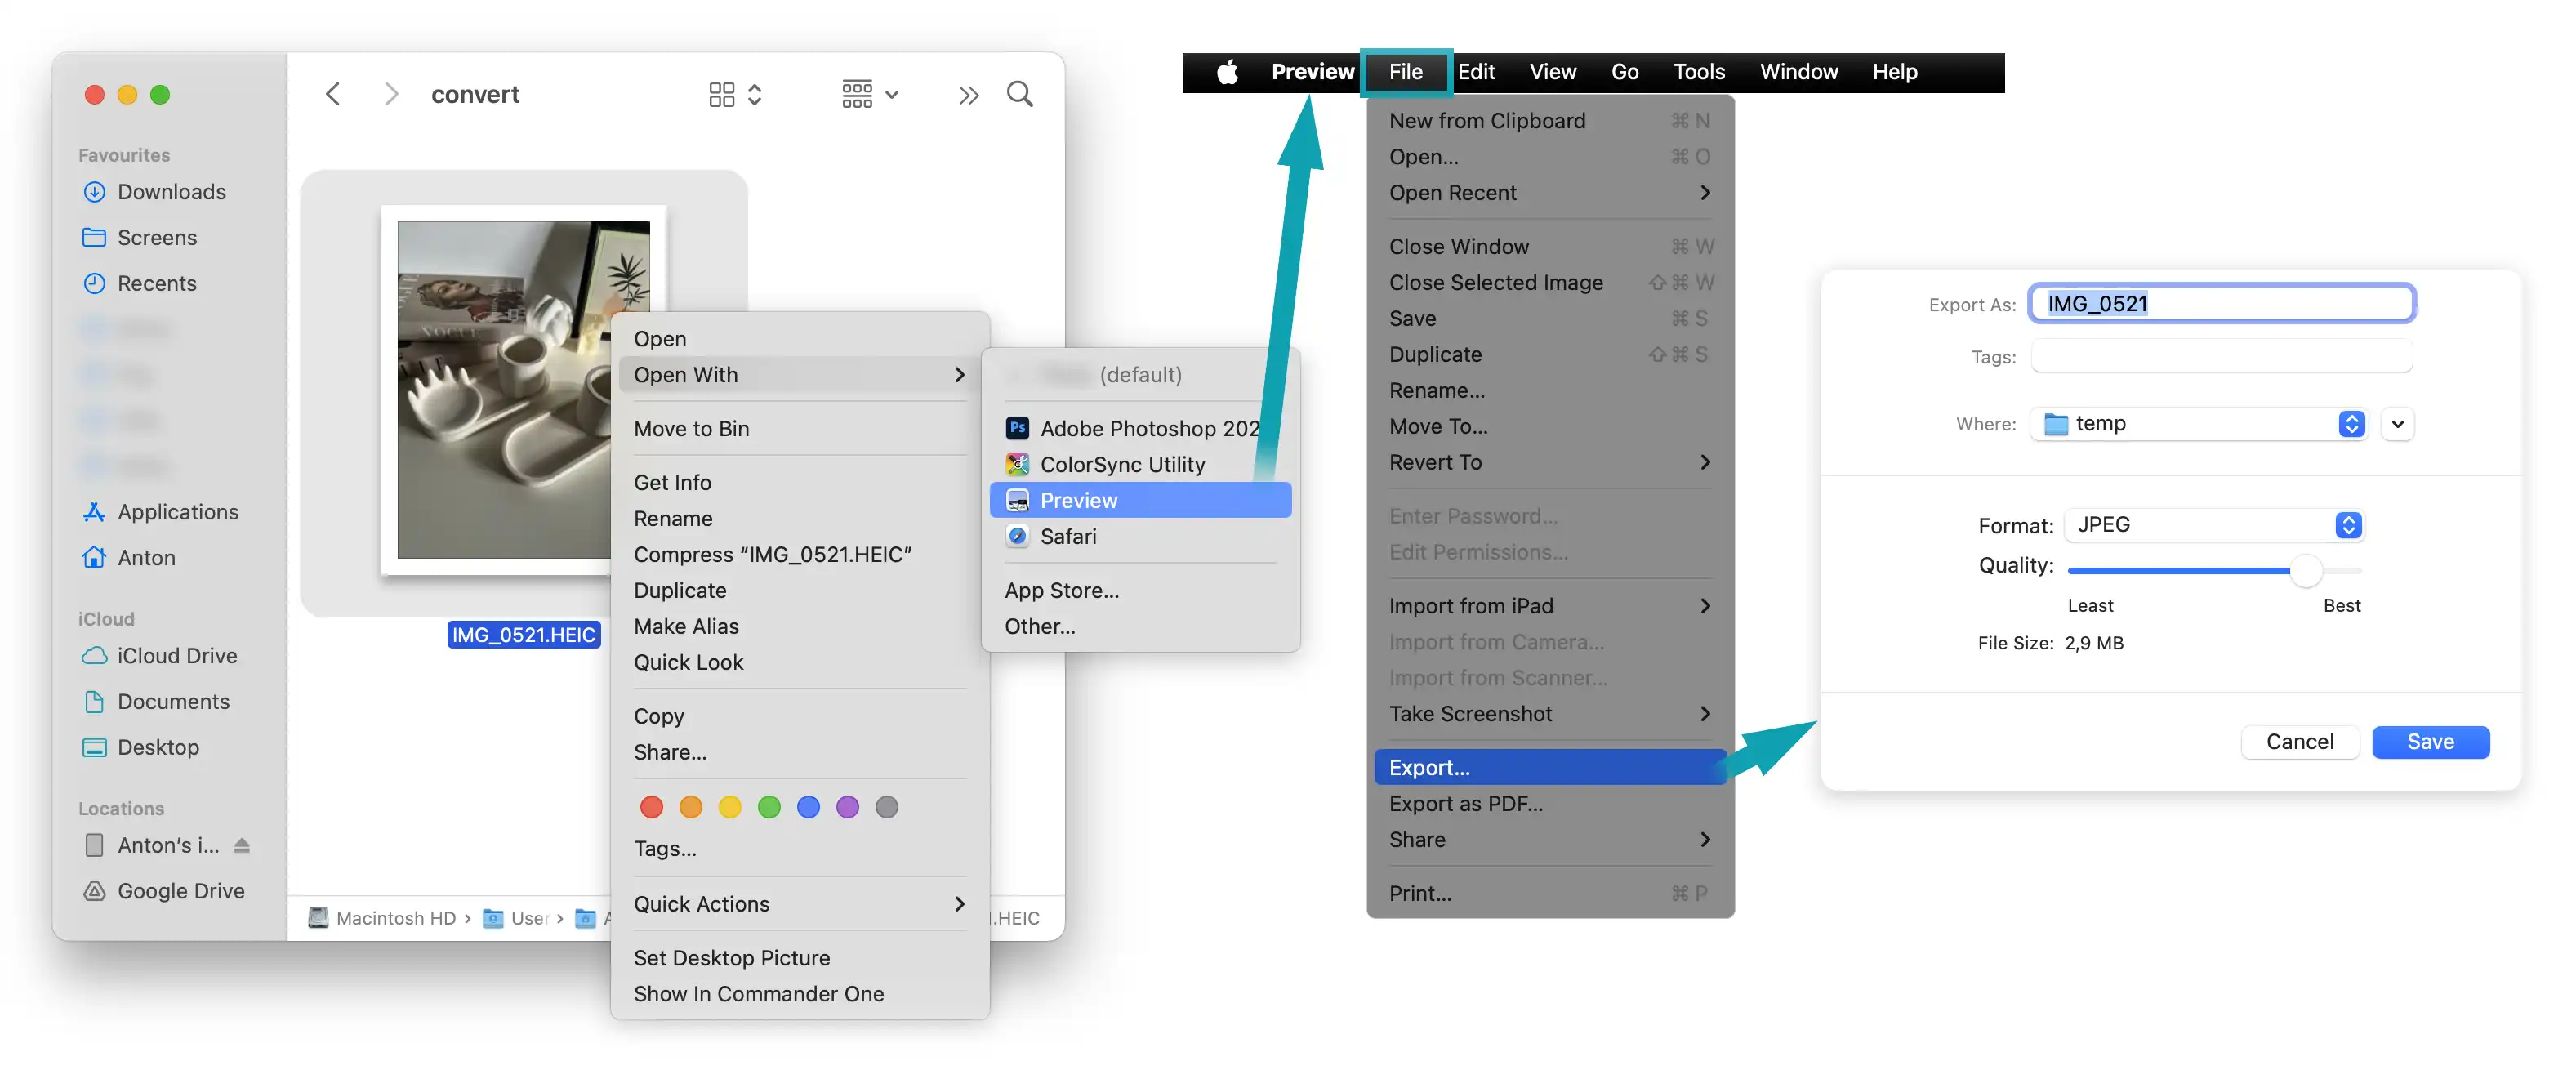
Converting HEIC to JPG with Preview App
The Preview app offers another method to export HEIC photos to JPEG format. This built-in macOS tool provides a straightforward process for both single and bulk conversions.
-
Open Finder and navigate to the folder containing your HEIC photo(s).
-
Select the HEIC photo and press Space to open it with Preview. If Preview isn't your default viewer, right-click HEIC photo and choose Open With > Preview.
To convert multiple HEIC photos simultaneously, select all target files and then Open With > Preview. When Preview opens, you will see opened files icons at the left. If not, click on Choose sidebar display > Thumbnails.
Then, select all thumbnails to apply conversion to them all and follow next steps below.
-
With the photo(s) open in Preview, go to File > Export... in the top menu bar. This will bring you to the Export dialog.
-
In the export dialog:
- Choose JPEG from the Format dropdown menu.
- Adjust the Quality slider to balance file size and image quality.
- Observe the estimated file size, which updates in real-time as you adjust settings.
- Click Save to convert and save your JPEG file(s).
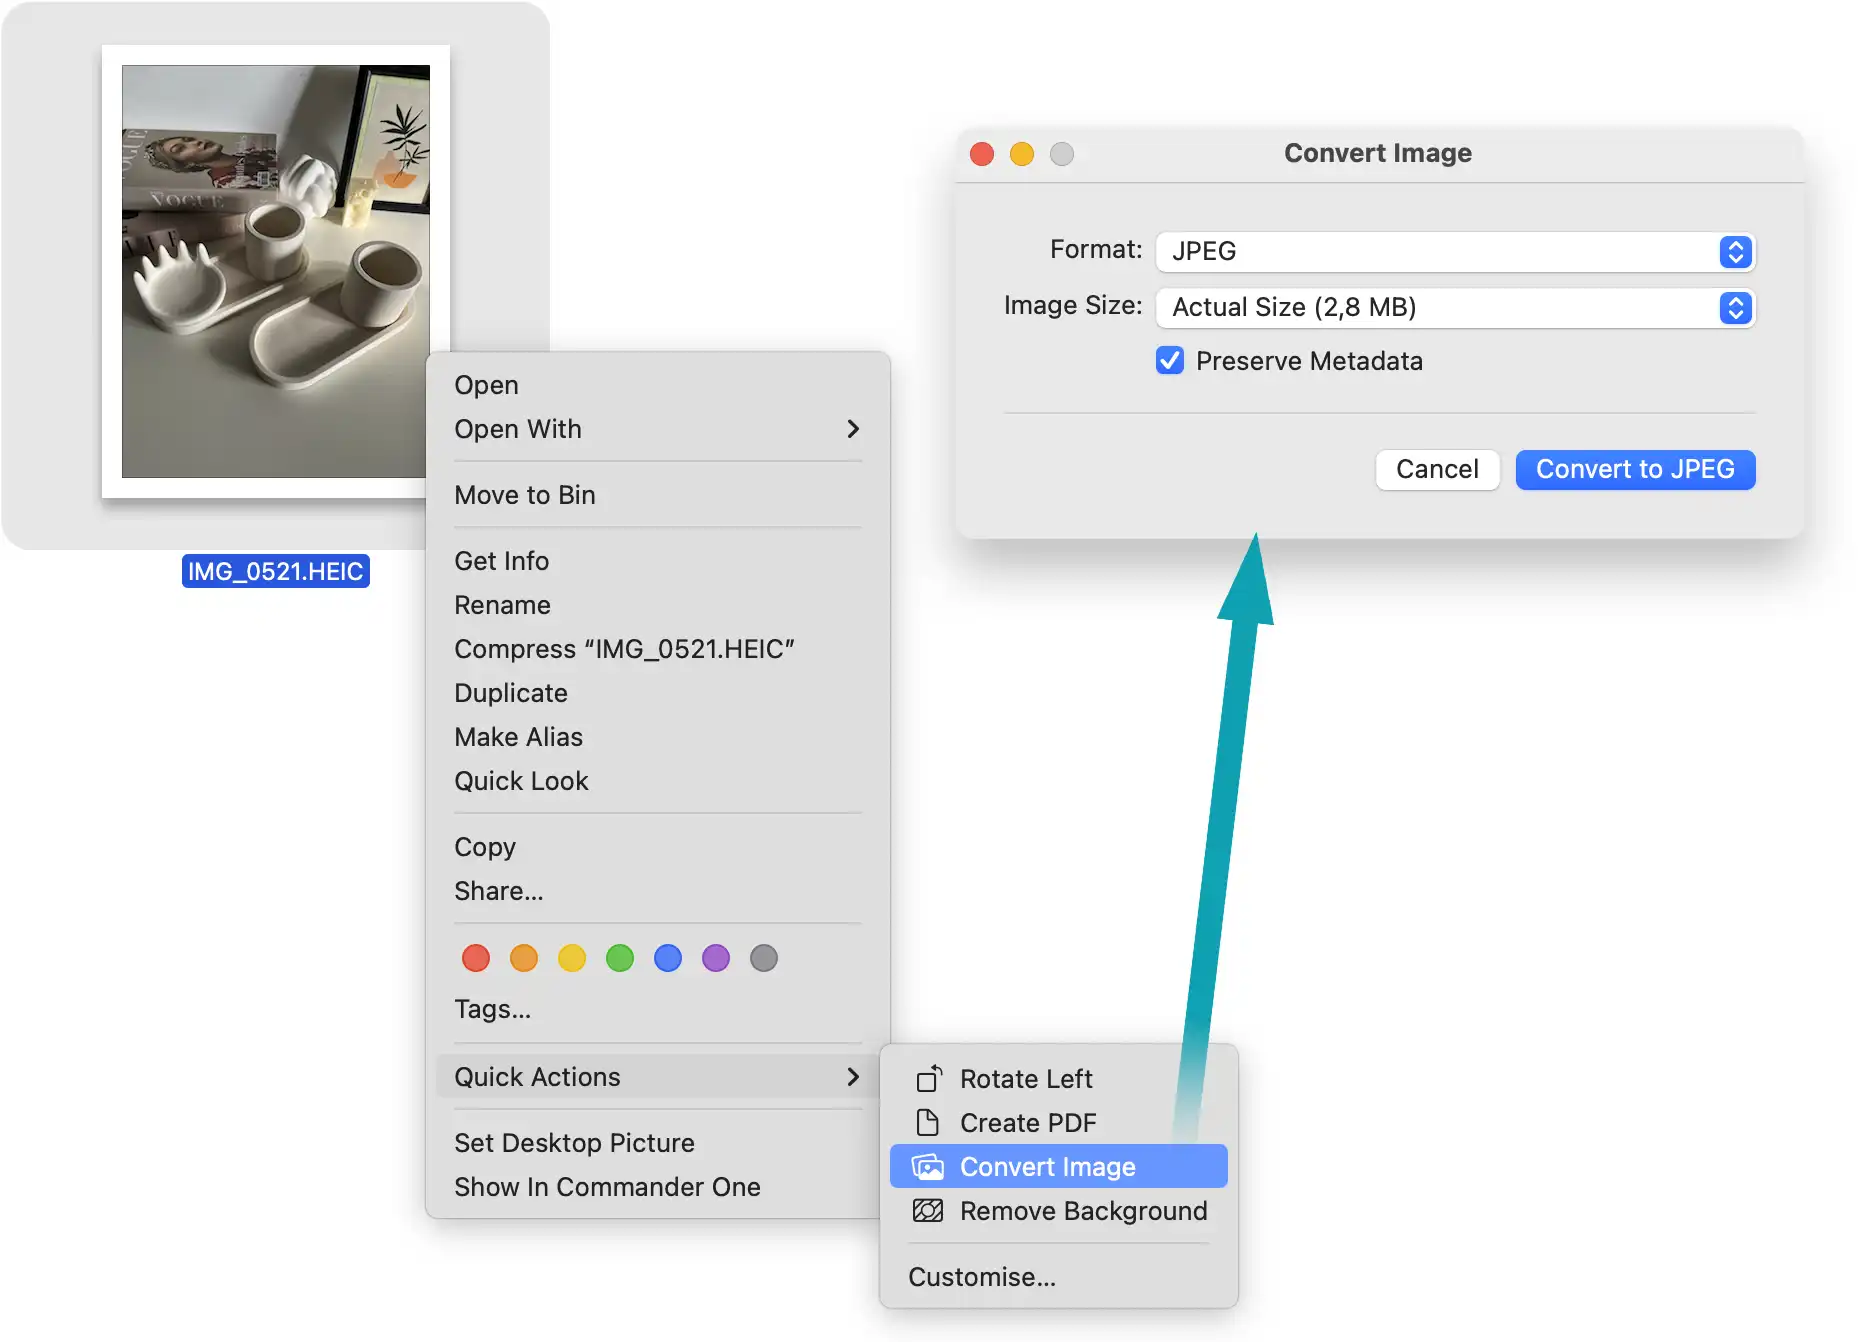
Converting HEIC to JPG with Finder's Quick Action
Modern macOS also offers a built-in Quick Action in Finder. To use it, navigate to:
Finder > locate and select a HEIC photo > right-click to open the context menu > Quick Actions > Convert Image. In the dialog that appears, select Convert to JPEG.
Limitations of Built-In Tools: What’s Missing
While macOS offers native solutions for converting HEIC photos to JPG, these built-in methods often fall short in flexibility and control. The primary constraints of built-in tools are:
- Limited options for compression and resolution settings
- Forced use of hardcoded presets
- No real-time preview of conversion results
- Time-consuming trial-and-error process
In today's digital landscape, active users frequently find themselves uploading images across various platforms. However, the limitations imposed by these platforms can be particularly frustrating. How often have you encountered upload restrictions due to image file size or resolution issues?
You need a tool that resolves these image-related challenges effortlessly. Such a solution would save you time and ensure your visual content always meets platform specifications without compromising quality, allowing you to focus on your creativity rather than technical constraints.
HEIC to JPG Anywhere: Image Convert Ninja
While macOS offers some built-in tools to convert HEIC to JPG, other platforms like Windows lack similar native options. For instance, Windows can't even view HEIC files without installing additional software (paid plugin for Windows Photos app).
If you've ever searched for heic to jpg windows 10 free, you're not alone.
This is where Image Convert Ninja comes in. It's a powerful, free online image converter and viewer that only requires a web browser, making it accessible on any modern platform.
One of the standout features of this tool is its ability to provide instant previews of conversion results. For example, when converting HEIC to JPG, you can see the converted image exactly as it will appear when downloaded. If you adjust the resolution or compression level, you’ll immediately see how these changes affect the file size and image quality, including any compression artifacts. This is a significant improvement over traditional "blind" conversion methods.
This level of precision allows you to fine-tune the image quality to achieve the exact file size you need.
Open a HEIC Photo: Get Started with Image Convert Ninja
To access Image Convert Ninja, simply navigate to the Image Convert Ninja page to upload your first HEIC image for conversion and/or viewing.
You can do this in several ways, but the most straightforward method is to use the Open Image button on any device, or just drag and drop the HEIC image directly into the Ninja's Image Viewer if you're on a desktop:
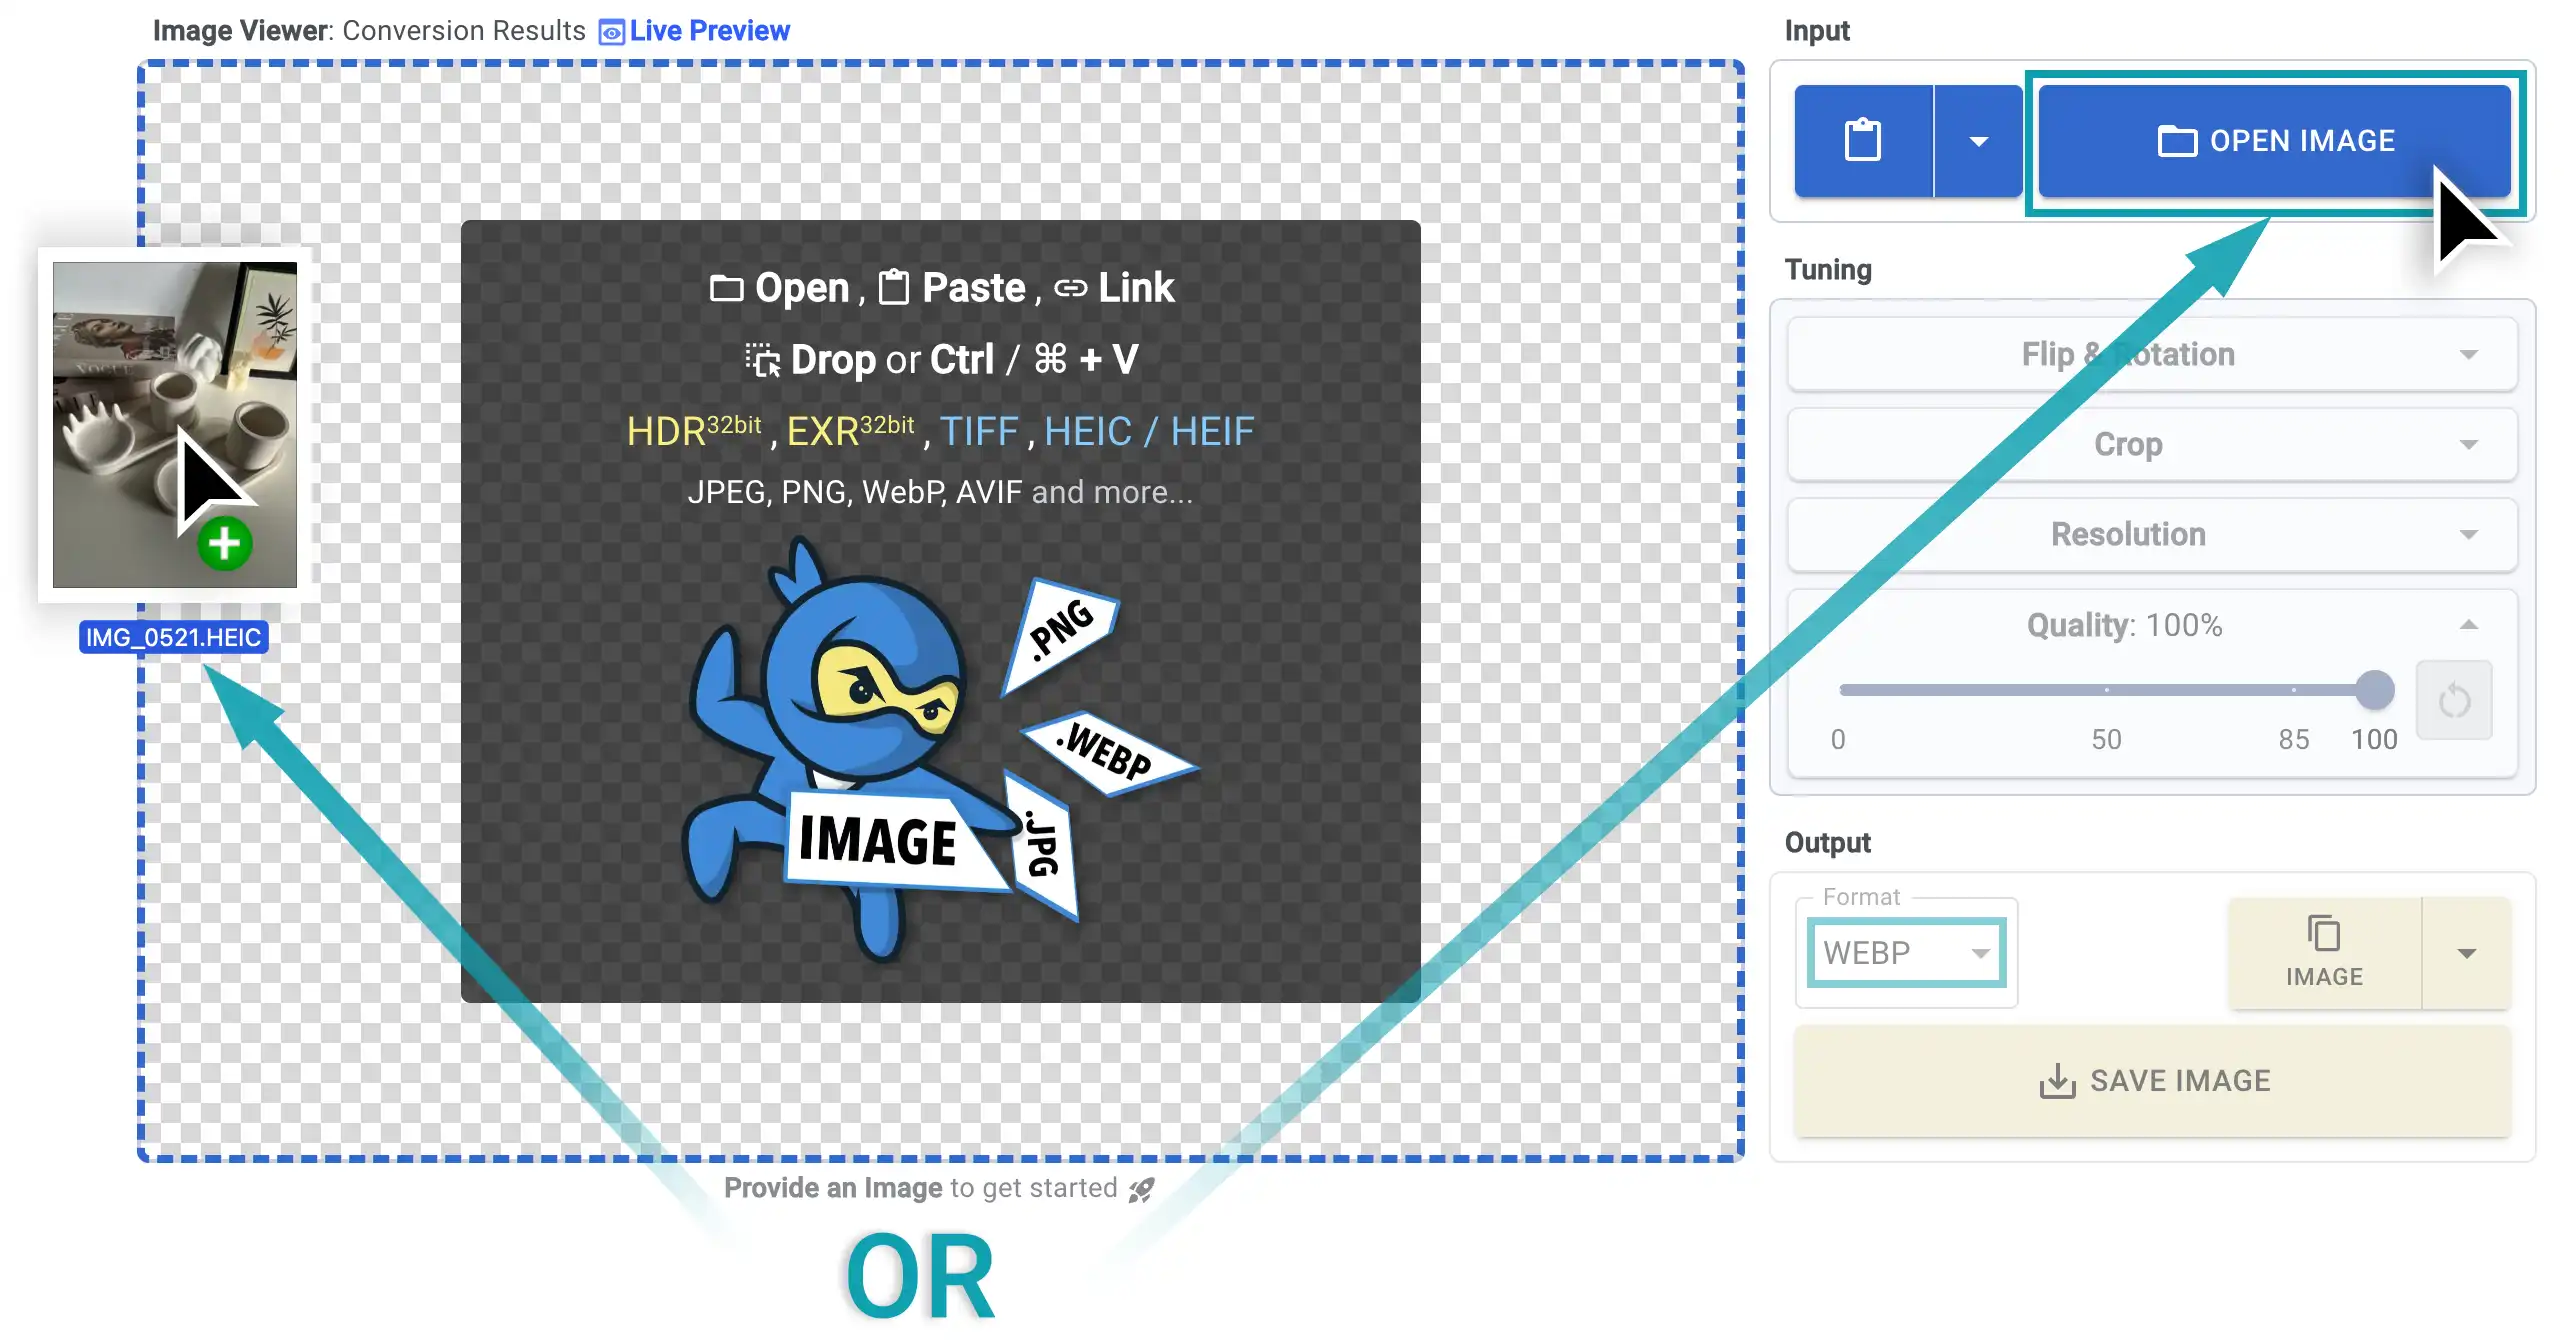
Convert to JPG: Changing Format, Adjusting Quality and Resolution
Image Convert Ninja will automatically convert the HEIC file to the default format, which is WebP, and display the result. To convert to JPG, simply select JPEG from the Format dropdown.

If you need to adjust the compression, use the Quality slider while observing the image's output size and quality in the Viewport. To change the resolution, use the Resolution pane, and so on.
Once you're satisfied with the result, click Save Image and choose where to save the converted JPG file to you device.
This conversion can be done on any platform, including your iPhone. Image Convert Ninja is a mobile-friendly web app with an adaptive UI layout that fits any screen size.
Video Guide: Converting HEIC to JPG with Image Convert Ninja
My Creative Uses for Image Convert Ninja
Image Convert Ninja is more than just a HEIC to JPG converter tool - it's an all-in-one "Swiss knife" for a variety of image-related tasks. I'm sure you'll find your own unique ways to increase productivity with this tool. But, here are a few innovative ways I've discovered to increase productivity and optimize workflows with this powerful online tool:
Holding Temporary Images
I use Image Convert Ninja as a temporary image holder. For instance, when I want an image from the internet to use as a reference, but don't need it saved permanently, I simply paste it into Image Convert Ninja. This allows me to keep the image accessible, including panning and zooming to details I need, without cluttering my drive with temporary imagery. I just keep the browser tab with Image Convert Ninja open and easily refer to the image whenever I need.
Quick Screenshots Adjusting
Another use is when I capture a screenshot and realize that I've captured too much. Instead of redoing it with precise targeting, I paste it into Image Convert Ninja and use the Crop tool to cut out the unnecessary parts. Even for me - a heavy Photoshop user, launching Photoshop every time I take a screenshot is too much for such a simple task, so I use Image Convert Ninja instead.
The same goes for other light image adjustments, such as simple downsizing before using it in a project. Instead of opening heavyweight software, I use Image Convert Ninja to make those quick edits. It’s a fast and efficient way to handle simple tasks without the overhead of more complex tools.
Uglifying Images: A Strategic Approach
One intriguing technique you can employ is to "uglify" an image. This method is particularly useful when you’re creating a final product, such as a 3D render, design, or photograph, and you want to ensure that it remains understandable but not usable — allowing you to retain your rights and receive payment for the original work.
How to Uglify an Image
To begin, open your image with Image Convert Ninja and do as follow:
- Adjust Quality: Lower the Quality setting to 0.
- Reduce Resolution: Optionally, you can also decrease the resolution slightly.
- Further Degradation: If the image still appears too usable, you can copy the converted image to your clipboard using the Copy Image feature in the Output section. Then, paste it back as the new input image. This allows you to further degrade an already altered image, and you can repeat this process as needed while monitoring the results through the Image Viewer.
The Benefits of Deliberate Distortion
While it may seem counterintuitive, intentionally distorting your images can save you time, money, and stress — especially when working on one-off freelance gigs. This technique serves as a powerful tool for protecting your work. By modifying your images, you can safeguard against potential misunderstandings in the rare event that a miscommunication occurs regarding usage rights. This approach can be particularly helpful when building new client relationships, ensuring clarity and mutual understanding from the outset.
Navigating the Challenges
When it comes to designs, where the concept is often the most valuable aspect, things can be a bit trickier. However, a distorted image is still significantly less appealing to a potential trickster than a polished, finished product.
If you’re working with a reputable client, they will understand your need to protect your rights, and this type of precaution will be appreciated. Conversely, if you encounter a less scrupulous individual, you will have effectively safeguarded yourself against potential exploitation.
This method may appear excessive, but it pays off in the long run. By taking proactive efforts to safeguard your work, you can concentrate on your creation without fear of unauthorized usage.
Pros and Considerations of Image Convert Ninja
Pros
-
Live Preview: One of the standout features of
Image Convert Ninjais its live preview functionality. As you make adjustments to compression levels or resolution, you can instantly see how these changes affect the image, including file size and quality. This real-time feedback is invaluable, allowing you to fine-tune your conversions with precision. -
Support for Multiple Formats: While many tools are limited to just a few formats,
Image Convert Ninjasupports a wide range of image types, including HEIC, JPEG, WebP, TIFF, and more. It even supports HDR and EXR input images, making it a versatile option for various needs. -
Cross-Platform Compatibility:
Image Convert Ninjais a web-based tool, meaning it works on any platform with a modern web browser. Whether you’re on Windows, macOS, Linux, or even a mobile device, you can access the full range of features without needing to install any additional software. -
Client-Side Privacy: Unlike many online tools that require uploading your images to a server,
Image Convert Ninjaoperates entirely on the client-side. This means that all image processing happens directly in your browser, ensuring that your files remain private and are never exposed to the internet. They never leave your browser. This feature makes it a trustworthy choice for handling images, particularly when privacy is a concern. -
No Strings Attached:
Image Convert Ninjais entirely free to use. There are no hidden fees, limits, trial periods, or requirements for credit card details, sign-ups, or logins. You can use it as much as you need, whenever you want.
Considerations
- Bulk Conversion: While
Image Convert Ninjaexcels in many areas, it’s important to note that the tool is designed with single image processing in mind. If you frequently need to convert large batches of images, the manual upload and conversion process could be time-consuming compared to other tools that support bulk processing. However, for individual or small-scale conversions,Image Convert Ninjais more than sufficient.
Image Convert Ninja is focused on fine-tuning image size versus quality with organoleptic (visual) process control in an interactive Image Viewer. It's not intended for bulk image conversion by design. This is not a limitation but part of the tool's philosophy.
If you need to convert multiple images, and you want to use Image Convert Ninja, you can load an image from a batch (a collection of all the images you want to convert), choose the Format and tweak the Quality on that image, save it. And then open another image - Image Convert Ninja will remember these settings and apply them to the new image as well. All you have to do is provide new images one by one and press the Save Image button each time. Repeat this process for all images you want to convert with these settings.
If you only need to convert 3-5 images with the same settings, this is a pretty decent option.
Conclusion: Enhancing Your Image Conversion Workflow
Converting HEIC to JPEG is a routine task for many iPhone users, particularly those who need their images to be compatible across various platforms. Image Convert Ninja stands out as a tool that not only handles this conversion with ease but also offers a range of features that make the process more efficient and precise.
With its ability to preview conversions in real-time, support for a wide array of formats, and user-friendly interface, Image Convert Ninja offers a solid solution for both casual users and professionals. The fact that it operates entirely on the client-side also adds a layer of privacy, ensuring your images are processed securely without leaving your device.
Whether you're dealing with a single image or need to adjust various image settings, Image Convert Ninja provides the tools necessary to achieve your desired results. However, like any tool, it's important to assess whether it meets your specific needs, especially if you frequently work with large batches of images.
Ultimately, the best tool is the one that aligns with your workflow and preferences. Image Convert Ninja is worth considering as part of your image processing toolkit, particularly if you value flexibility, privacy, and ease of use.
If you have any feedback or questions, feel free to reach out — I’m always here to help.
Share
Please share if you like it!