Gamma 2.2 in 3ds Max & V-Ray Full Guide

Feb 20, 2019 Update
Poster of the complete tutorial describing the process of how th setup gamma 2.2 correction in 3ds Max and V-Ray for photorealistic renderings workflow.
Advertisements

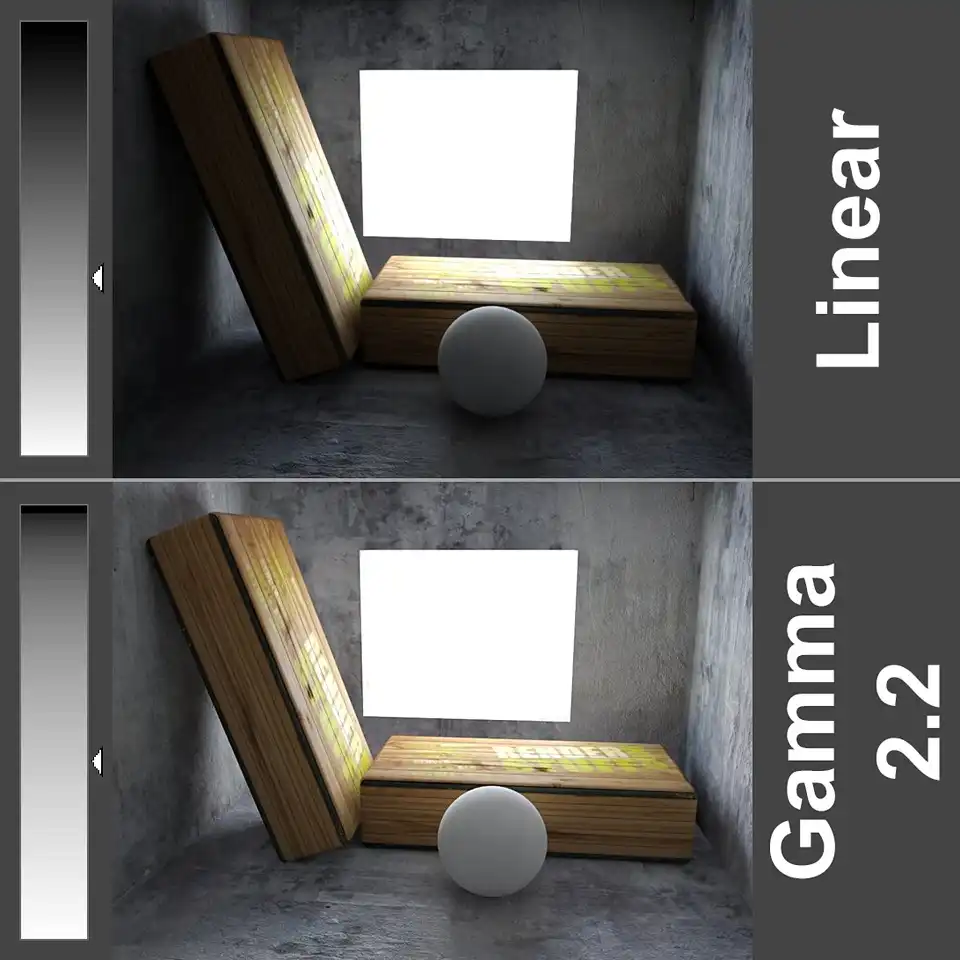
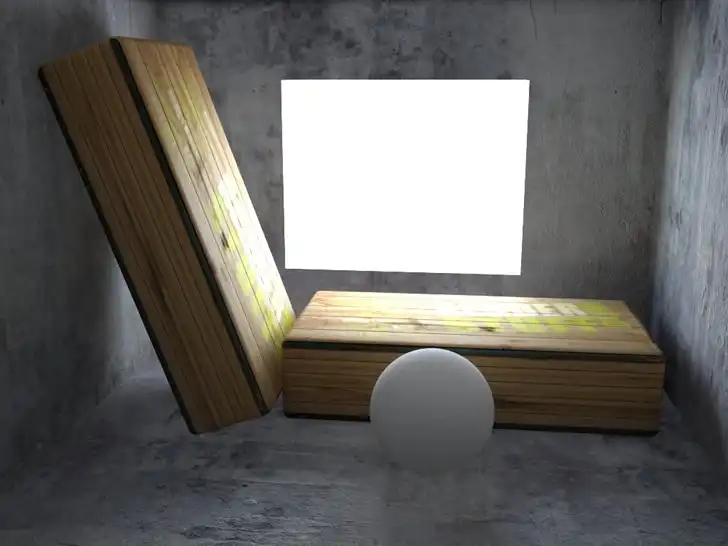
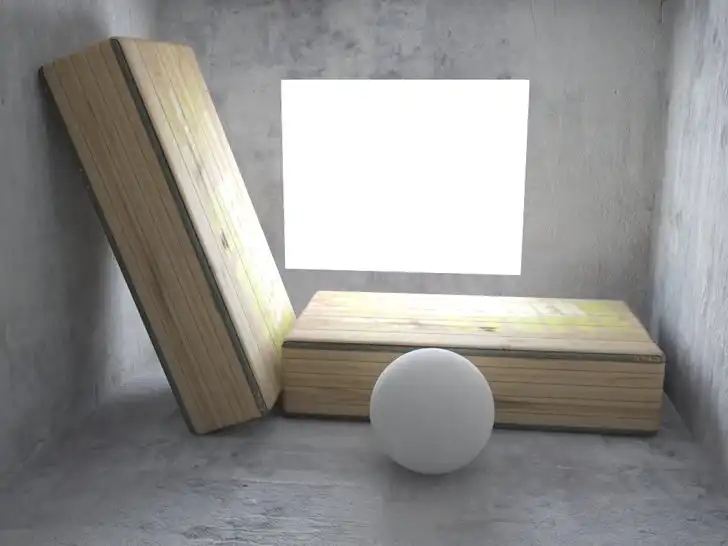
Many artists, especially those who faced the rendering of the interiors noticed that with physically correct formulation of the lights there is an overall dark-fetched result in illumination. That is noticeable in the corners and on the shadow side of objects especially.

Two wooden boxes and a sphere test scene. 3D rendering in 3ds Max and V-Ray with Gamma 1.0. The result image is dark with excessive shadows density.

Everyone tried to deal with this issue in different ways. Beginners immediately tried to correct this by simply increasing the brightness of lights.

This approach brings some results increasing the overall illumination. However, it also led to no less unlikely overbrights made by these light sources. This does not alter the situation with unrealistic image. One bug of darkness (in the hard-to-reach for light places) is replaced by another bug of overbrights (near the light sources).

Two wooden boxes and a sphere. 3D rendering in 3ds Max & V-Ray with Gamma 1.0. Lack of gamma correction compensated with excessive lighting multipliers and creates renders with over-bright spots.

Someone used more complex ways to "solve" the problem by adding extra lights, and making them not visible to the camera so dark places were simply illuminated. However, with this way no physical accuracy and realism of the image could not be considered. Along with lighting of the dark places, shadows disappeared and was the impression that the scene objects are flying in the air.

Two wooden boxes and a sphere. 3D rendering in 3ds Max & V-Ray with Gamma 1.0. The lack of gamma correction is compensated by additional ambient lighting, which washes away shadows and creates renderings of 'flying' objects.

All of the above ways of dealing with implausible darkness rather far-fetched than elegant solutions :)

The heart of the problem of dark renders is in that the image and monitor gamma values are different.

Gamma is the degree of nonlinearity of the color gradient from dark to bright values. In mathematical point of view the linear gamma value is 1.0 and this is why software such as Max, V-Ray by default performs calculations in the gamma 1.0. But the gamma 1.0 value is consistent only with the "perfect" monitor, which has a linear dependence of the display from white to black. Because there is no such monitors, the actual gamma of devices is nonlinear.

The gamma value for the video standard NTSC is 2.2. For computer displays the gamma value is typically between 1.5 and 2.0. But for convenience the nonlinearity of the color gradient on all screens is considered as 2.2.

When the monitor with gamma 2.2 shows an image with a gamma 1.0 we get dark gamma 1.0 colors instead of needed gamma 2.2 bright ones. So the middle-range colors (Zone 2) become dark when viewing the gamma 1.0 image with the gamma 2.2 output device. However, in range of dark tones (Zone 1), gamma 1.0 and 2.2 representation is quite similar, what lets to display the shadows and black colors properly.

Linear gamma gradient 1.0 and corrected gamma gradient 2.2 comparison example with zonal division.

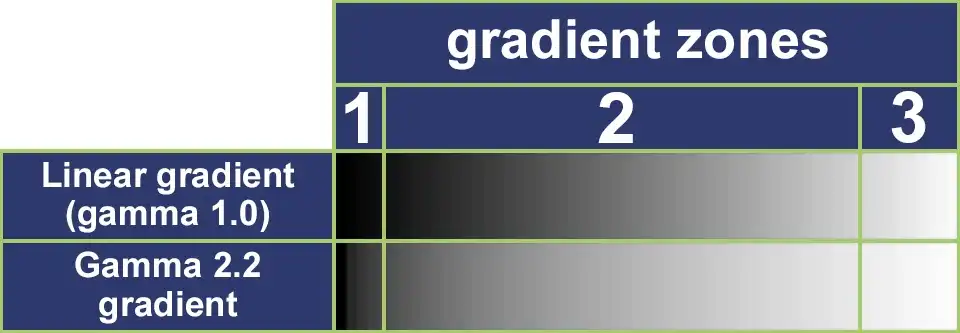
In the areas of light tones (Zone 3) there also are the great similarities. Therefore, bright gamma 1.0 image is also quite correctly displayed on the gamma 2.2 monitor.

And so, in order to get at the appropriate output in Gamma 2.2 the source image gamma should be modified. Surely this can be done in Photoshop, simply by adjusting gamma there. But each time to change the image settings, saving them to your hard disk, and editing in raster editor can hardly be called convenient. Because of that we will not consider this option, and in addition this method provides an even more significant deficiencies. Modern renderers, such as V-Ray, calculate the image adaptively, so the calculation accuracy depends on many parameters, including the light brightness in the area. Therefore, in the shadow areas image is calculated less accurately and become noisy. And in the bright and visible areas the calculation passes with more accuracy and with minimal artifacts. This allows faster renders due to the saving time on a slightly visible areas. By raising the output image gamma in Photoshop you change the brightness of those parts, which renderer considered as a less significant and reduced the quality of a calculation. Thus, all unwanted artifacts become prominent, and the picture will look awful, but more bright than before :) In addition the gamma of textures also will change and they will look pale and discolored.

The only correct way out of this situation is the changing the gamma value in which the renderer is working. That way you will get an acceptable brightness in the midtones and there will no obvious artifacts, as when changing gamma in raster editor.

We will show you how this is done in V-Ray renderer and 3ds Max.

To change the gamma in which the renderer will work with it's enough to find drop-down tab named "V-Rray: Color mapping" in the "V-Ray" tab on the "Render Scene:" (F10) window, and set the value "Gamma:" to 2.2.

Instruction of how to set gamma 2.2 V-Ray color mapping in render scene dialog of 3ds Max. V-Ray Color Mapping Gamma Value

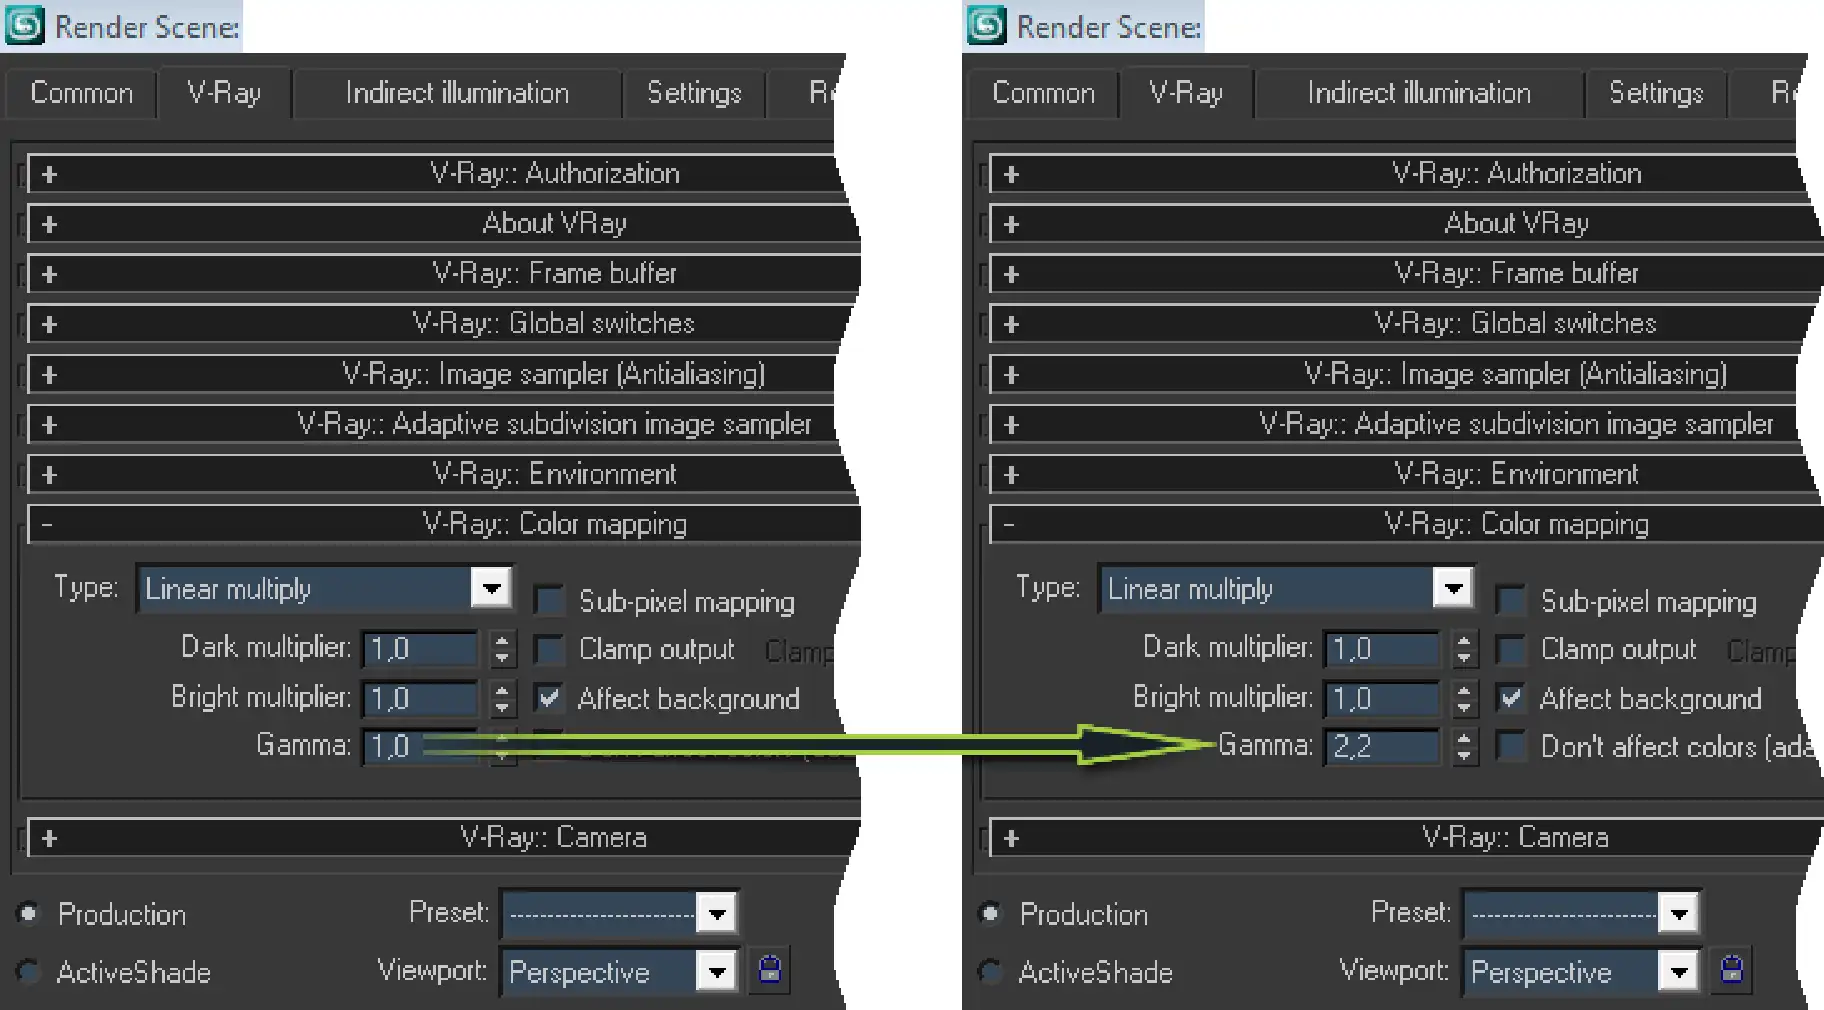
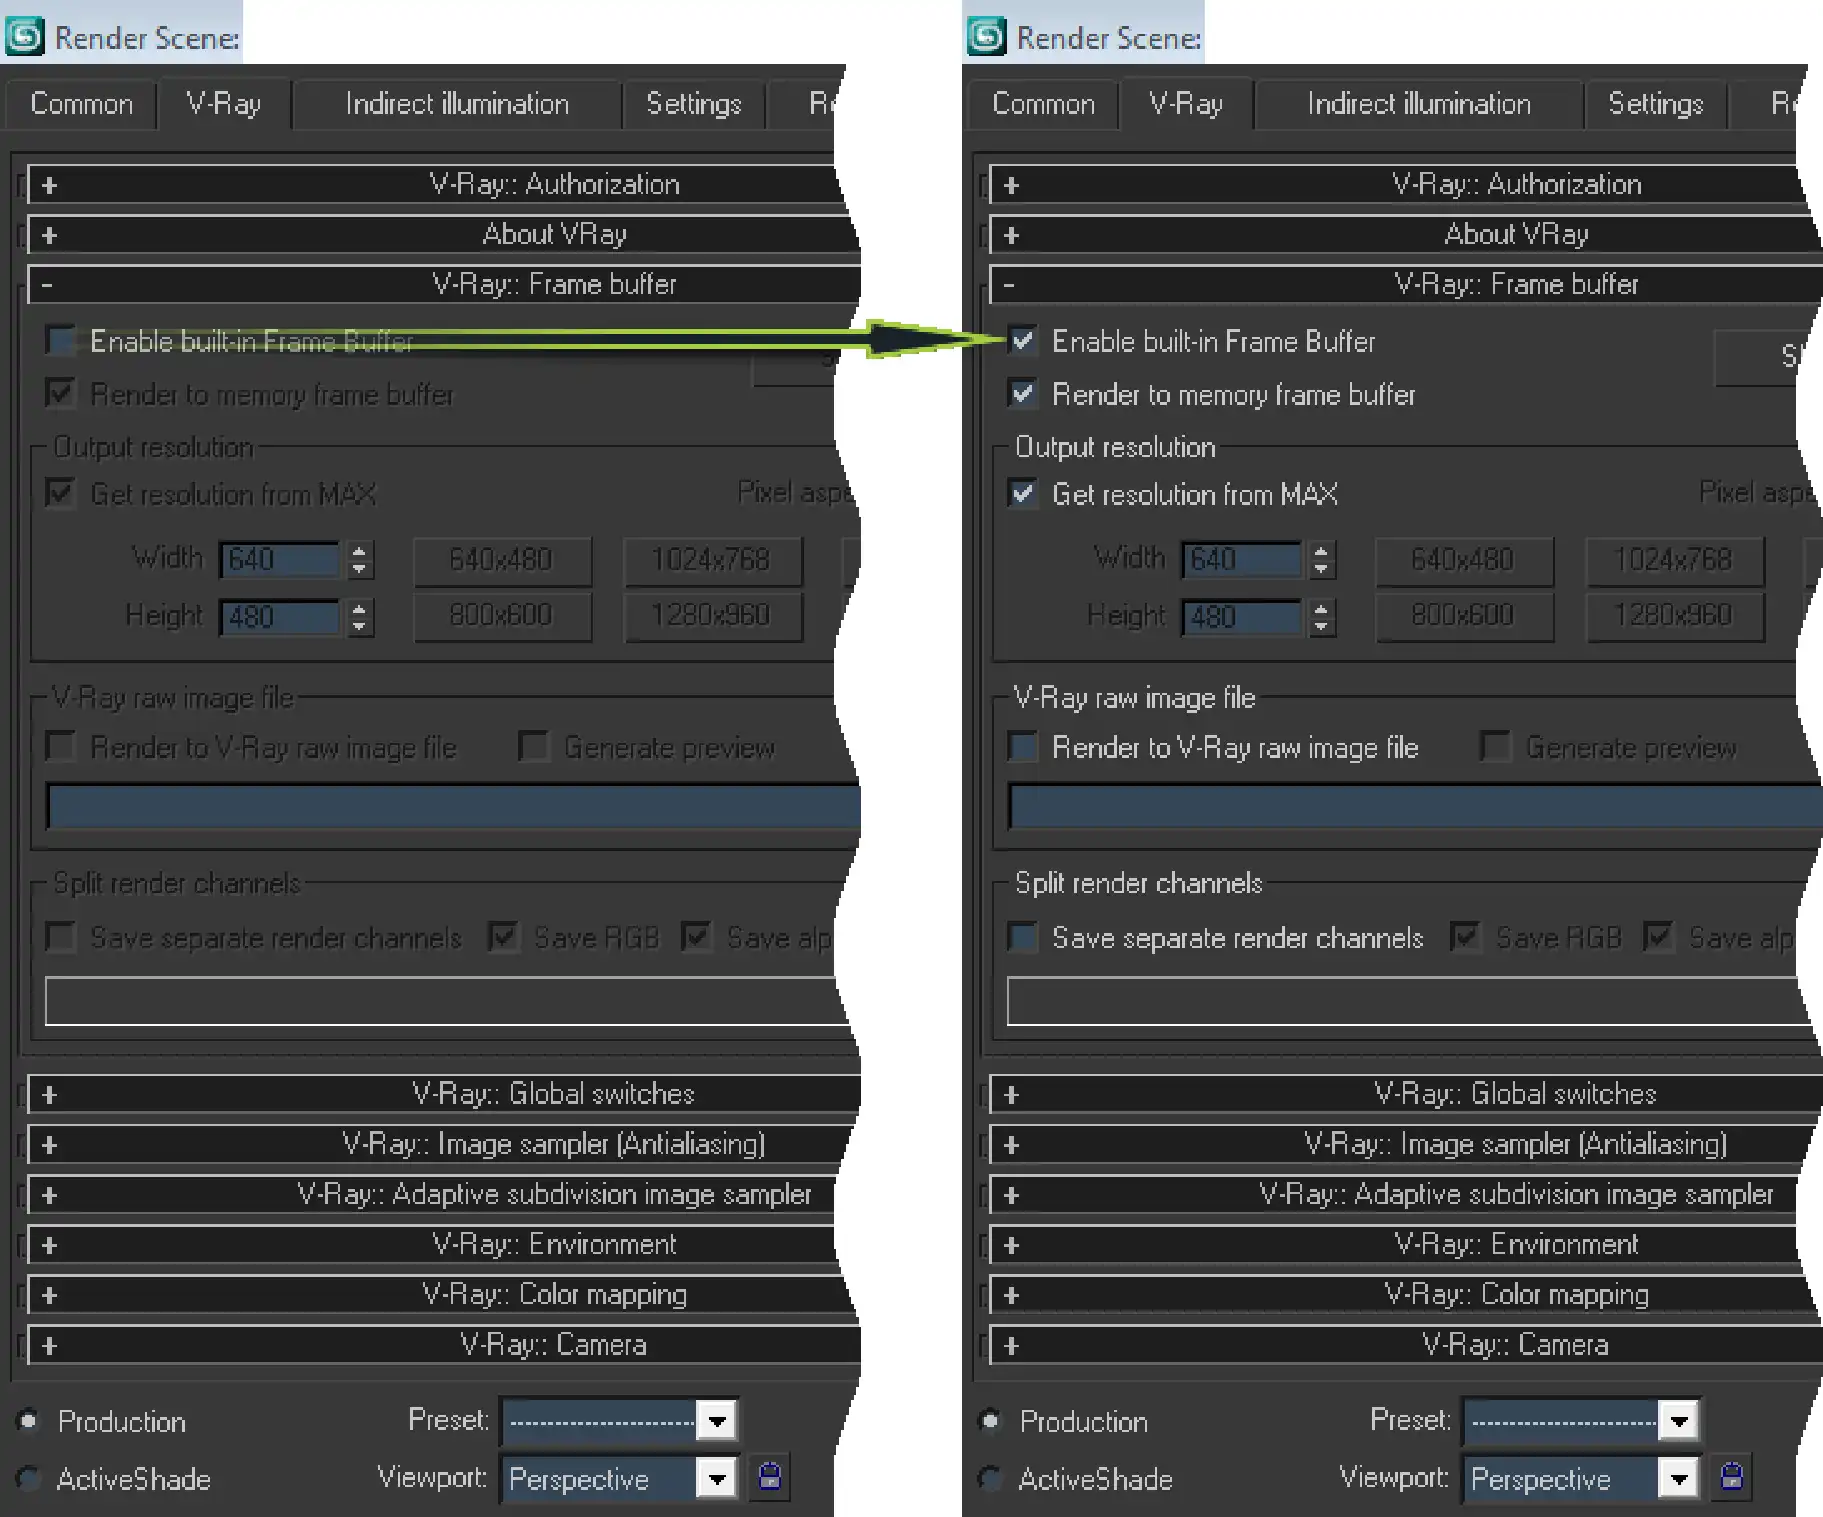
A feature of V-Ray renderer is that the color mapping gamma correction works in the V-Ray Frame buffer only, so if you want to see the results of your manipulation with gamma it is necessary to turn on frame buffer on "V-Ray: Frame buffer" in the "V-Ray" tab.

Instruction of how to Enable build-in Frame buffer of V-Ray. Screenshot of Render Scene 3ds Max dialog.

After this the resulting rendered image will be with needed gamma 2.2, with a normal lit midtones. Yet another disadvantage is that the textures which are used in the scene will be lighter and will look discolored and faded.

Two wooden boxes and a sphere scene. 3D rendering in 3ds Max & V-Ray with Gamma 2.2 but without input bitmaps correction. The shadows are great but textures is too bright.

Almost all textures we use have a normal appearance on monitor. That is because of they are already adjusted by the monitor and have a range of 2.2 initially. In order the renderer to configure a gamma 2.2, and to not to set image gamma at 2,2 × 2,2 value, textures must be in the gamma 1.0. Then, after their correction by renderer their gamma will become 2.2.

You can make all textures darker, by setting their gamma from 2.2 to 1.0 in raster editor, counting on further lightening by renderer. However, that approach would be very tedious and will require time and patience to ensure that every texture in the scene are in 1.0 gamma, and secondly it will make impossible the viewing the textures in the normal gamma because they will be shaded at that time. To avoid this, just force them to adjust the 3ds Max input. Fortunately this 3d editor has enough settings as for the gamma. Gamma settings available from 3ds Max main menu:

Customize > Preferences ... > Gamma and LUT

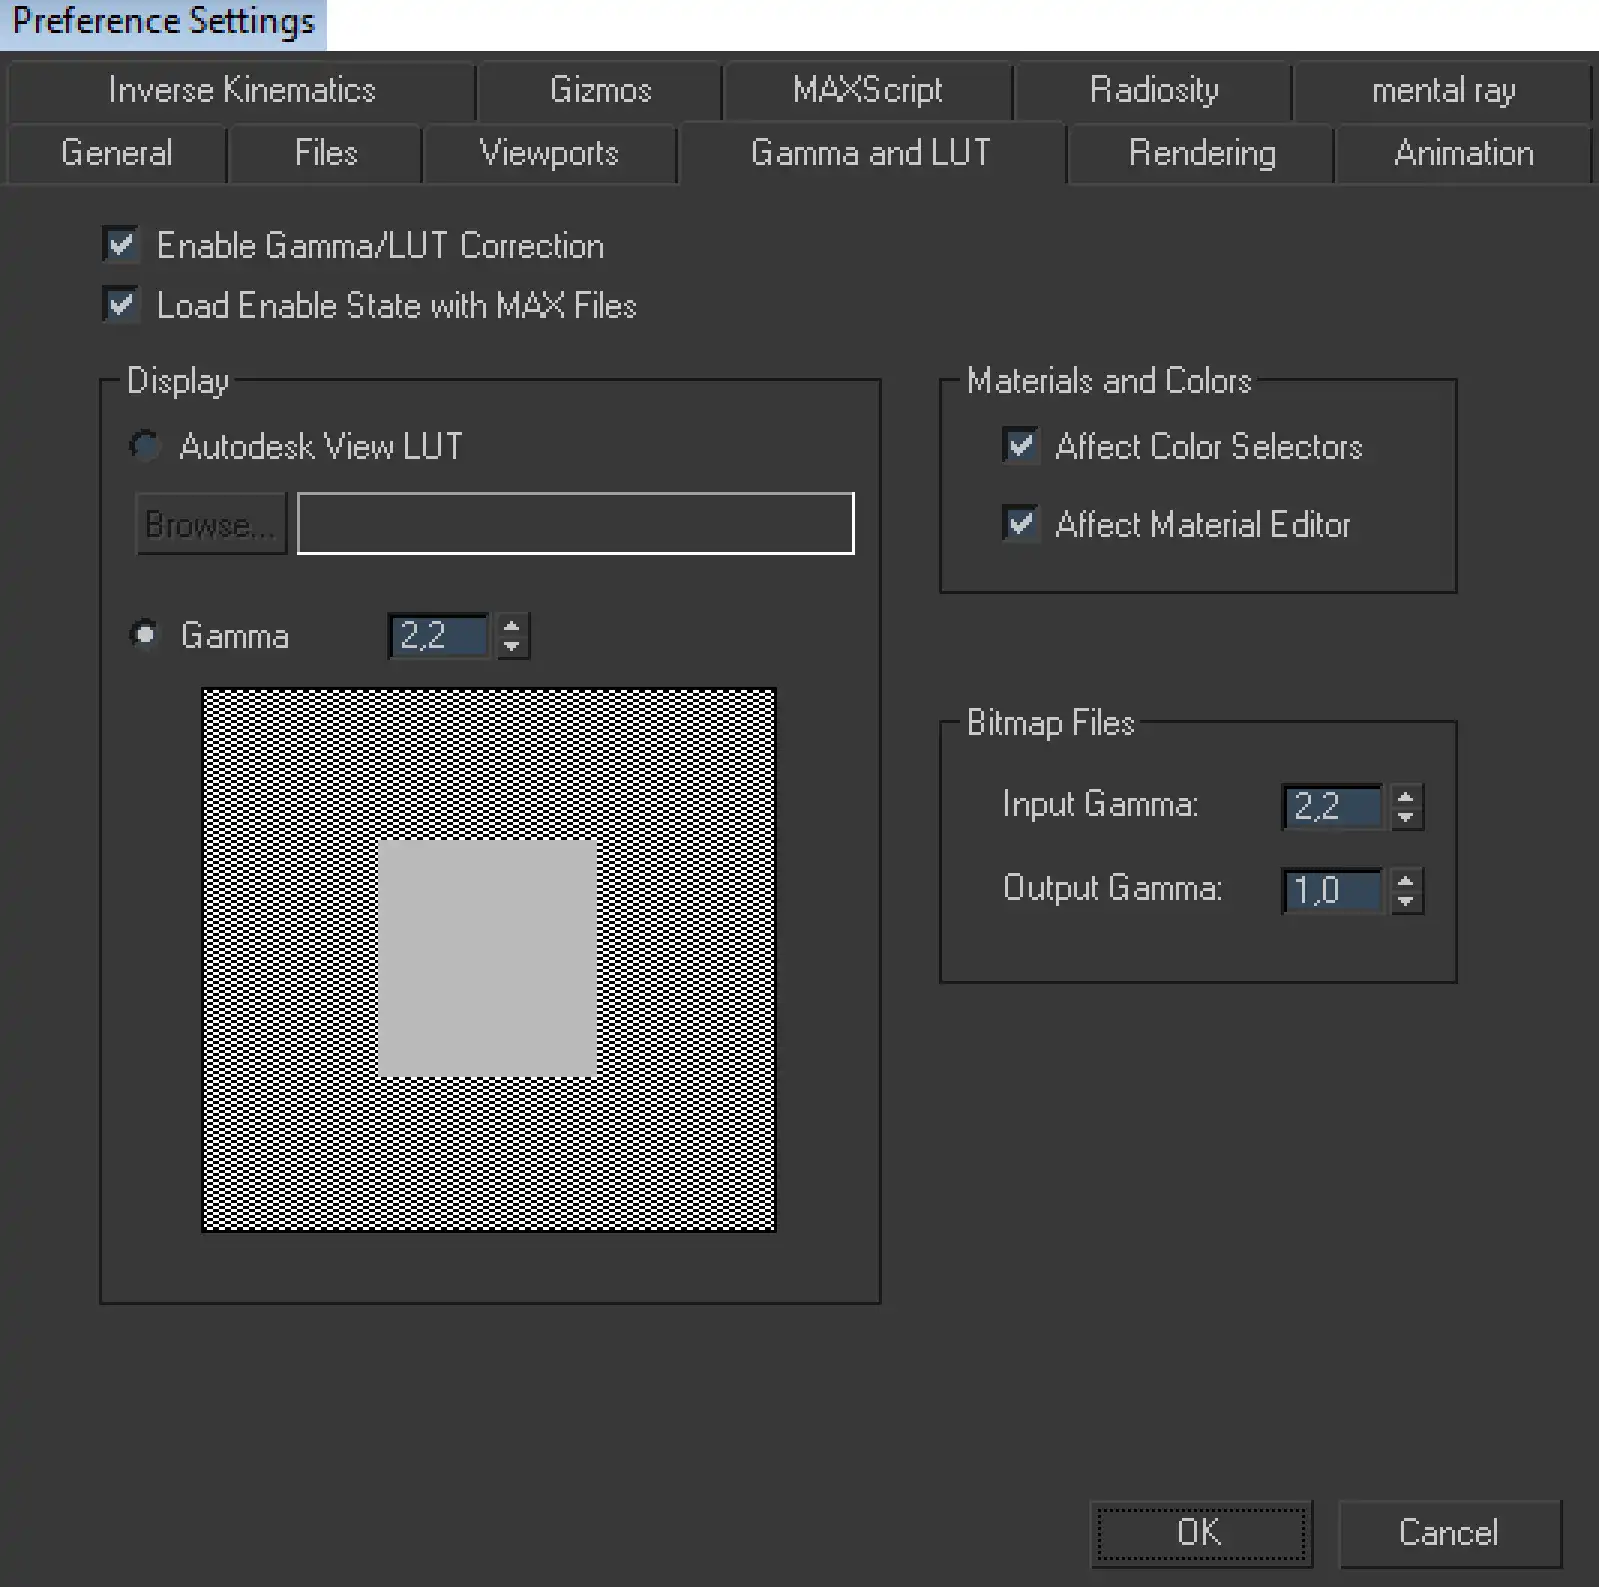
The main 3ds Max gamma settings are in the "Gamma and LUT" tab. In particular, we need input texture correction setting named "Input Gamma". We should not delude ourselves that there is a default value of 1.0. This is not the adjustment value, this is an input texture gamma value. By default it is considered that all the textures is composed in a gamma 1.0, but in reality as previously mentioned they are at gamma 2.2. And that what we must specify the 2.2 instead of 1.0 default value.

Don't forget to enable "Enable Gamma / LUT Correction" checkbox to access the gamma settings.

Two wooden boxes and a sphere test scene. Final 3D rendering in 3ds Max and V-Ray with Gamma 2.2 for both, the renderer and input bitmaps. Great photorealistic results, everything done right.

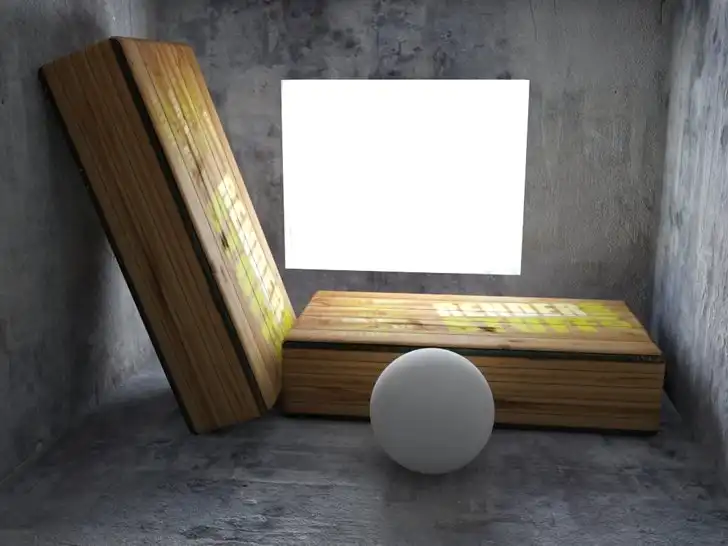
Images made with that gamma settings look much better and more correct than those that were obtained by using the settings described a little earlier. They have correct mid-tones, there are no over-brights near the lights and no artifacts in slightly lit areas. In that way textures will also be saturated and bright.

It seems that's all, but finally we would like to tell about one more thing in the work with gamma. Since the renderer operates in a unusual gamma we got to set 3ds Max display mode to gamma 2.2 for "Material Editor" and "Color Selector" colors to become correct. Otherwise there may be a confusion, as the apparent tuning of materials will be produced in gamma 1.0, but actually inside the program it will be transformed into gamma 2.2.

Linear gamma and gamma 2.2 corrected 3ds Max Color Selectors comparison screenshots.

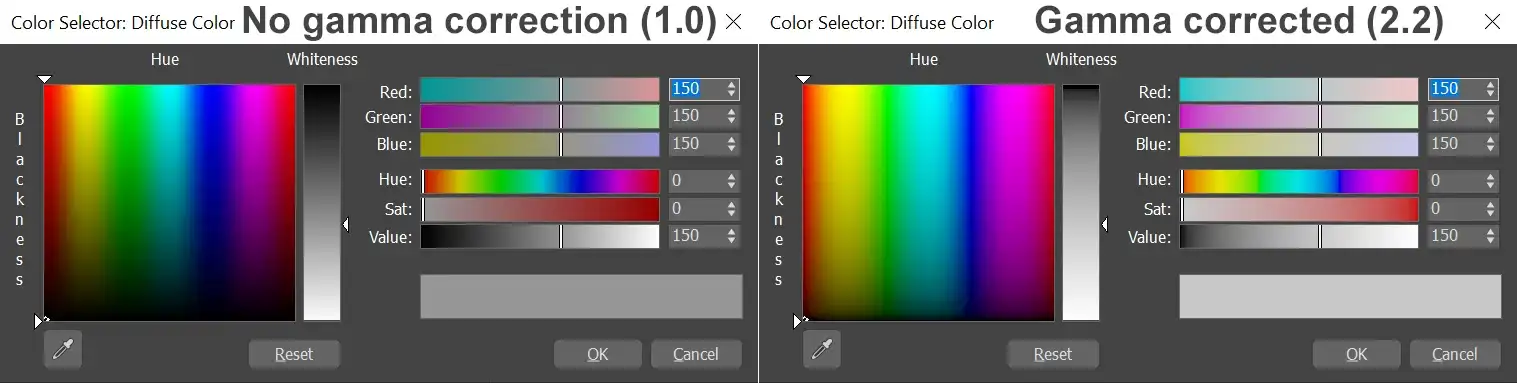
To set the correct display of materials in the "Material Editor", you should use the settings in the "Gamma and LUT" tab. For this the 2.2 value of Gamma in "Display" segment and checkboxes "Affect Color Selectors" and "Affect Material Editor" in a "Materials and Colors" segment must be set.

Screenshot of Gamma and LUT tab in 3ds Max Preference Settings window with right gamma 2.2 setups for Gamma, Input Gamma and Output Gamma.

Gamma 2.2 has become the standard for many 3d professionals working with 3ds Max and V-Ray. We hope that this lesson will help you to correctly configure your workflow in 3d!

Advertisements
Comments
Tony
Feb 22, 2010
Perfectly! I use this every day. Initially, stuck on the frame buffer enabling, but then quickly understood whats wrong. Anyway, the tutorial is great! Thanks!
ashrul
Mar 24, 2010
great! thanks for the tips! rendering will be more fun after this!! heh..heh
alludin
Mar 30, 2010
Super useful tutorial
Dimon
Jun 8, 2010
The tutorial is superb, I would say this is not even a tutorial, but rather the guide or textbook. I saw a copy-paste of this tutorial in many places on other web sites. You guys are just great. Guru!
San
Jun 9, 2010
The tutorial is cool. For a long time, I didn't want to change my workflow from Gamma 1, but you convinced me, and I don't regret it a bit. Thanks!
ajith
Jun 21, 2010
Thanks a lot i was searching for this.
ajith
Jun 21, 2010
is there any chance to get render elements with these settings? because when frame buffer is on the render elements doesn't work for some reason
RenderStuff
Jun 21, 2010
Hi ajith, The 3ds max duplicates the render elements to separate windows as rendering process ends when you render to a standard Frame Buffer. But, when you render using V-Ray Frame Buffer, all chosen elements already are in the V-Ray Frame Buffer single window. They are available by the selecting in a drop-down list in the left upper corner. The RGB color is the default option. Just pick the needed render element from that list and save it just like you do it with the RGB color rendering by clicking floppy disc icon.
ruls
Aug 20, 2010
i tried this way already..and the results looks so weired...my object looks like floating...
RenderStuff
Aug 21, 2010
Hi ruls, the so called flying chairs effect is a result of an insufficient contrast of the shadows or too lightened shadows. It shows up mostly in well lit areas with small details that must cast shadows. Usually this flying effect arises because of the excessive brightness of an ambient lighting or, if you use V-Ray renderer, because of low quality setup of an Irradiance Map. To get rid off this shadowless effect, you need to lower the brightness of a filling/ additional lights and rise the setups of a secondary illumination, increasing the GI maps quality. Also, this like effect can appear if you have a incorrectly set gamma value of the input texture. For example, if the 3ds Max and V-Rays gamma value is 1.0 when the gamma of the input bitmaps gamma set as 2.2. Make sure that those gamma values both are identical. For this check if you setups of the gamma values correspond the ones in the final part of this tutorial.
bora
Aug 26, 2010
i used to input 2.2 for the output gamma option aswell and everything was very bright and faded. now it is correct as i inut gamma 1.0 for the "output gamma" however , i think i still have a problem about texture baking as it ignores my settings thus over gamma-ing the autosaved image(the lightmap for example).to overcome this, i have to manually save the image by pressing the "floppy" icon in 3dsmax. so atlast a real question to you: as for the 3dsmax 2009 versions and above, is it still a good idea to use color correct plugin's gamma adjustment for defining the texture's gamma to 2.2 ?
RenderStuff
Aug 27, 2010
Hi bora, there are known bugs in the autosaved rendering to texture images. Using manual saving is a preferred way. We believe that using color correct plugin for local changing of a textures gamma value is a bad idea at all. This is a complex way and it is better to globally change the overall input gamma in the Gamma and LUT tab of the 3ds Max preferences.
aqther
Sep 3, 2010
whoa!! its amazing.. just the low quality renders look so beautiful.. thanks a lot, you rock!!
Max
Sep 6, 2010
Thank you for enlightening me!
Adanedhel
Nov 20, 2010
great mate. really good way of making better images. always had to do lot of differnet things (adding lights, playing with vray camera settings!!!!!, changing brightness of main lights) to get such a nice effect and now i can have it only by changing few things. thx and keep making new tuts :P we need them . cheers
enot-poloskun
Nov 20, 2010
Very reasonable and easy to understand tutorial. Thank you
Andrew
Nov 27, 2010
Why when I save and view an image, it appears very light ... awfully bright???
RenderStuff
Nov 27, 2010
Andrew, because you do not correctly set the gamma correction. Just follow the lesson and one to one set all checkboxes as on screen. After completing all of the recommendations of the lesson, you are guaranteed to get the correct result. Also make sure that when you save the rendering to a raster format, you can not substitute the gamma value of the stored image, see Gamma Browse Images for Output dialog box.
Nadezhda
Dec 11, 2010
Thank you so much for this web resource. very useful tutorial. all essentially without water and most importantly, with a reasonable explanation. life with gamma 2.2 become easier :)
hudruk
Dec 13, 2010
Is a standard camera used in the scene?
RenderStuff
Dec 13, 2010
hudruk, gamma is an independent parameter indicating the degree of tone correction input or output image and has no relation to the camera. Not to be confused with the gamma correction by changing the exposure Shutter speed, f-number, and Film speed (ISO). It is possible to use a camera that is more convenient in a particular situation;)
hudruk
Dec 13, 2010
In what situations is it better to use a standard camera over vray camera?
RenderStuff
Dec 13, 2010
hudruk, about the situations in which you should use VRayPhysicalCamera, and in which 3ds Max Standard Camera, read the lesson on replacing VRayPhysicalCamera standard , it is just on the topic of your question;)
Md. Ehsanul Islam
Jan 17, 2011
this is absolutely amazing tutorial ...
Rafael
Feb 4, 2011
Hi. I've read the tutorial and adjusted my 3ds Max and Vray settings accordingly. But when I rendered, the results were still faded textures, even when I adjusted the Bitmap Input to 2.2. So I went back to the Vray settings and checked the "Don't affect colors (adaptation only)" setting. And when I rendered the colors are what I wanted, full and lush. Oddly, when I set the Vray Color mapping back to 1.0 and unchecked the "don't affect colors" option, the results were unchanged.
RenderStuff
Feb 5, 2011
Hi Rafael, if it is difficult to follow all the setups in this big tutorial, please look at it's shortened version with exact instructions for gamma 3ds max & vray settings. Just follow the all instructions there and set all the checkboxes in the exact succession, as the screengrabs show. Also, do not forget that all manipulations with gamma values in V-Ray: Color mapping will be seen in V-Ray Frame Buffer only ;) To have correct gamma correction, the Don't affect colors (adaptation only) function shouldn't be enabled, more on this subject read at Best Vray settings Color mapping.
Елена
Feb 11, 2011
and I have the opposite with these nastroykamim scene became oversaturated and very bright, which is not ????
RenderStuff
Feb 11, 2011
Elena, see question # 435 Andrew . Perhaps the answer to it will help you. See also hint Quick Setup Gamma 2.2 in the Max 3ds , certainly for him will be easier for you to just repeat all the settings and get a great result.
d252
Mar 4, 2011
As I understand when working with gamma 2.2 all materials with no textures, will have to appoint vrayColor canal diffuse? settings VrayColor have gamma correction to the drop-down list None, Specify, 3dsmax. tell me that the right to choose? And one more question: In the settings of Gamma and LUT I put value Output Gamma should be equal to 2.2 or 1.0 should be left as in your example?
RenderStuff
Mar 5, 2011
When working with gamma, do not perform any tricks with parametric color palettes in the material editor. Even adjusted gradient allows without any problems customize any desired color on the material. Working in a linear and in a different setting will only complicate the configuration process. Lesson describes the exact configuration workflow with a gamma of 2.2, for a nominally correct operation, no adjustment should be made not by yourself. Input Gamma - this parameter is not literally correct incoming textures. He points to the renderer, which is part of the gamma texture. As described in the article, all the textures that you see on the screen in normal brightness (not dark), and have already adjusted the gamma 2.2. That is what should be reported renderer to produce correct results. Output Gamma - setting, literally pointing to the renderer, whether correct the final image should be when it is saved. The value of this parameter equal to one means that no correction will be performed. That is, you need to keep the final render as he is. This is different from the unit, making the correction in the gamma correction of the final rendering, while maintaining. When the right workflow, you should not make any correction. In this case it is already introduced at the rendering stage. In fact, as the whole theory of the gamma correction, it seems a bit confusing, but if you vniknesh, make sure you understand everything;)
Борис
Apr 27, 2011
Good morning, please tell me how to set up 3d max work time rendering 30-40 minutes away where there is a "bucket" how to configure it? Thank you.
RenderStuff
Apr 28, 2011
We understand that your question goes beyond the lesson on setting up a gamma of 2.2. You should find a more suitable topic CG discussions . For example, to create a new topic in the section of questions on 3ds Max. Just be kind, set out in more detail the subject matter and the problems that you need to solve. In particular, do not use any of the terms just outlined in your own words that you do not get, and what exactly you want to achieve.
mOPs
Apr 28, 2011
: D correct placement of punctuation marks can not only help correctly interpret the question, but in some cases radically change the nature of the proposal. For example, as in the old fairy tale "Eats, Blogs" So guys, respect yourself and read your questions :) Please take a moment of time and re-read what you have written before pressing the buttons "add" :) Sorry for offtopic, I mania on these things, I can not put "my 5 cents" when such a notice ...
denny
Jun 27, 2011
Hey. I want to ask, is it normal when the final image is necessary to keep the range of 2.2 prescribing? At default settings it leaves too dark.
RenderStuff
Jun 27, 2011
Of course not. Carefully read the whole lesson and repeat all the settings one-to-one. You can even check with the gamma settings 2.2 in the Max 3ds . They collected all screenshots with the correct settings. If you repeat everything exactly as described in these lessons, 3ds Max will remain exactly the same image that you see on a display in a frame buffer. The same, read the comments on these lessons. There we have already discussed in detail a similar situation;)
denny
Jun 28, 2011
Yes gamma setting of 2.2 I have long standing, and this did not exist before. The very surprised, but if Save Image not to scale in the Override check and register 2.2 - it is preserved dark ... maybe the SP4A to VRay?
RenderStuff
Jun 28, 2011
Shows all the settings. Spread skninshoty settings. In particular, all the windows and scrolls trough described in the lesson about the gamma of 2.2. Then we can say for sure is the rub;)
denny
Jun 28, 2011
and how to upload images here ?!
RenderStuff
Jun 28, 2011
denny
Jun 29, 2011
greeting. Here's how it looks: if it is to keep the default. this is a normal image, but with the Manual prescribed range. This setting is not shown at all - by default.
RenderStuff
Jun 29, 2011
Prezaley settings, for example, here: http://piccy.info/. The fact that you are now filled with a resize to 600 pixels ... it is not readable. Just out with ALL THREE srinshota are responsible for the range. Other settings are not necessary. Here is a closer look this lesson: http://renderstuff.com/gamma-2-setup-3dsmax-vray-tutorial-45/, there are screenshots only necessary adjustments, that meet and influence the range. Other parameters of the renderer is not necessary. They do not affect the value of gamma. Pay attention ;)
denny
Jun 29, 2011
Settings screens:
RenderStuff
Jun 30, 2011
Now all you put right. You should now save as expected;) If not, the last thing you should check is in what format you save and what options you set when you save. Nominally, the right to maintain a raster 16 or 8-bit format. For example, in given a 16 bit png. If this does not adjusting it while storing and preserving as is. But this is hardly necessary, because if you are now rendered with these default settings will not go back. Yes, and a check mark "Linear workflow", about which you asked in the lesson about the optimal settings-Ray the V , you also do not need. You can disable it.
denny
Jun 30, 2011
these settings I have the original))) for the first rendering, with a long time))). And about the save format is you surely noticed, in HDRI all without any problems, you need to manually put gamut while maintaining to JPEG. Maybe it's the iron?
RenderStuff
Jun 30, 2011
Hardly in the gland. Yes, of course HDRI. There you you adjust itself, as needed. Very strange, you have all the settings correct. Everything must be maintained as it should be. But if so, then there is another option. Then force the 3ds Max retain gamma correction. For this purpose, Gamma and LUT, in the Bitmap section, replace the value of Output Gamma. Now you have is 1.0, and you replace it with 2.2. Then, by default max will do gamma correction while maintaining the raster files. Essentially the same thing as you do, enter the value manually, when saved in jpg. It's certainly not a way to rational, but still way out :) Although we would not greatly upset this "bug". We always maintain a nominally renders in .hdr format: D
denny
Jun 30, 2011
may be because of the iron, because monitor gamma of 1.7; range video card generally 1.0; and 2.2 in max. Another question on the scale, I read somewhere that in difuz.svoystvah material, if only the color you need to put it through ColorCorrect card and that it put color and prescribe the appropriate range (in this case 2.2), in addition to pure colors ( 255; 255; 2555-255, 0, 0-, etc.). Do I need it or a waste of time?
RenderStuff
Jun 30, 2011
5 years ago, a gamma correction in 3d there was no question, and all worked without it. Here 3d artists accustomed to working without gamma correction, are used to working with a linear gradient in which a white to black gradient gray distributed completely linear. With gamma correction, gray gradient linearity moves (this is the essence of the gamma correction). In particular, when the gamma 2.2, gradient gray strongly shifted towards black. The result is that the gradient in bright colors, detailed and smooth, and in the dark - sharp. So accustomed to the linear gradient Wieser came into confusion. How can "smoothly" to choose the exact color in a dark environment, if it is strongly narrowed? Therefore, they are by habit began to invent different ways to "exact" color settings in the dark band that, as it seemed to them to return the precision and flexibility of the color settings. The essence of this method is that the 2%0s using a color sample ColorCorrect plug-in, set the "exact" color and then adjust it in the same place, under the required value range. But 3d render beauty and photorealism pictures, this is only an illusion graphics and everything that is done in 3d visualization is done by eye. There is absolutely no need for the exact color you specify. Not only accurate in relation to what? Therefore, the "waste of time" is an understatement for this approach. A little different situation when it comes to converting material configured without gamma correction, in a scene from the gamma correction. There is a certain sense to take color samples configured in a linear gradient and convert to the gamma value of the current scene. But in practice it is more convenient and faster again slider pull eye color, rather than a substitute for the color sample by putting a plug into it. And here again we return to the tick "Linear workflow" :) So yese no bother with this method. Do everything in the workspace in which you work with the current scene.
Andrew
Jul 5, 2011
Thank you for the lesson . Explain please: 1. referring to the scheme which is the usual gamut of picture, given that the color of the photographed her laminate identical to the real color of the laminate to sell in the store. 2.
The problem lies in the dark renders unequal gamma values ​​of the image in the monitor and on which its browsing.
and if the print image is counted in the range of 1.0 3Dmax on paper what a gamma work, the exact same as in the photo that we introduced in max? if yes then it turns out that changing the range from 1.0 to 2.2 for a correct image on the monitor, "which is not ideal," we will get when you print the image does not correspond to the original photos? explain please =)
Andrew
Jul 5, 2011
And if you can here is the question: RAM Plaer window does not respond to changes in scale !!! ie render with a light floor casting in RAM Plaer it displays it as a light, then the range of changing the render - rendering dark floor turns into RAM Plaer to another channel and then again throw light both on the last picture ... It RAM Plaer not configured or glitch Max?
RenderStuff
Jul 6, 2011
Andrew, which would not have been correct in the video signal transmission chain, the result must always correspond to photographs, and it corresponds to the original image. It is impossible to talk about the gamma correction, taking into account only the original result. "Gamma" exists only inside the chain. This applies both to print the photographed images and generated by renderer. Printing equipment / software, of course, allows for gamma correction, initially applied to all graphic formats in one form or another, and at one stage corrects your work, allowing you to output the correct gradient. Thus, the monitor image to be printed match in terms of the linearity gradient. Regarding the RAM Player, then, unfortunately, the results of changes in the gamma correction value in V-Ray, right displayed only in V-Ray Frame Buffer. RAM Player is a tool originally built in 3ds Max and of course based on a built-in frame buffer maksovskom that with V-Ray does not work properly *PARDON*
denny
Jul 6, 2011
greeting. not just seen that when installing scales in the Customize-Preference Settings- Bitmap Files Output Gamma value of 2.2 is also put ... this is an error, or some other approach?
RenderStuff
Jul 6, 2011
Hello! If the question is whether there are unusual situations when it is necessary to carry out gamma correction while maintaining the image, already computed with gamma correction, we have just considered such a situation. Your situation :) If the question is how to correctly adjust the nominal range with V-Ray and 3ds Max, that is true exactly as described in this lesson.
Andrew
Jul 29, 2011
OK ! Thank you for the clarification! =)
Martin
Nov 15, 2011
Hi, great tutorial! Explained exactly what needed and easy to follow! Many thanks!
Игорян
Dec 15, 2011
Guys thank you for the lesson of the past, a couple of times tried rendernut a couple of pictures with a range of 2.2, the result is not like (very Exposed visas have turned out.) I threw this thing came back to the old settings with which my grandfather still render with range of 1.0: D And it turned out I I am not configured correctly Now all class all the best to you :)
Brad Aliff
May 17, 2012
Just great! Thanks for the tips! Brad Aliff
swaoamit
Oct 27, 2013
Hi, Very good article and excellent website. The question - If anyone obsessed for particular color/RGB value to use, how can we approach for it? i.e. R250, G90, B20 in Gamma 1.0 so what will be in Gamma 2.2 ? I read somewhere, that we can use VRayColor Map for it, is it right? Thanks !
wonder
Dec 27, 2013
how about 3dsmax 2014, do i need to set gamma 2.2 for input&output or leave it so confuse! :|
Maks (RenderStuff)
Dec 28, 2013
For manual conversion of the material tuned for Gamma 1.0 workflow to the Gamma 2.2 workflow one needs to apply reverse gamma correction by using ColorCorrect, which was popular in the previous 3ds Max versions. It has exact setting named Gamma. But if you making new materials, they will be exactly as you set them. Talking about 3ds max 2014, it is better to use the workflow (= gamma settings) proposed by default without any corrections. It is more correct from the theoretical point of view. For those who prefers the old-school gamma approach, there is a way by using little script: http://www.cg-blog.com/index.php/2013/06/08/gamma10-max2014.htm
This discussion has been closed.