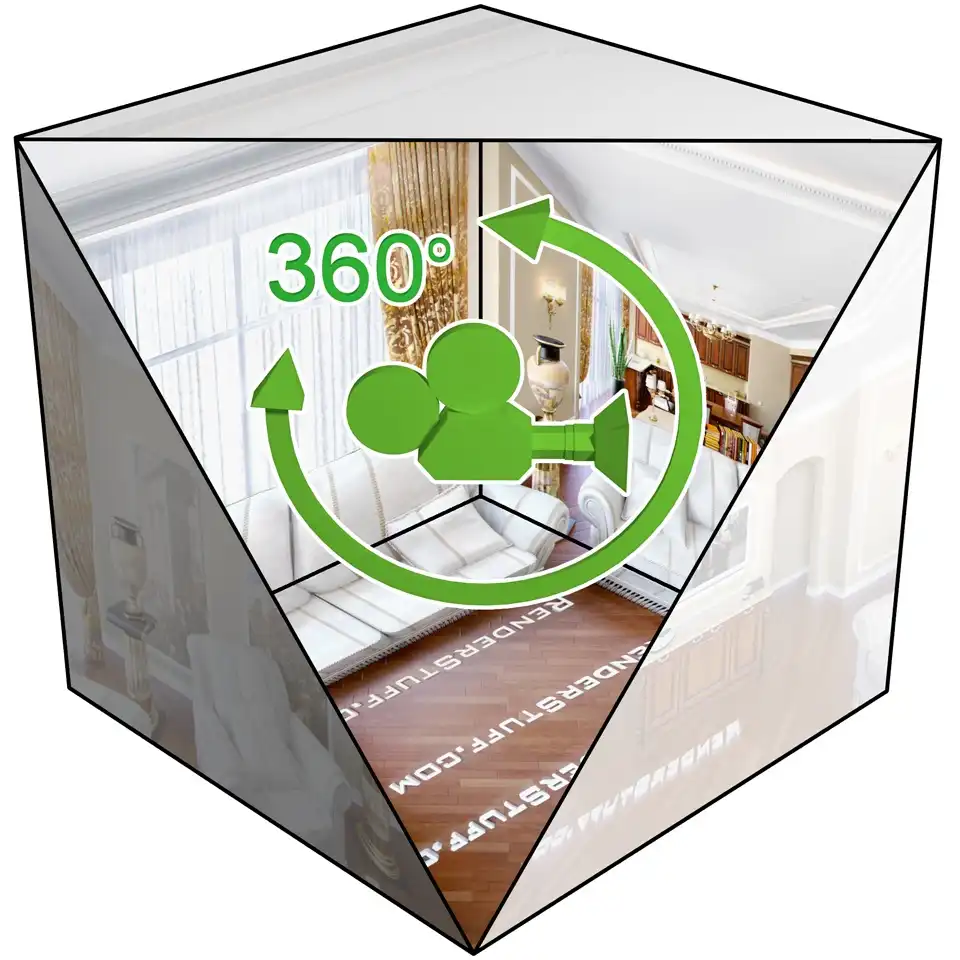
Rendering 360° Panorama Complete Guide
How to create so-called equirectangular or simply the spherical interactive 360 panoramas using 3ds Max and V-Ray. How to render, assemble and view them later. If you use other 3D rendering software, such as Blender, Cinema 4D, Maya, SketchUp or even CAD, this tutorial will still be useful to you, as 3ds Max is used as an example and the methodology for rendering and assembling a spherical panoramas is quite universal.
This tutorial was originally written in 2010. In the current update, some sections have received minor changes to be relevant for today. The 3ds Max and V-Ray versions have not been updated, as nothing has changed in this area for 10 years, so these settings are still relevant and have remained unchanged since the original tutorial. The biggest update is in the section that describes panorama viewers. Back then, interactive panoramas weren't exactly a new concept, but there weren't as many software options to choose from as there are now.
According to the original approach, after you have rendered the panoramic image, you run stand-alone program (Pano2QTVR from Garden Gnome) that use QuickTime codecs to create a panorama and generate a file in Adobe Flash format. Then the *.swf file is ready, you open them in a browser and interact with the ready-made panorama. There's nothing wrong with this approach other than having to generate panoramas from additional application, but the real problem is that the Adobe Flash is officially becoming a banned format for major browsers due to security policies and performance requirements.
That's why section that describes how to view panoramas was really needed a new breath and got it as the 360° Panorama Web Viewer tool. At the moment, this is the easiest way to view panoramas without any additional applications. Just a panoramic image that you rendered, and a modern web browser that you certainly have already installed on your system.
To know more, welcome to read this renovated tutorial!
Contents
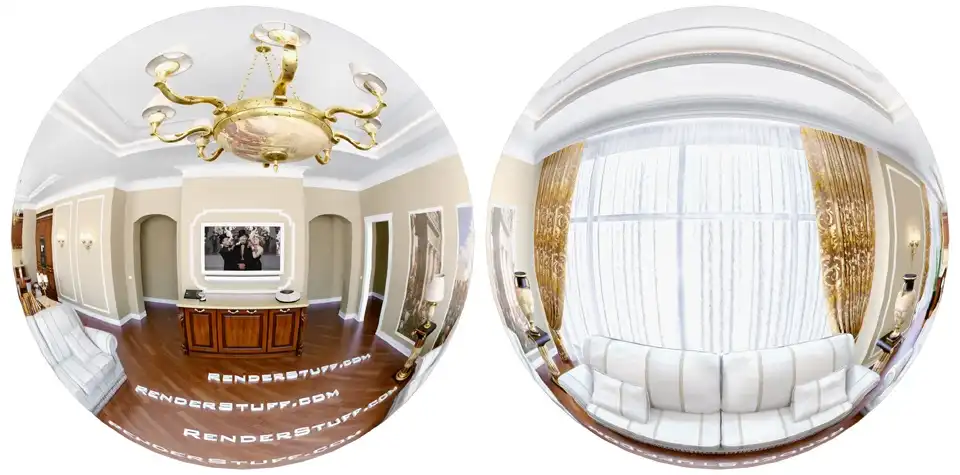
Spherical 360° Panorama Live Example
Why to Use 360° Panoramas
Hope you enjoy playing with interactive 360 panorama above. And now let's dive into technology details.
Many of you already know how important photorealistic 3D visualization is and its role in visual presentation of ideas, especially in the field of interior design. Nice photorealistic renders are very representative by themselves. It's like real a photos from a future of non-existent objects. Nonetheless, even a set of really photorealistic static images showing an object from different angles, can be not enough to present a complete picture of the idea due to the lack of interactivity. This is definitely because not many people can imagine themselves inside a picture just by looking at it. In human nature, it is much easier to perceive interactive and moving images as reflecting true reality than static ones.
And this is where the interactive 360 panoramas come into play to shine!
Of course, an interactive panorama that allows to the viewer to look around, only from a static point of view, is not fully interactive, such as interior scenes created with the Unreal Engine, for example. In such scenes, you can really not only look around 360 degrees (including immersive 360° VR), but also literally move anywhere within certain boundaries of the scene.
On the other hand, if you're an well-formed professional with experience in, say, 3ds Max, you probably wouldn't want to spend a year mastering a new 3d package (Unreal, Unity, whatever...), just to cover some cases where static images aren't quite enough to present an idea.
The second con is that interactive engines do not provide effective 3D modeling and texturing tools, and you still need to model and assemble the scene in your native 3D modeling software. In the essence, you are modeling and texturing all the objects of the scene, lets say of interior, from the walls to the furniture, and then export them as 3d assets to a real-time engine. And only then, using a real-time engine toolkit, you start to adjusting lighting, customizing materials, and compiling an executable file with a built-in viewer to present your scene to the consumer (client, employer, etc.) in full 3D. This process requires much more time and effort than just doing everything you need in your native 3D program and then simply "hitting the render button".
Thus, interactive panorama is easy and fast way to fill 2d images with additional sense of presence and volume with almost the same effort that required for a usual static visualizations. It only takes a few extra steps. So read this tutorial further to find out exactly what these steps are.
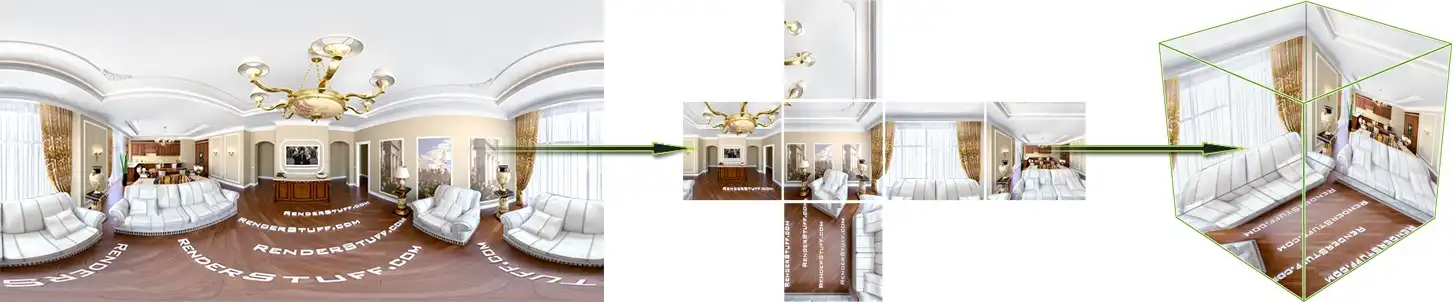
Cubic Panorama
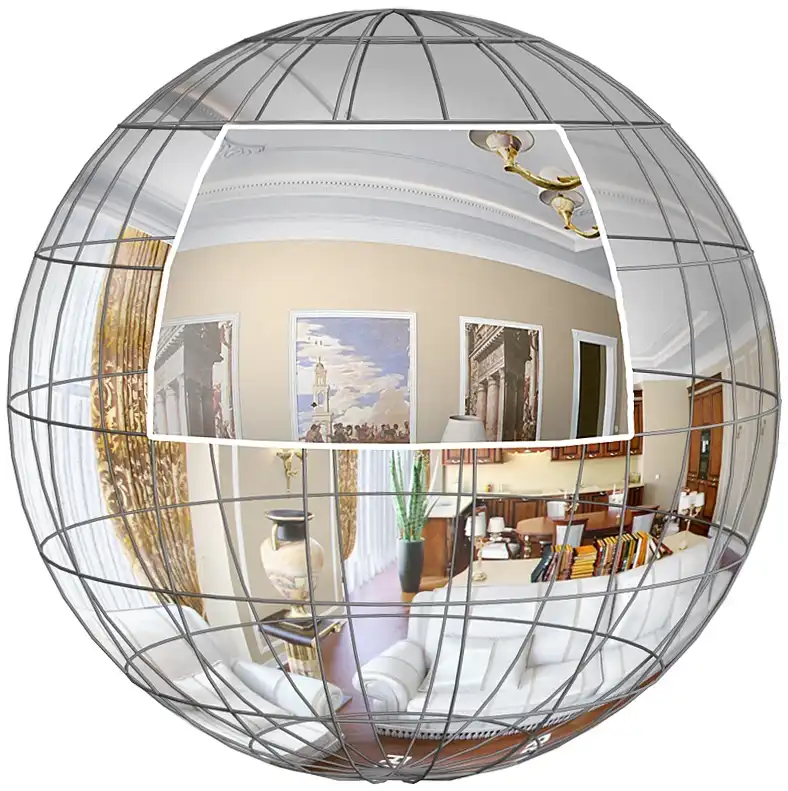
The easiest way to understand what Panorama 360 technology is and how it works is to imagine a cube with photos of the interior applied as a self-luminous texture on each of its faces. Photo of the ceiling on top, photo of the floor on a bottom, photos of a walls and furniture on a front, back, left and right faces respectively. And now imagine yourself standing inside this cube in one place, not moving, but turning your head and looking around. What you will see will be the interior around you. And that's how interactive panorama technology really works. It is a cube, with applied textures, and the camera inside strictly centered in the middle.
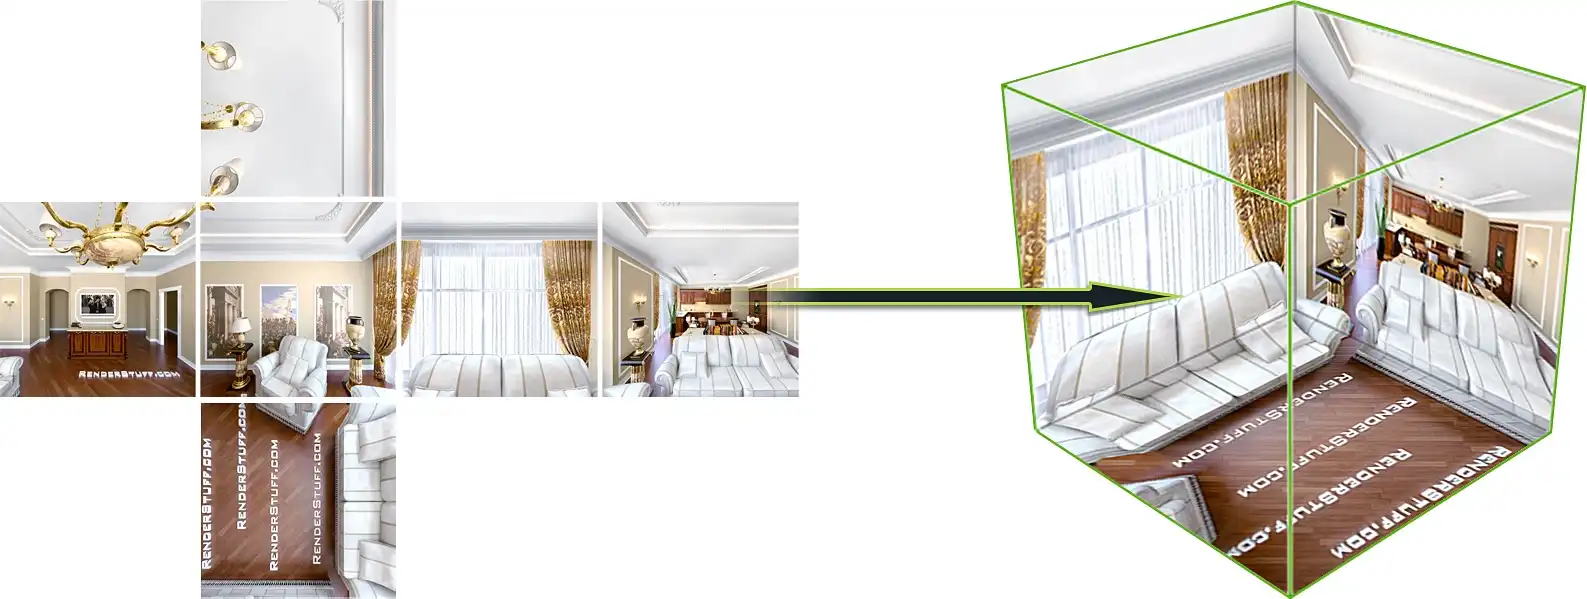
The thumbnail image of this tutorial will also help you imagine this.
By rotating the panorama, you are actually rotating the camera inside and watching the textures on the cube. Since the textures (material) are self-illuminating and are not affected by any lighting or shadows, the joining of the faces are barely noticeable. Of course, the respective sides of the textures themselves seamlessly join each other.
As you may have guessed, the process of rendering a cubic panorama is about how to render these conjugating texture images and then stitch them into the single image of a special format. In turn, the process of creating interactive panoramas is how to load special formatted image into specialized software for viewing panoramas. In a very simplistic sense, a panorama viewer is a standalone scene with a cube and a camera inside. Also viewer provides you controls for rotating the camera and renders on the screen the view from that camera in real time. And basically that's it.
Let's return to the image of a special format, or panoramic image, or panorama projection. You can see it in the picture above. This is example of a cubic map panorama format. The cubic panoramic image looks like a cross assembled from six square images.
Cons of Cubic Panorama
It may seem to you that to reproduce cubic projection image, it is enough to create 6 cameras aimed at the corresponding sides of the scene, render from them, and then compose the results together into one cross-shaped image. I must say that this assumption will be mostly true.
The only feature to note is that the side renders applied to the faces of the virtual cube should not be just the regular camera shots. It must be the the projections of a sphere on the faces of the cube. The diameter of the sphere should be equal to the diagonal of the cube. This is needed to cover the entire 360° of the surrounding space and to have seamlessly stitchable images with specific perspective distortions.
Sounds pretty complicated, doesn't it?
Therefore, we are not going to use cubic projection to create panoramas, because of redundant complexity.
Next, the process of creating a virtual panorama will be described on the example of 3ds Max 2008 as a 3D editor and V-Ray 1.5 as a 3D renderer, with mention of some features inherent in this particular software versions. However, all the principles described next, are usable for any other 3D software that supports a spherical camera with a 360-degree space coverage. Therefore, if you need to create a panorama using an alternative 3D editor or renderer, you should simply omit the specific features of working with 3ds Max or V-Ray and abstractly apply these methods to create interactive panoramas in your native 3D application.
For example, even though I'm a 3ds Max dude, I have Blender installed on my PC. And I know that Cycles renderer panoramic Camera has literally an equirectangular lens:
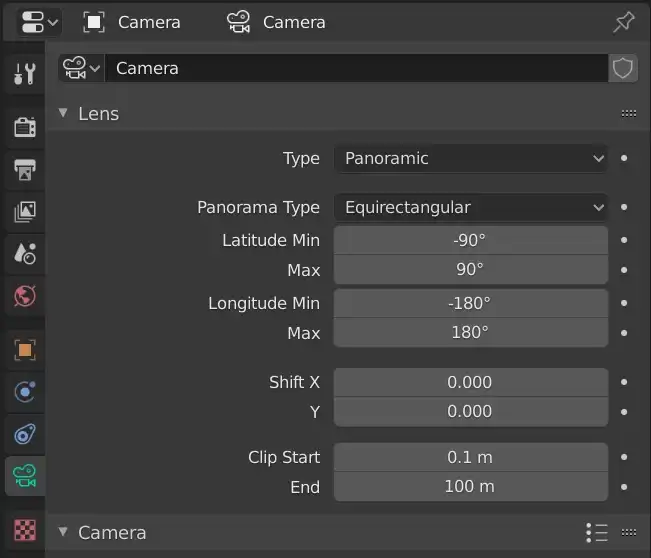
I believe that any other advanced 3D software has a similar option. So, keep it up!
Cons of Box Camera
It should be noted that, with 3ds Max, you can get render composed from six standard cameras placed on the sides of a box. You can use a Box Type Camera for this. The 3ds Max will automatically place six cameras, render from them and then compose the results ino one image. But, even this method is still inconvenient.
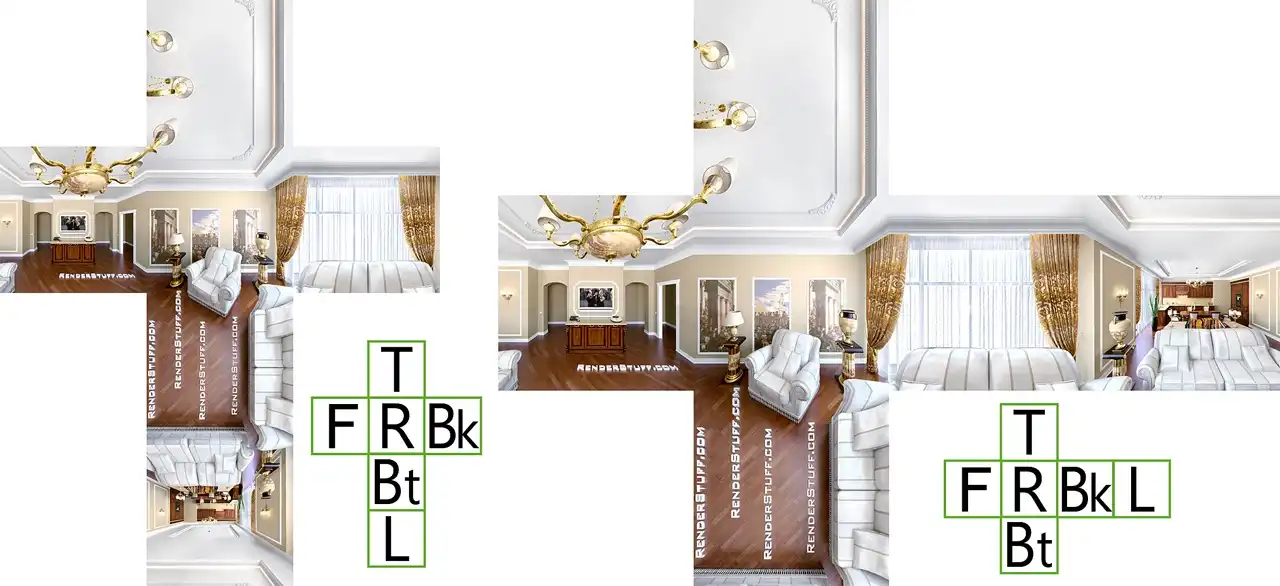
Firstly, because the format of the cubic panorama is a horizontal cross, while the 3ds Max Box Camera makes an vertical cross and you need to convert one to another using 2d editor.
Secondly, because the cross-like pattern is very badly utilize an image canvas, occupying only part of it. In addition to that, the biased rendering applications, in order to save CPU time (such as a Quasi-Monte Carlo based V-Ray) simplify the results by throwing out some "unimportant" samples. As a result, the edges of each camera render will not be perfect with distinctive jaggedness. This can lead to the appearance of visible edging where different cubic renders will be stitched together.
And third, it is still not a projection of a sphere on a cube. This is a projection of the scene directly on the cube (formed by 6 square frames of the cameras). This means that the "cubeness" of such a panorama will be quite obvious. Especially during interactive camera rotation.
Cons of Panorama Exporter
3ds Max also has utility called Panorama Exporter. It located at: Command Panel => Utilities => Panorama Exporter and has two buttons, Render and Viewer.... If you click the Render button, the visualization settings will appear and you will be able to make a spherical panorama from the selected camera. But the problem is that this utility is the same six cameras, and it makes separate 6 square renders one after another and only then stitch them into one spherical image. If you want to use, for instance, V-Ray Frame Buffer mouse tracking or region rendering options, forget about it. This utility does not allow you to do this.
The Viewer is very simple and, in my experience, it is very slow. It can be used to make draft panorama previews, but it is not suitable for displaying results to a client.
In addition, both Panorama Render and Viewer are interface blocking. This literally means that if you open either Viewer or Render window, the other 3ds Max interface will "freeze".
Impossibility to use standard handy tooling that you are used to using every day, will ruin your normal workflow. In any case, you are free to use Panorama Exporter Utility, if all of the above does not bother you, but I personally do not use it and therefore cannot recommend it to you.
Spherical Panorama as a "all-in-one" Solution
As you can see, cubic projection based rendering is not the best option, but there is another one. The equirectangular (also known as equidirectional) or simply the spherical panorama format. Briefly, a spherical panorama projection it is a "unfolding" of a sphere into rectangular "pelt". The equirectangular projection is a well-established and long-used concept of cartography. It is used to represent the spherical surface of the planet Earth as a rectangular world map, mainly to be printed on a rectangular sheets of paper.
The spherical 3d panorama also has long been used in modern photography. I think most of you have used and seen panoramas of Google Street View many times.
Another common use of panoramic photography is to create spherical HDR environment maps. I also believe that most of you not only know about, but already use such maps to illuminate and form an reflections in your 3D scenes.
I will not go into the details of the panoramic photography. But, in short, there are two main methods by which a photographer obtains spherical projections of the environment.
In the first method, they literally use a mirror ball. They place mirror ball in the environment in which they want to shoot, and then shoot the ball itself with wide-angle lens. Initially one side and then the opposite:
Afterwards the images with hemispheres are uploaded into special software, which converts them into a single spherical projection of the environment.
In the second method, the photographer mounts the camera on a tripod and captures the environment by rotating the camera itself. The idea is to capture all 360 degrees of the environment from one point with a small overlap between frames. Only one photo of the environment is taken at a time:
The process is repeated until the photographer creates enough photos to cover all 360°. Then, with the help of special photo stitching software and manual retouching in the raster editor, the photos are composed together into a single 360 degree equirectangular panorama projection image of the environment.
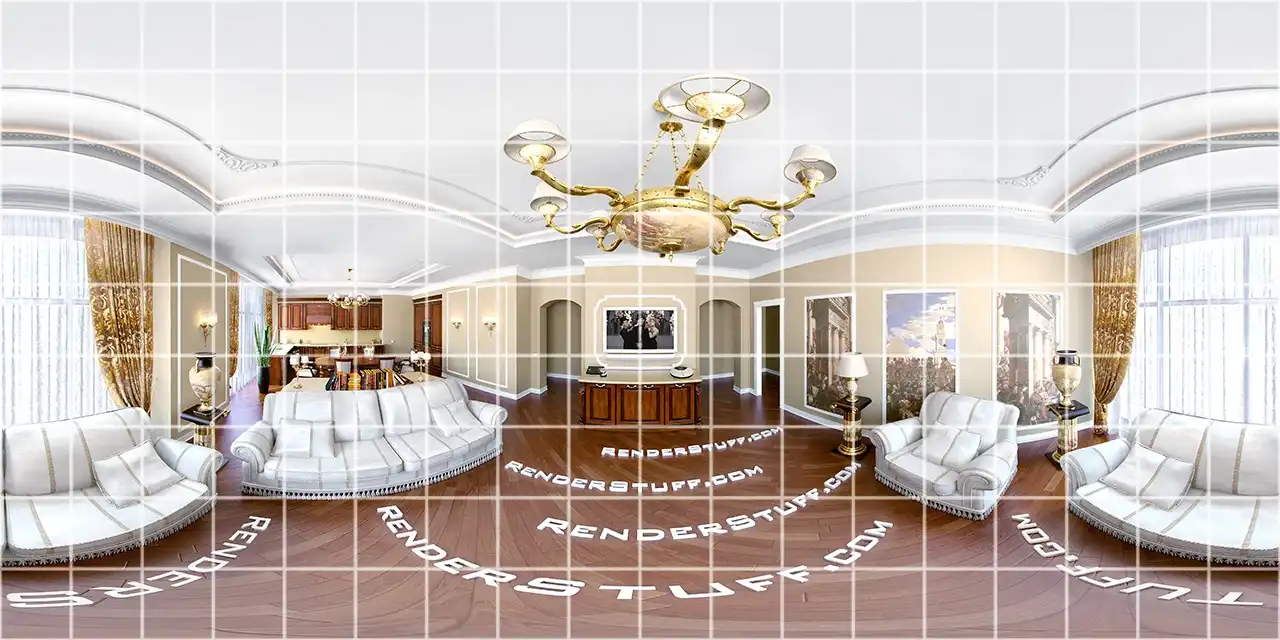
In 3d, the process of obtaining a spherical panoramic image is much simpler. But first let's see how a spherical map (equirectangular projection) looks like:
Camera Placement
To make a spherical projection, you must have a Camera in your scene. Use a Standard 3ds Max Target Camera for this purpose.
The place where you put the camera's body (Camera's body Pivot Point) will be the point of view center of the future interactive panorama. In optics, this point is called the nodal point.
Usually, the best nodal point is in the center of a scene. Since you probably want to watch the scene from a human point of view, it is wise to have a nodal point at a distance of 1.6-1.9 meters (average human height) from the floor.
Next, move the Camera.Target to get the best shot from the nodal point you choose. This view will be the default or initial view for the panorama, so it is important that it is the best possible view from the nodal point you choose.
Spherical Camera Mode (Type)
Now you need to make the Standard camera work in Spherical mode. V-Ray has settings for this.
To locate it, open the render settings (F10 on the keyboard). In Render Scene dialog that opens, go to the V-Ray tab and find the V-Ray:: Camera dropdown. There, change the Type from Standard to Spherical. Next, select the Override FOV check-box checked and enter the FOV value as 360 degrees.
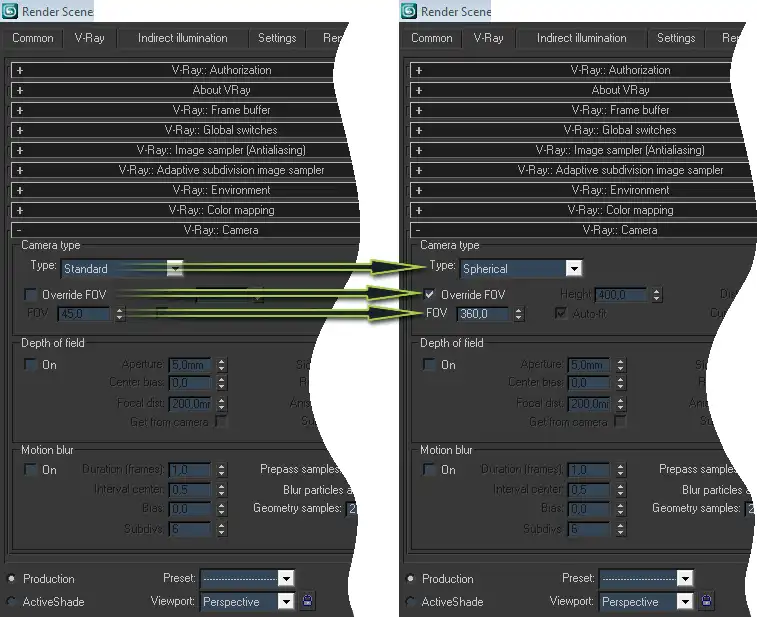
Now you have a spherical camera in your scene that is ready to render a spherical panorama.
Keep in mind that when you change a Camera Type from Standard to Spherical and set the FOV to 360, you will still not be able to see these changes in the 3ds Max viewport. This settings affect the rendering results only.
Render Output
According to the technical specifications of the equirectangular projection image, it should be a rectangle whose width is twice the height, ie has a aspect ratio of 2:1.
Just an extra reminder, that for a correct equirectangular projection, the rendered image must have an aspect ratio of 2:1. That is, the width of the 3d visualization result must be twice the height.
To set the aspect ratio of the rendering output in 3ds Max, you need to go to the Common tab of the Render Scene dialog and go down to the Output Size section. There, find the Image Aspect option and set it to 2. When the aspect ratio is set, lock it by clicking the "lock" icon next to it.

When you have the Image Aspect locked, you can change the width to the desired value, and the height will be automatically changed to the appropriate value to maintain the locked aspect ratio and vice versa. Very handy option, by the way.
As for the image resolution, it should be as high as possible. The bigger it is, the clearer and more detailed the panorama will be. This is because the panoramic camera will only display a part of the panoramic image at a time. Only the part that fits into the camera view will be shown in the viewport of the panorama viewer. To better understand this, we should temporarily return to the description of the second method that photographers use to create panoramas. The illustration there shows an approximate part of the sphere that can simultaneously fit into the camera frame. So imagine how much higher the resolution of the rest of the image should be compared to the camera frame.
Based on this, we can conclude that the size of the panoramic image we need directly depends on the screen size of the device on which the panorama will be viewed. It also depends on whether it is full screen mode view or not. And in fact, it is difficult, and sometimes even impossible to predict. That's why, I advise you to stick to something like 8k wide, that is 8192 × 4096 pixels. This resolution will suffice for viewing on most devices. If you can do more, please, if you want less, fine too. I believe you will quickly find what works best for you.
There are technical limitations for panorama viewers on the maximum image size they can process. But these are specific software values, and it's somewhere around 20,000 pixels wide and more. You should never go that far, otherwise the rendering time will be significant.
The last thing to consider about rendering output is the image format. The most universal are JPG and PNG.
I advise you to save the visualization results in the file format of your choice, perform all the necessary compositional work to which you are used to, and only then re-save the result in JPG format with a compression of about ~ 90%. The smaller the image file, the faster it will be loaded by panorama viewers, and the easier it will be to send it over the Internet (send it by e-mail to a client, upload it to online services for editing and viewing panoramas, etc.).
When you're done and the panorama is saved somewhere on your drive as an image file, we can move on to the last step - uploading it to the panorama viewer.
Panorama Viewers
If we return to the explanation of what a panorama viewer is, on the example of a cubic projection, then it seems logical that a spherical panorama viewer is the same technology, with the only difference that instead of a cube, it uses a sphere with an interactive camera inside.
And this level of understanding of how technology works will be enough not to go into any other details, but just start using it. However, since we have already begun to consider the technology itself, it should be noted, for technical correctness, that many panorama viewers still uses a cube. They takes a spherical panoramic image and projects it onto a cube, so in this case we finally have a projection of the sphere on the cube.
This extra step, panoramic software does automatically for you, so you don't need to put in any extra effort on this.
Today there are many 360 panorama viewers. Some of them free, some are not.
As a rule, paid versions have a built-in editor and allow you to create control points on panoramas, clicking on which, the user can see additional information or even move between different panoramas. Free ones, mostly provides only the basic functionality of panorama viewing.
According to the scope of this tutorial, we need only the basic functionality of panorama viewing, so we will consider free panorama viewers only. If you need advanced functionality, once you've learned how to render an equirectangular projections and use the basic panorama viewer, you'll definitely be able to master more complex panorama related software on your own. For example, to create interactive panoramic tours between the rooms of the real estate you archviz.
Mobile Panorama Viewers
A mobile panorama viewer app is one of the first things that comes to mind when you think of a panorama viewer solution. And really, there are lot of them for both Android and iOS. All you have to do is just search the Google Play or App Store for "360 Panorama Viewer" and you'll see plenty of apps to choose from for both platforms. From simple finger swipes to gyroscopically controlled cardboard virtual reality.
I haven't found one that I would really like and that I could definitely recommend to you, but you may be less demanding than I am, and maybe find some app that you really like. So, just try a few. Some have a good user interface, while others look ugly, overloaded with advertising and unprofessional, though prettier interface does not mean better performance and functionality, and vice versa. Anyway, they all have the same principle of use. When you have finished rendering the panoramic image, you need to upload it to your mobile device. Then open the panorama viewer app of your choice and select uploaded image from its menu. The program will "think" a bit, and then show a panorama with the image you provide.
But before you dive into the searches for a suitable mobile application and multiple installations, think about the following. You will definitely render a panorama on a computer (desktop or laptop). After that, you will immediately need to review the result of your work. Upload the just rendered image to your mobile phone, viewing the panorama through its small screen, and all this every time you just need to see immediate results, can hardly be called a convenient solution.
Even more, when you finally finish and, for example, send to client a final panorama visualization, you should also ask a client to install the same or similar program on a phone or tablet so that the client can see how cool the final render made by you looks. Will the client agree to install an unfamiliar app on a phone just to see an image you provide? Especially something potentially full of annoying ad and asking for permission to full access the camera and storage. Let's say it's questionable.
Free Online Panorama Viewer
I asked the same questions and came to the conclusion that I indeed needed something simpler that worked on desktop, could be instantly available, free and not installable. And that's how the 360° Panorama Web Viewer tool was born. I developed it using a popular WebGl-based library called Pannellum. This library is mainly focused on giving to a web developers the tooling to embed already created panoramas on web pages. So I turned it into a user-friendly tool where anyone can change a panoramic image directly on the page, that is, to use it as a full-fledged standalone application, that simply works in a browser.
To avoid duplication, I would not explain all the details, because everything you need, including instructions for use, is on the page of this panorama viewer. But in short, you open the panorama viewer tool page, drop the panoramic image into the viewport of panorama viewer, and immediately see the panorama ready to use. Nothing else, no long loads, no installations. Open the page, apply the image, you're done!
By the way, the panorama from the example at the beginning was created with literally this tool, only the ability to change panoramic images was disabled for demonstration purposes of this tutorial.
So try it now, it's very easy to use and it's free.
Summary
-
Place the Camera body at the desired nodal point, directing the camera target to the best frame of the scene.
-
Set Camera
Type=> Spherical andFOV=> 360. -
Render an image with the appropriate resolution and save it to the drive.
-
Upload saved image to Panorama Viewer.
-
Enjoy the results!
I hope you like this tutorial, leave any questions about it in the comments section below.
- preparatory operations, such as installation projections, rendering the launch sequence;
- general secondary illumination rendering maps GI;
- not inflated settings that might be necessary for a better pairing separately counted cube projections;
- unavoidable absence, in the case of the individual renders, need to match the image;
- fulfillment of post-processing, as You do not need to do it in six separate frames or pre-merge them into a single image;
- simple instructions into a single image "collecting" the panorama program.
What kind of "camera settings" you say? :)
In order to render the panorama, not one particular configuration of the scene the camera is not affected.
Change only render settings (F10 on the keyboard), which are global for the entire scene. In particular the substitution of the global configuration of the standard cells in the scene, as well as render the aspect ratio, 1 to 2. And, in general, all.
By this, to render "flat view" should, in the book V-Rray: Camera uncheck Override FOV and return to the Camera type Standard. And also, in the tab Common, set the desired Output Size.
Question 30 seconds;) What could be easier: D
Share
Please share if you like it!