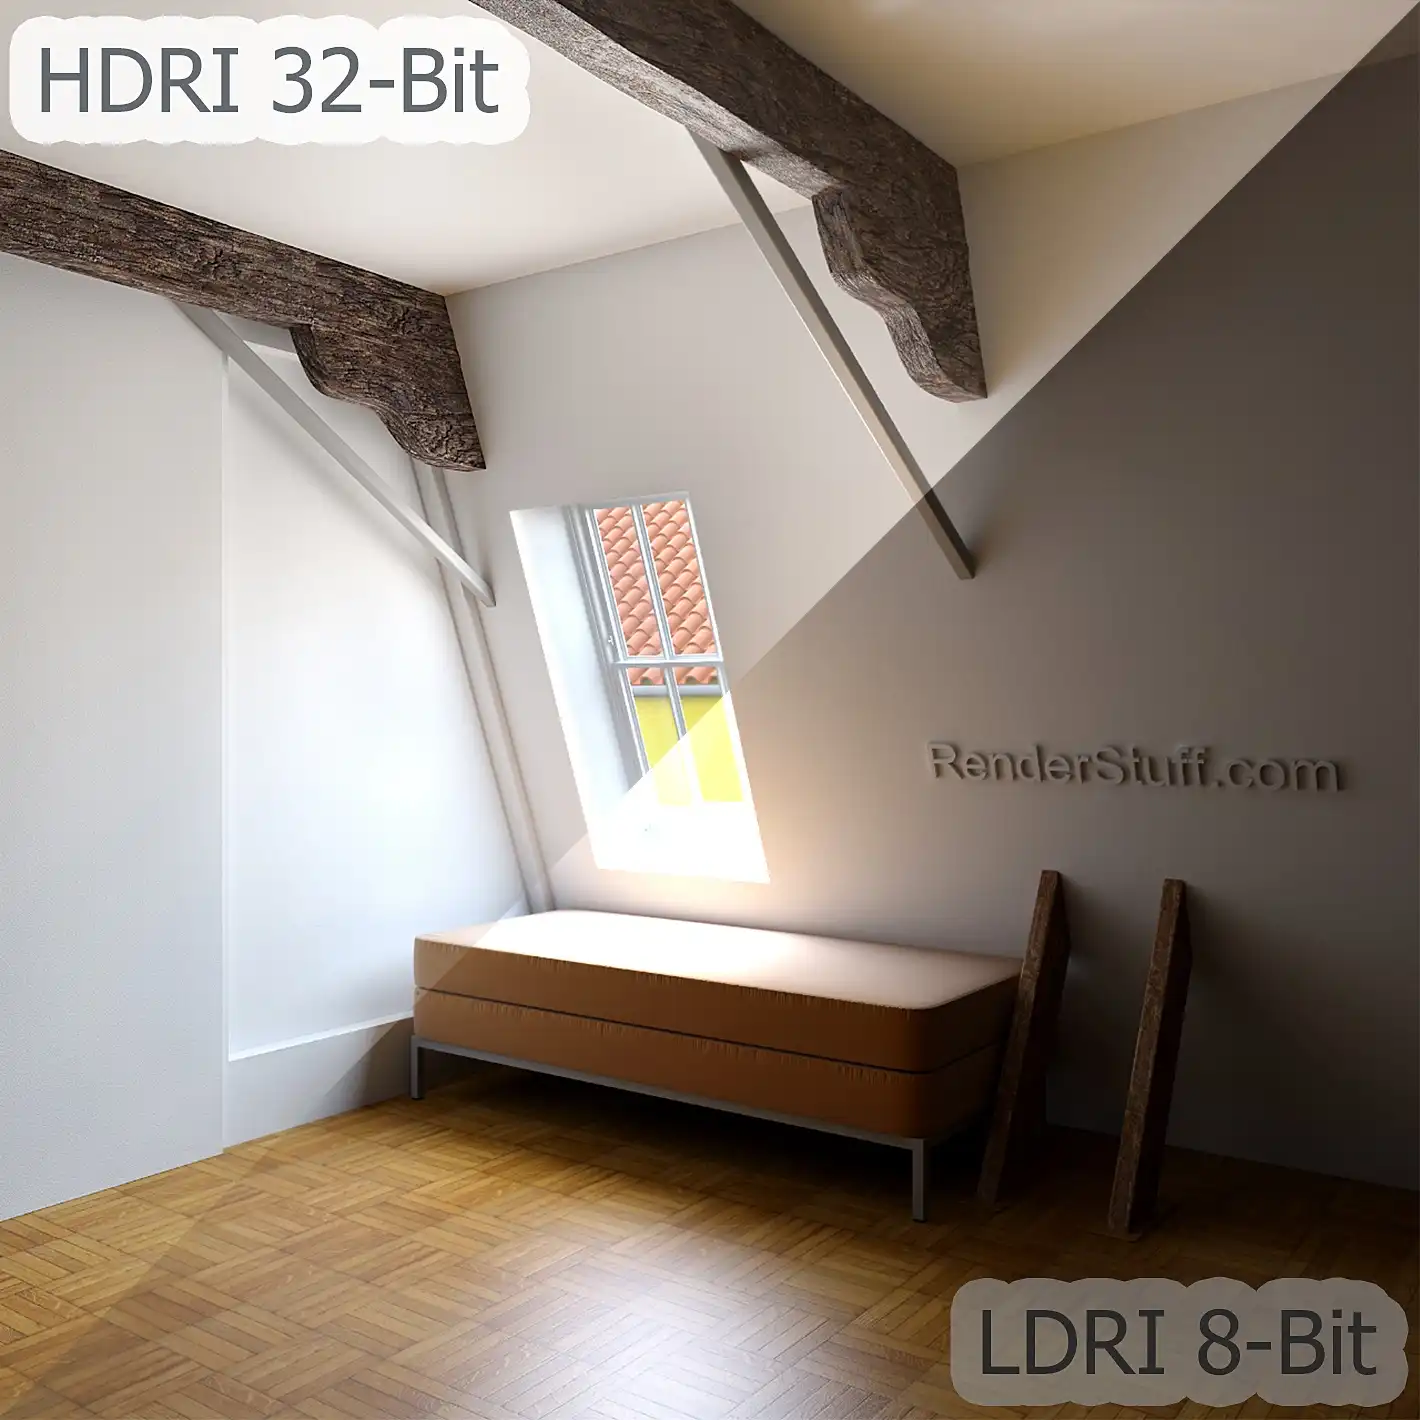
HDRI Rendering & Post-Processing, Ultimate Control Over Exposure
What is HDRI and how it differs from LDRI. How to visualize, store and edit HDR images. What are the advantages of using 32-bit formats over standard 8-bit. How to deal with overexposure or underexposure of 3D visualization only with post-production tools, without having to re-adjust scene lighting and re-render whole image again. How to fine-tune brightness and contrast in a very deep range of an already rendered image directly in a 2D editor without losing any details.
This tutorial was originally written in 2012. In order to be relevant today, it has received a significant update to ensure that the described technique is fully applicable today. So now it is a completely renovated modern tutorial, the information in which fully corresponds to the realities of 2020 and far beyond. If you haven't read it yet and want to master HDRI rendering and further 32-bit image editing techniques, welcome to this tutorial!
Contents
Disadvantages of Simple LDR Compositing
HDRI from Exposure Bracketing HDRI and Photorealism HDR Rendering 32-bit File Format for HDRI HDRI Post-Processing / Editing Saving HDRI with LayersConverting 32-bit HDRI to 16-bit / 8-bit LDRI
Summary Conclusion & CommentsIntroduction
Hello everyone!
Before proceeding, it should be said that the technique of rendering and post-processing of HDR images, that will be described below, is very general.
In short, you render an image as usual in 3D editor and rendering engine of your choice, but without color clamping (compression of the full estimated color value from millions to only 256 possible values). Then the rendering ends, you save rendered image not into a standard image format, such as .jpg, but in a special HDR format that contains millions of possible values for each color. You then open a saved HDR image in the 2D editor of your choice, perform the final adjustment, and finally save an adjusted image in a standard image format that you can use as usual.
However, in order not to be completely abstract, for ease of perception, the whole process is shown on examples of 3ds Max & V-Ray as a 3D editor and renderer engine, and Photoshop as a 2D editor.
If you use other software, such as Blender, Maya, Cinema 4D, etc., with any other render engine, you can still easily reproduce all the steps described. Just ignore the specific names of the 3ds Max and V-Ray settings and find similar options in your native 3D software.
The choice of 2D editors is less versatile because Photoshop is the industry standard and there aren't many alternatives on the market. But in any case, if you use another 2D editor, make sure it is capable of processing 32-bit images. If so, then let's go!
In this tutorial, we will see what HDR is and how to render HDR images, as well as how to control the gamma and exposure of rendered images at any time after they have already been rendered. But let's first look at the theory behind HDRI, and only then move on to practice.
Interesting fact: I built a small 32-bit HDR image viewer for this very tutorial, which eventually grew into something much bigger. My passion drove me to expand it into Image Convert Ninja, a free yet powerful online tool for viewing and processing images.
Now live at Image Convert Ninja: Online HDR Image Viewer, it handles ultra-high-res (8K–16K) 32-bit HDR/EXR images right in your browser, with robust resizing, cropping, optimization, and conversion features.
Despite its flat 2D appearance, it’s actually a 3D app powered by the Three.js WebGL library and uses GPU acceleration for smooth navigation ��— something surprisingly rare in browser-based image tools.
HDRI Explained
Recently, the term HDR in computer graphics has become quite popular and has confidently entered the dictionary of standard CG terms. However, there is some confusion about the meaning of this term and its spelling. The term HDR itself is an abbreviation that literally means High Dynamic Range. All other letters that appear later are mostly related to images. For example, HDR can exist as a stand-alone term and mean a wide dynamic range in all senses, not just in terms of image. If it is written as HDRI or HDRIs, then usually "I" means Image or Imagery and "Is" means Images.
8-bit
As you probably know, a bitmap is an array of pixels. In turn, each pixel is a "dot" (actually a square) of some color. The most common model that represents the color of each individual pixel is RGB. It literally means Red, Green and Blue. So, these are three values that indicate exactly how much red, green and blue a certain color of a certain pixel contains. In turn, each value of this triplet is just a number. 8-bit is usually used to represent this number in standard image formats. 8-bit for R, 8-bit for G and 8-bit for B. That is, pixel color = [8-bit, 8-bit, 8-bit].
The term bit stands for binary digit. That is 8-bit is a 28 = 256 in decimal notation. Because 0 is also used, the standard color range is 0 - 255. Since 0 means no color, the single component of standard color triplet can be represented by 255 gradations.
Here are some color examples to help you understand what this is all about:
[255, 0, 0]; [0, 255, 0]; [0, 0, 255]; [128, 128, 128]; [92, 55, 201]; [200, 19, 183]; [245, 110, 5]; [200, 19, 183]; and so on.
Actually, you can just play with any color picker that is surely available to you from any CG software.
You also need to understand that when it comes to dynamic range, it's not just about hue or saturation, but also about brightness or luminance. Because the hue of two separate colors may be the same, but the brightness is different, in this case, your vision (brain) will actually perceive them as different colors. One as darker and richer, the other as lighter and paler. The theme of colors is more complicated than it may seem at first. And for this tutorial, as well as for the art of CG in general, all the details of a color theory are a little redundant. So, for simplicity, let's consider a standard color range not as a triplet of values, not as a combination of saturation and brightness, but as a single abstract value of the possible 255 gradations. Thus, the standard color range will be considered as only 255 possible gradations, period. So, let's move on!
We have a pixel, we have 255 gradations to represent its color, this representation is looks pretty great on output devices, such as monitor (most monitors are RGB in standard range), so what's the problem? The problem is that the actual color range is much wider than standard range covers, with standard range we see only some of the color differences possible in the real world, only a portion.
On the plus side, our vision can actually only see part of the full spectrum, it adapts to the light (more on this later) and chooses which part of the whole spectrum it will transmit to the brain, the darker part, the middle or the brightest, or anything between.
The same thing happens with photography, for example. When you try to capture the environment with the camera, it automatically captures only a sub-range of a middle-brightness from the entire brightness range. It does not transmit the true brightness of the sun, as it is technically impossible. But you can also take a picture of the sun itself. If you do this, the brightest spot in the sun will be transmitted simply white (255), while objects of medium brightness, mountains, roofs, tree canopies, etc. will be dark (1+). This will happen because the camera will "crawl" / "slide" along the actual brightness range with its standard range, and the brightness of the mountains will be somewhere at the beginning of the standard range (1+), while the brightness of sun will be close to its end (255). To clearly understand what we are talking about, look at the diagram below:
*a scales and values is shown symbolically for convenience purposes

- green movable slider with a gradient inside is represent a standard range, that is only a sub-range of the entire range of environment brightness.
- long horizontal gradient is represent an entire range of environment brightness, from dark to the maximum possible (in the visible spectrum) brightness.
- a-b -> from full dark to medium bright sub-range (like earth, shadows, dark colored objects.
- b-c -> from medium bright to very bright sub-range (for example, not shaded well-lit objects, light colored objects).
- c-d -> from very bright to extreme bright sub-range (surfaces illuminated by direct sunlight, the sky and the sun itself).
Take the green slider as a frame through which cameras can see the full range of brightness in the real world and slide back and forth to select the appropriate sub-range that will be perpetuate on a photo of standard range.
For example, if the camera "decides" to select the sub-range 1,800,000 - 1,800,255, this will mean that the actual value of "1,800,000" will be represented as "0", ie will be completely black, and the value of "1,800,255" will be represented as "255", ie it will be just white. All set of values before and after this sub-range will simply be cut off and thrown away.
32-bit
And now we are at the point where we can easily understand what HDR is. According to our example, HDR is the full range, from 0 to 4,294,967,296. The HDRI is an image, each pixel of which can be represented not by a limited number of only 255 possible values, but with a full range of 4294,967,295 possible values.
In HDR image file formats, this is achieved by allocating 32 bits to store the corresponding color information of the pixel, instead of 8. Returning to our example, the number 4294,967,295 is just the 232 - 1 (because range is starts from 0).
Again, the range from 0 to 4294,967,295 was taken only for representativeness and perception simplicity. In fact, an HDRI files, to represent a single color channel, of a single HDRI pixel, stores data not as integer values, but in floating-point with 32-bit accuracy.
So, for the purposes of this tutorial, let's continue to think that full or high-dynamic color range is an abstract 4294,967,295 possible gradations.
Because, that's for sure, you don't want to deal with all the real math behind of storing data in HDRI files. But, if you will, welcome to High Dynamic Range Image Encodings or to The RADIANCE Picture File Format and so on.
Advantages of HDRI
Okay, we have 4294,967,295 possible values instead of only 255, but we can still see only 255 possible values on our monitors, because they still work in the standard brightness range. What is the benefits of this?
The advantage of HDRI is that, having an information about full brightness range, we can decide which sub-range to choose at any time, because everything else (before and after selected sub-range) has not been thrown away. We can "slide" back over the full range, to make our picture darker and more contrasting, or "slide" forward to make it brighter and more lit, more, more, moooore... even more. And no detail will be lost. We will be able to make the dark corner brighter, and instead of turning black into gray, we will be able to see what was previously hidden in the dark, in color. This because, as has been said, nothing has been thrown away. By the way, this process is called tone mapping.
Even more, using masking, we can choose which part of the image to make darker and which brighter. More about this will also be shown later in the examples.
Limitations of LDR / SDR
The range we previously called "standard" actually has its own name, it's called LDR or SDR. The term LDR or LDRI is stands for Low Dynamic Range Image. As you might guess already, the SDR or SDRI term is mean Standard Dynamic Range Image.
To better master the material read, let's take a closer look at real examples of photography.
You've probably photographed an object against a bright sky with the sun behind it, for example, with a mobile phone. Then you know that you should choose either a well-lit object, but in front of a over-bright sky, or a beautiful blue sky, but with an object in the dark. You will never get both perfectly illuminated at the same time, no matter how hard you try.
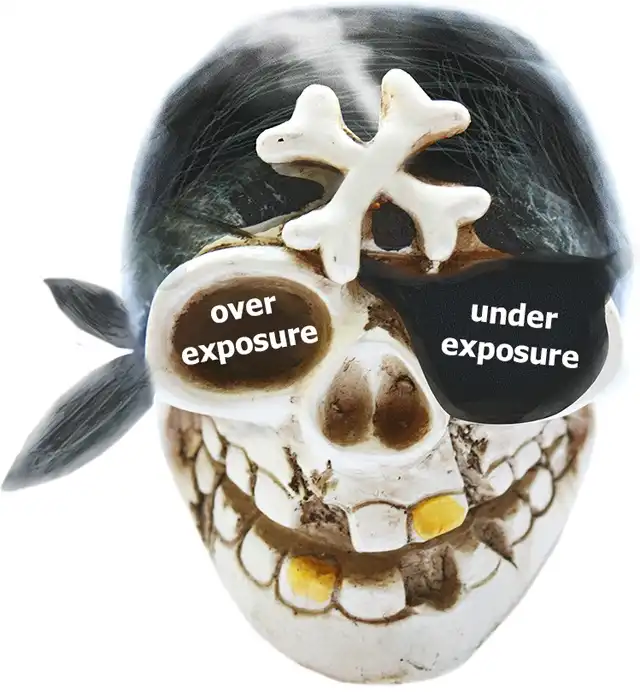
Overexposure
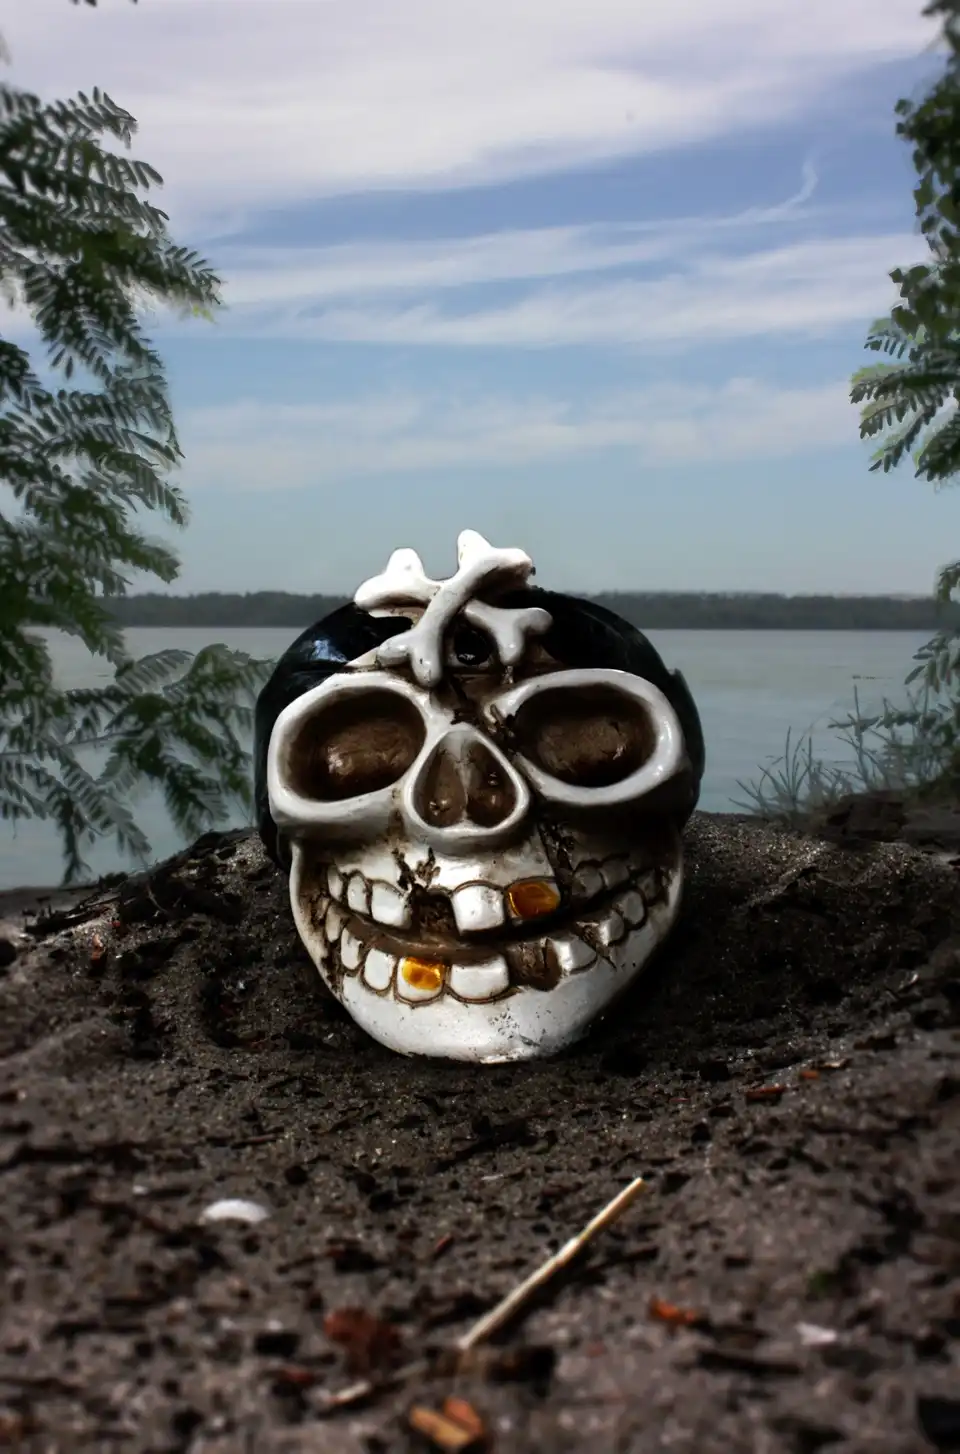
Take a look at this photo of a ceramic pirate skull moneybox on a sand taken in front of a light blue sky and greenish river water of the bay:
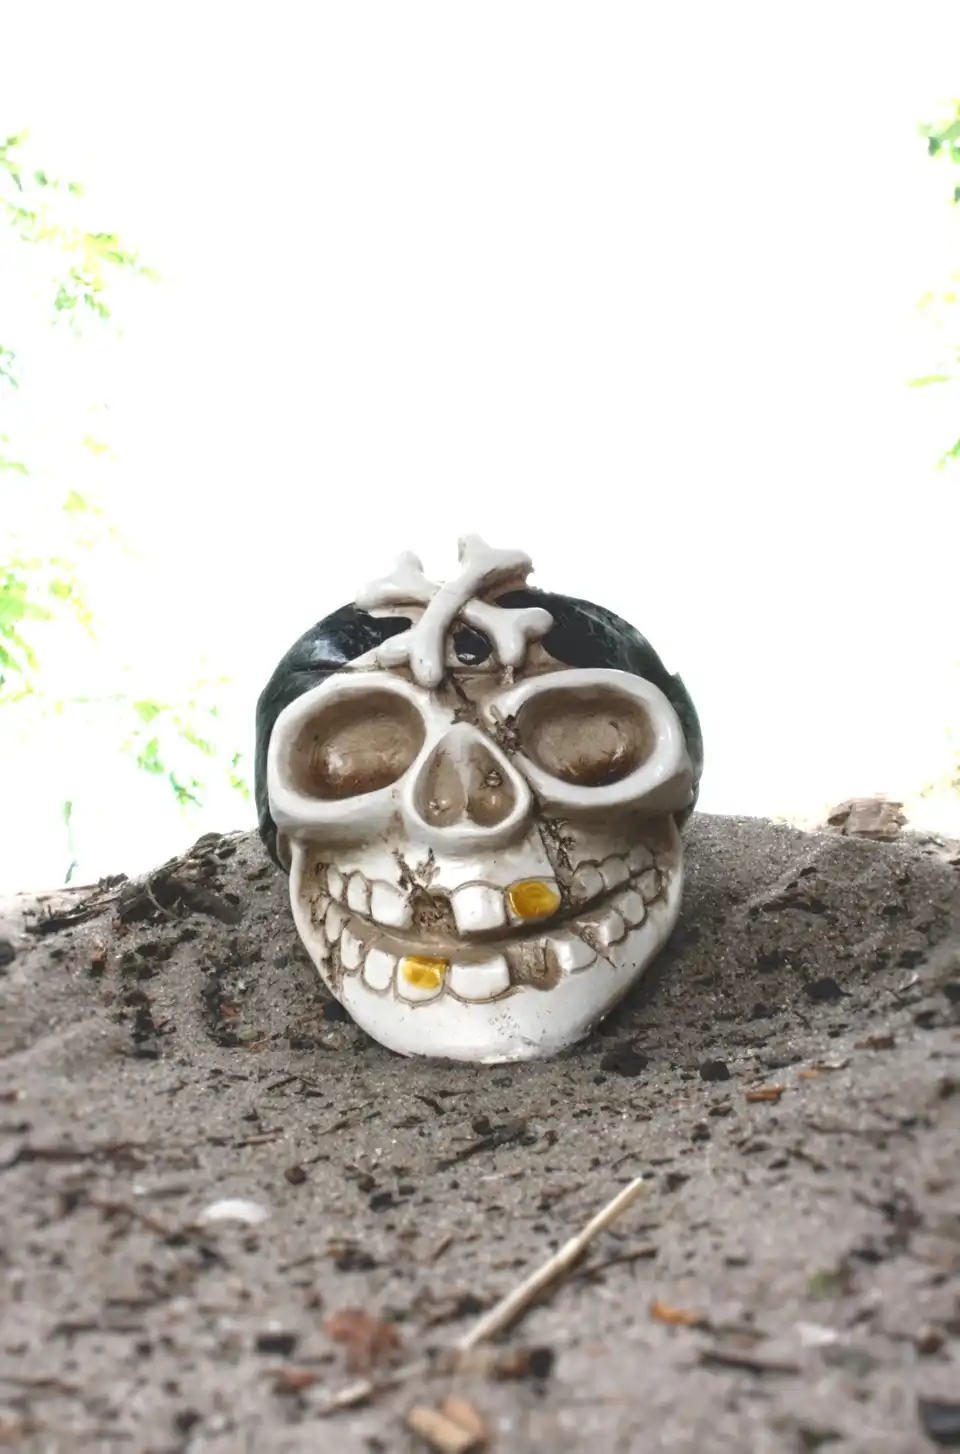
Eeeee... what bay? You can ask. Well, the bay behind the skull, the one that looks like an overexposed white spot.
As mentioned earlier, the standard camera operates in a limited range of LDR brightness. In this particular example, the LDR sub-range was chosen precisely to have a perfectly illuminated skull. At the same time, the illumination of the water and the sky turned out to be much brighter than the upper value of the selected sub-range, and was simply reduced to white. No color information outside of the selected LDR sub-range has been saved in this photo. That's why, with LDR photo you can't get the water and sky visible by any post-processing in the 2d editor. Because they are cut off.
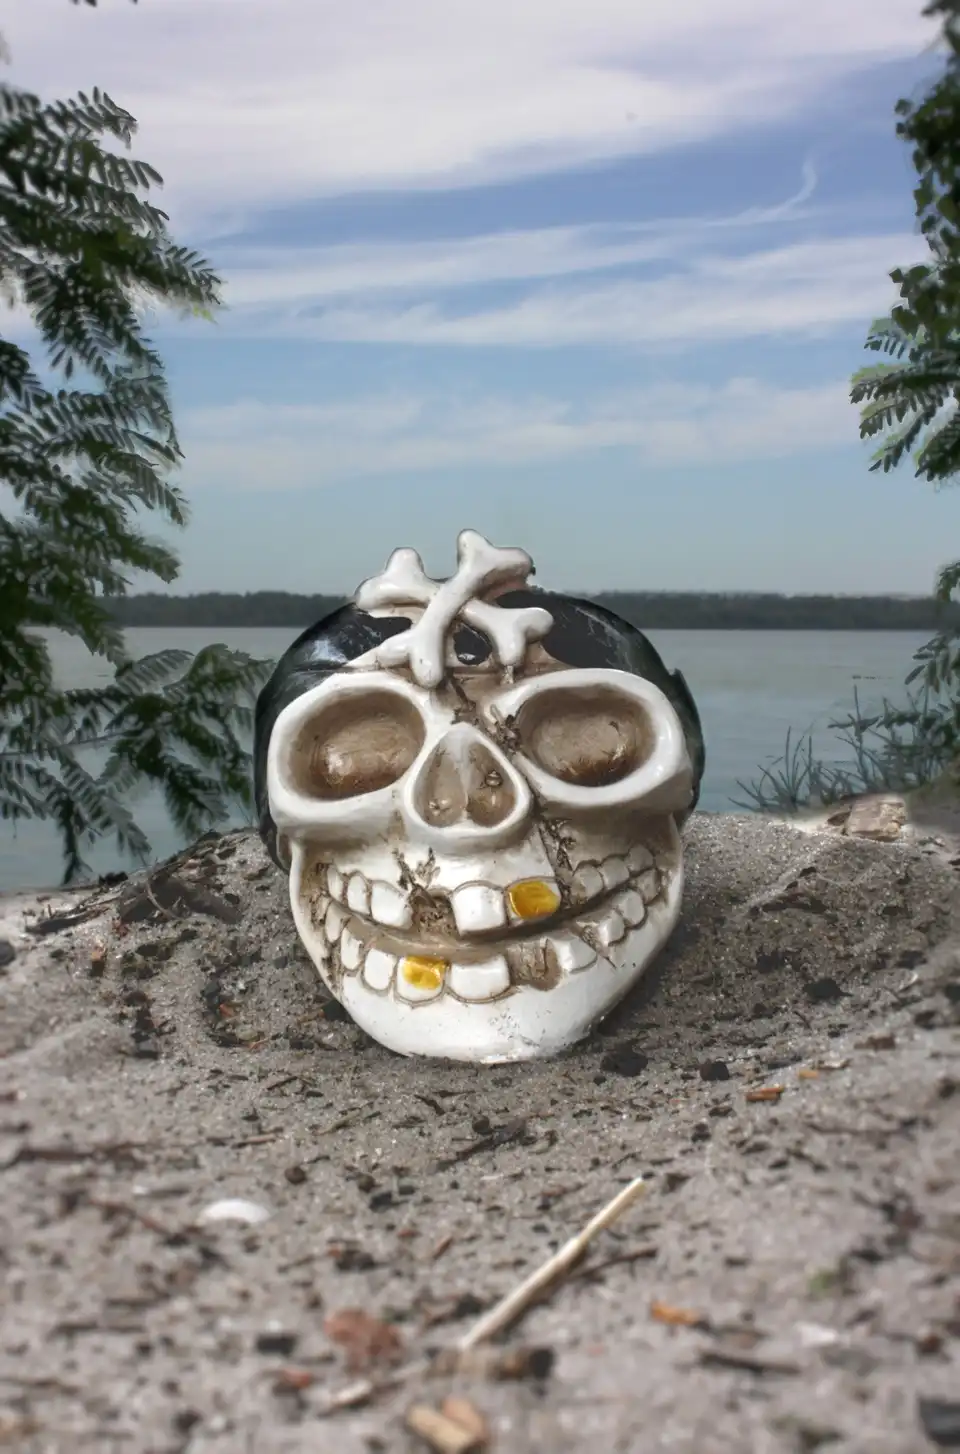
By the way, let's just adjust the background color in Photoshop, by reducing it brightness, and see the evidence with our own eyes.
We will use the Exposure tool, although you can also download this image and try to reveal the sky and water behind the skull by your own methods.
This is what we get:
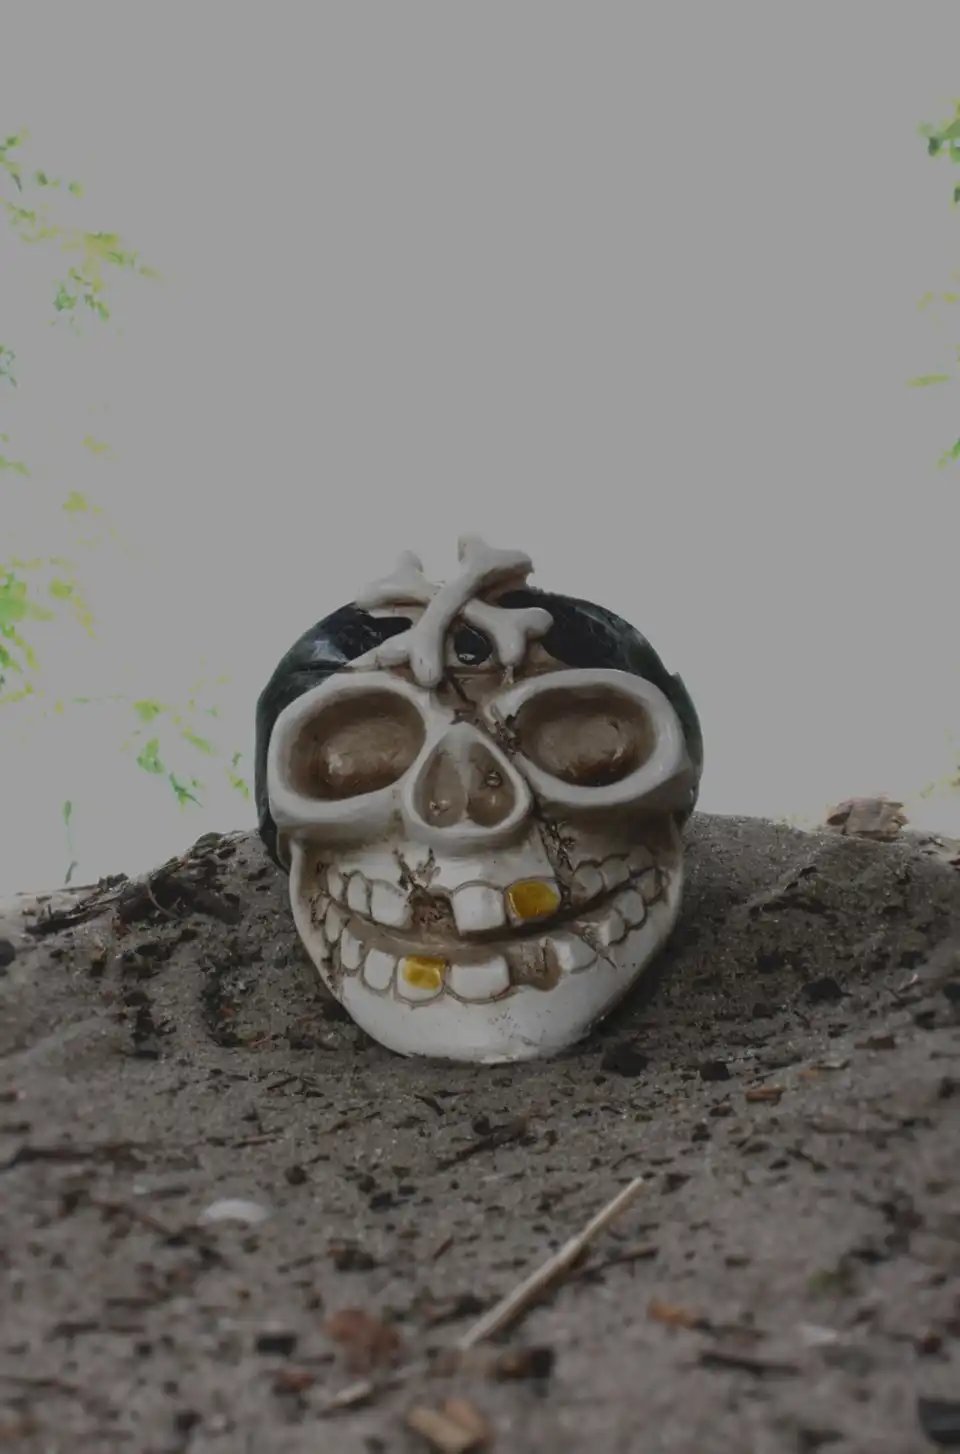
Instead of the promised bay and sky, we see only a dull gray color in place of the former white. Despite the fact that we saw a little more leaves on the sides, nothing else appeared.
Any editing tools cannot reveal something that does not exist in a standard dynamic range image. This is the limitation of LDR. Once a sub-range is selected, you won't be able to change it later by any means.
Underexposure
Well, let's say we are experienced photographers and predict this situation. So we took an extra photo, with a different exposure, with the LDR range shifted to the right. So, finally, we can see the bay, the sky. Even the contours of the vegetation on the sides become obvious. But, of course, since the beginning of the range fell on very bright colors, the skull and sand become barely visible in the dark, underexposed:
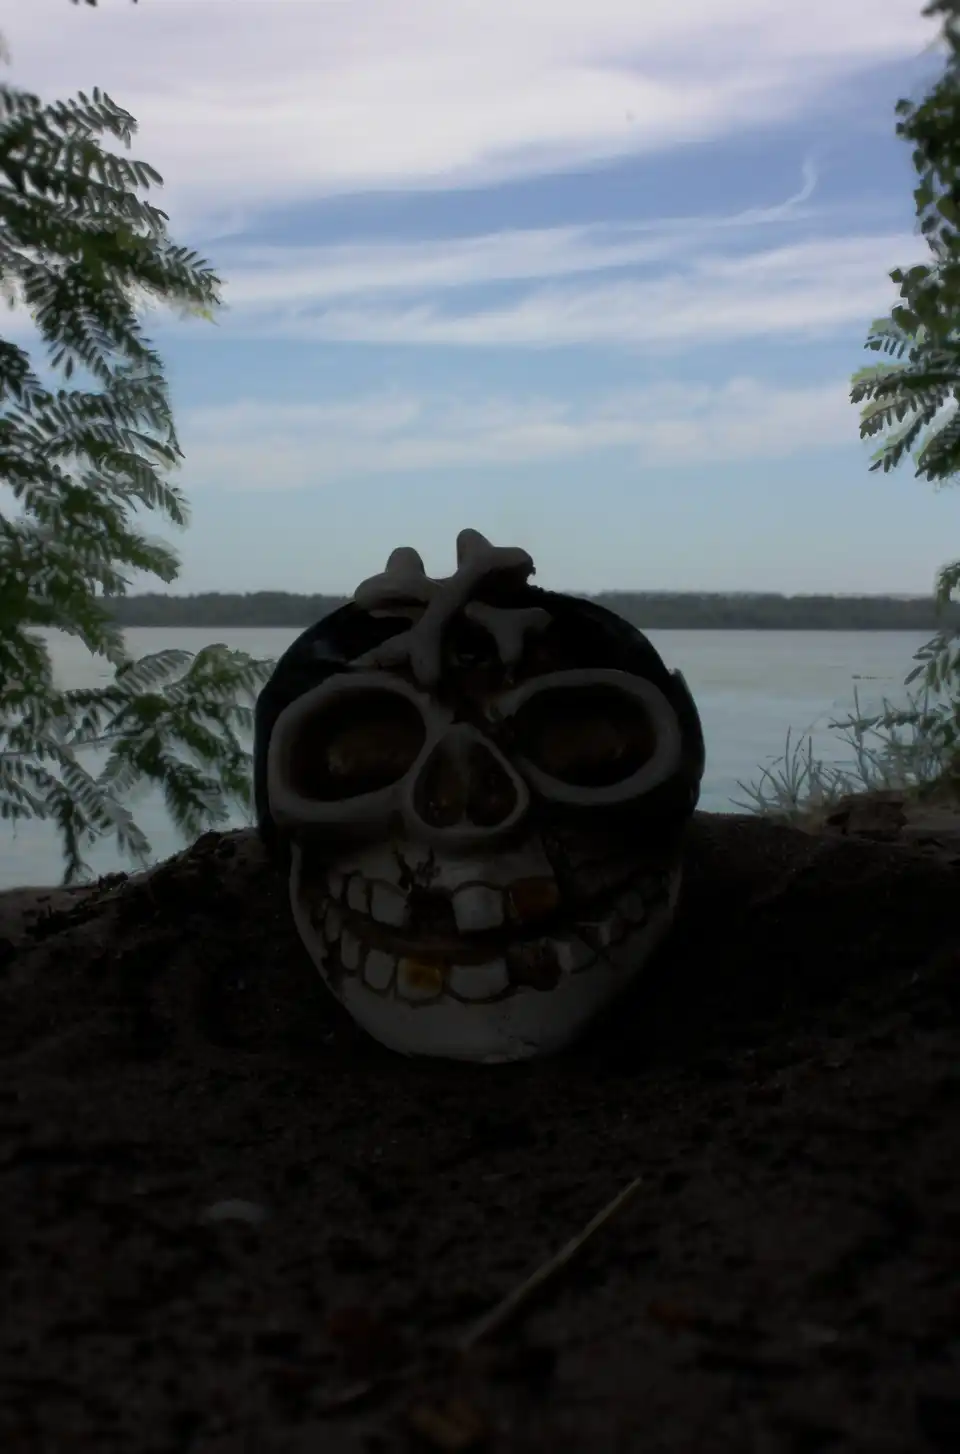
We did this in order to take the sand and skull from the first photo and compose it with water and sky from the second.
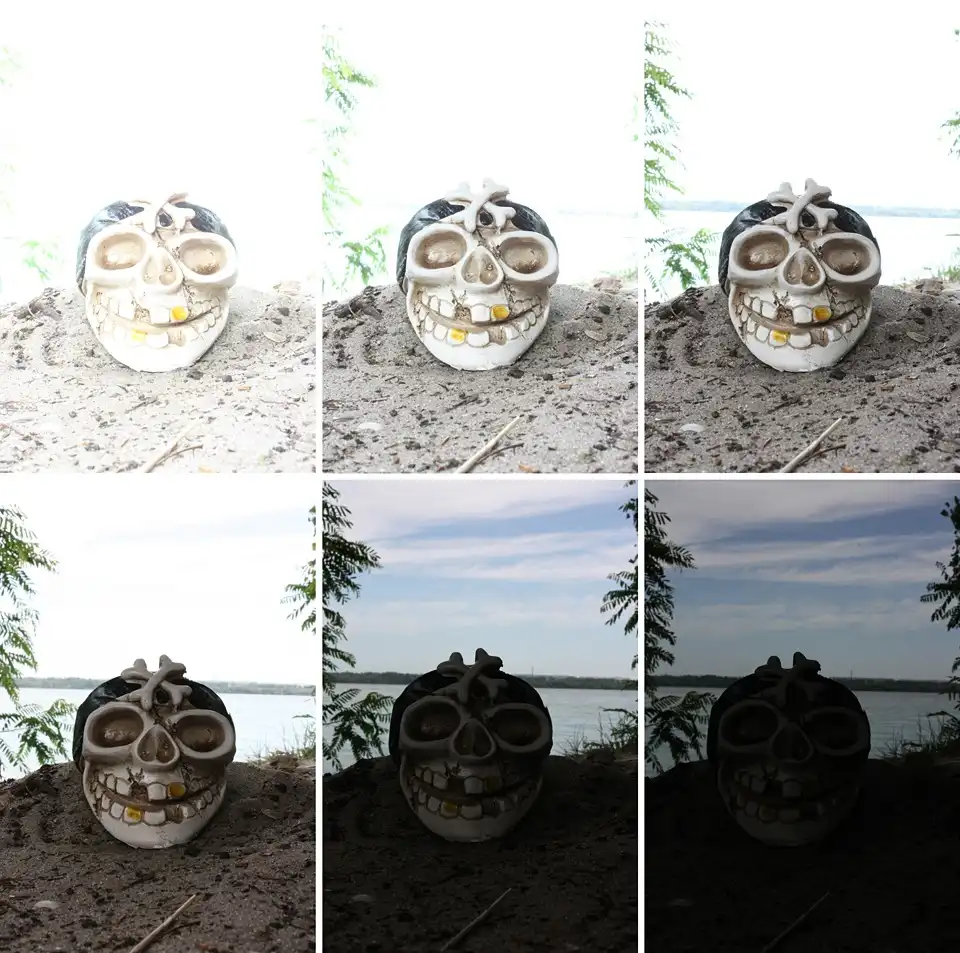
For the experiment, we can do the same thing that was done with the first photo, that is, try to adjust the brightness. But this time, make the photo brighter to better see the skull and sand. And, as expected, no additional information was found, except for noise and artifacts, which are always hidden in the shadows of any photo. The result is extremely contrasting and burnt:
Disadvantages of Simple LDR Compositing
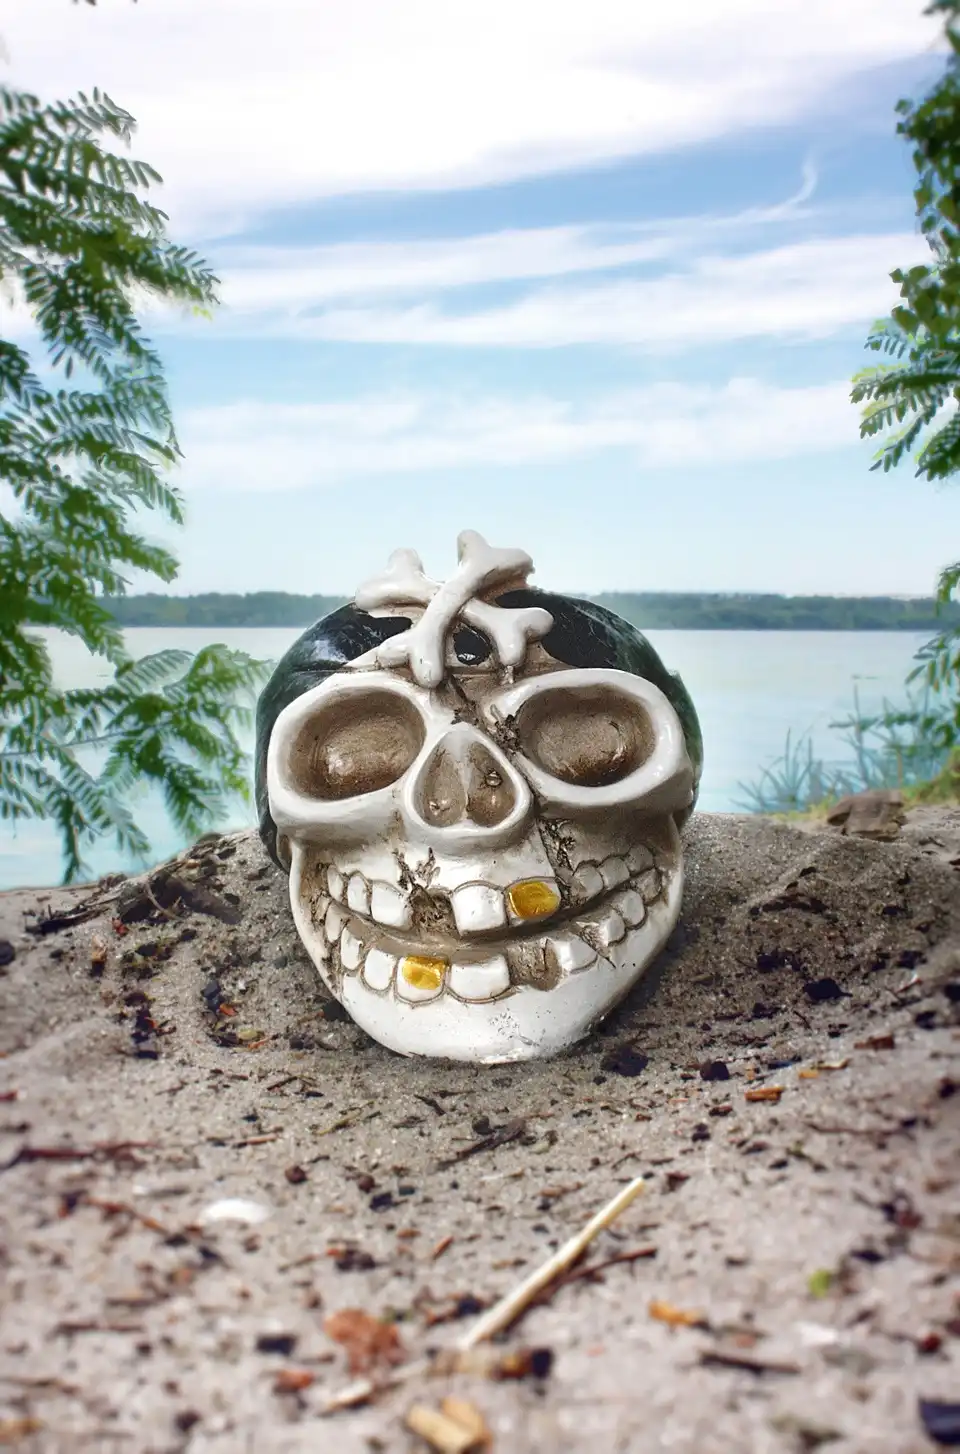
Okay, let's compose. The best thing you can do is to place both photos on separate layers (underexposed on top of the overexposed) and apply a mask that hides the skull and sand on the underexposed photo. Thus, we get visible water and sky along with a well-lit skull and sand:
For this particular example, we did not strain ourselves with precise masking, but it is clear that you will need to do a huge amount of work to get a seamless composition with the perfect combination of background and foreground.
The effort can be even more enormous if the composition in the photo is more complex, with a lot of small details along the edge between the overexposed and underexposed versions.
But with this approach, the most important thing is still unresolved. And this thing - the inability to slide across the entire range and accurately select the part of the LDR to have a perfect match of both versions of the photo with each other, and the brightness of the resulting image as a whole. With this approach, you simply bind to pre-selected sub-ranges.
But there is a solution and it is called bracketing.
HDRI from Exposure Bracketing
Bracketing is a technique where you get multiple photos of the same scene, but with different camera settings, and combine them into one flexible format that allows you to return to any required step. There are several types of bracketing, but to recreate HDRI we specifically need so-called exposure bracketing.
Bracketing is a technique where you take several photos of the same scene, but with different camera settings, and combine them into one flexible format, which allows you to later retrieve to any shot from the set or get a combination of them. There are several types of bracketing, but to re-create HDRI we need so-called exposure bracketing.
The idea of this type of bracketing is to take a series of shots of a scene with different exposures to cover the full dynamic range (or as much range as you actually need) and then combine all the data from the resulting LDR images into one HDR image:
Therefore, it will be an image that contains summary information about all the images in the set, ie details that exist in the dark, mid-tone details, as well as color information from a very bright areas. That is, it will be a real HDRI.
We pre-took six shots with different exposures and then combined them into HDRI using Photoshop: File > Automate > Merge to HDR Pro....
So we got a 32-bit image that we easily edited to get a beautifully lit scene without any overexposure or unnecessary darkness:
As you can see, it looks much better than anything before, and it took much less effort than the previously demonstrated example with only two LDR photos compositing.
HDR makes the post-processing process very simple, efficient and clear. This gives you almost unlimited possibilities to adjust the exposure as deeply as you want, without losing color details, even more, discovering new ones.
There is nothing special about editing this particular HDRI photo. Just a few soft masks to apply different exposure values to different areas of the image. In any case, we will consider in detail the process of editing HDRI on interior scene rendering example, which will be given below. The same exact technique will be used.
HDRI and Photorealism
Another interesting topic that we will touch here, is the realism of images with selective tone mapping. Because that's exactly what HDRI is really needed for. In our example with the skull in front of the sky, we select one tone for the skull with sand, but at the same time select another for the water and the sky. As a result, we got a really good image with a selective reduction to medium brightness of the background and foreground. But is this photorealistic?
Not for disappointment, but for the sake of correctness the answer is NO! This is completely unrealistic, neither for photography nor for the eyes.
Someone might say, "Hey, dudes, I don't know about you, but I can personally see both the sky and the skull at the same time, without any exposure issues, for sure!".
And it will be true and absolutely not, at the same time.
True, because that's what the human brain really thinks. Not true, because human vision is also SDR / LDR. Then you see the sky, and then you direct your eyes to the skull, your vision adapts. In particular, the eye iris is almost closed when you see the sky, and very little light enters inside eye, but when you focus to the skull, the iris opens more and more light falls on the retina. In this way, your vision automatically changes the "exposure" of the image you see and which is transmitted to the brain. By analogy, your vision perform tone mapping of the real-world high dynamic range of brightness. It happens so fast that you're really sure you can see in HDR, but no, you can't, of course, unless you're are the person with superpowers.
If you really try to look at an object in front of a bright sky, you will either see how dim the object looks, or you will be blinded by the light of the sky. But please don't look at the bright sky for long, because extremely bright light can really damage your eyes.
Another experiment you can do is look at a light source and then quickly look somewhere in a dimly lit area or just on the ground and you will think for a moment that you are a little blind and darkness covers everything, but after a few seconds you will adjust to the new brightness again and see everything perfectly. This is because vision adaptation also has some delay and is not instantaneous.
Mankind has been familiar with this phenomenon for a long time. Try to remember how a typical pirate from fairy tales and fantasy movies looks like. This is always a one-legged man with a hook instead of a hand, a stick instead of a leg and who almost always wears the most typical attribute of all comic pirates - the black patch for an eye.
Many believe that this patch covers the injury that caused the pirate to lose his eye during another battle for the precious cargo of the ship, that he and his team are boarded. There is no doubt that there were one-eyed pirates, but for the most part, the eye patch was used as a tool no less important than a spyglass or compass.
It is obvious that the ships of that time were not equipped with electricity, so in the hold of the ship, even in broad daylight, it was very dark. The pirate captain could lead a team aiming guns in a dark cannon compartment, and then quickly ascend to the light deck of the ship to give some orders to the helmsman. After that he could went down to the hold again. In order to see in the darkness of the hold, after the bright sun on the deck, he closed one eye with eye patch when he is on the light deck, but raised it to see with that eye in the dark hold. Thus, he was immediately ready to perceive the details in a dark environment, and not wait until his vision adapts. He was immediately ready to see the bright sun with one eye and the dark hold with the other. At least, that's what the legends say. Arrrrgg!
If you try to shoot a dark room with a camera where there is a small but bright window, and choose an exposure to see the room well lit, you will definitely get an "atomic bomb explosion" instead of the window on a resulting photo.
The same goes for renderers, then you get overbrights on rendering in a situation like this, it's not a renderer's bug or a "physical incorrectness", it's how a real photorealism looks like. So when it comes to HDRI, it's mostly not about realism, it's about art, because an image without excessive brightness and uninformative darkness looks more attractive. But since we are CG Artists, this is exactly what we need!
HDR Rendering
You probably think that we can use the same exposure bracketing technique to get an HDR render, that is, to make a series of LDR renders with different light intensities and then combine them into one HDRI. And you're right, we can do it for sure, but we have great news for you. The fact is that 3D rendering engines actually perform calculations in the full range of light intensity values, ie they render in HDR. Renderers work with scene-based values, ie the brightness over scene surfaces is collected by renderers as they are. One part of the scene may be dimmed, and the brightness values there may be very low, but another part, such as a light source, may be a thousand times brighter. So, at the output of the renderer, we have an full dynamic range of brightness in scene, that is HDR data literally.
Forced HDR Clamping
This way, you don't need to do bracketing, you can get HDR data directly from the render output. The only thing you need to worry about is that some render engines can purposely clamp high values of brightness to prevent artifacts on a final render. So you just need to make sure that the forced HDR values clamping option is turned off. And that's it. That's so simple!
For this tutorial we choose V-Ray renderer. If you use another renderer, it may not even have a clamp option and output the image data in HDR values by default. For detailed information, see your renderer's documentation. If you bored to do this, or the documentation does not say anything about, then, just go to the next sections, where explained an optimal 32-bit format to store HDRIs as well as further HDRI editing technique, because most likely everything is as it should be by default.
In previous versions of V-Ray, up to 3.6, there is only one check box to care about: V-Ray tab > Color mapping rollout Advanced parameters > Clamp output. And it must be unchecked. In V-Ray 5, Clamp output checkbox and Clamp level spinner are hidden from the UI. So now, new V-Ray do not perform output clamping.
Another thing to know is what is true for photography, is also true for the rendering. Despite the fact that renderers operates with HDR data, tone mapping is still performed so that we can see the rendering results on our LDR monitors. In V-Ray, tone mapping of HDRI data, ie the selection of some LDR sub-range from full HDR range, is performed by Color mapping functionality. What we see in Frame Buffer (render window) is actually a tone mapped version of real HDR color data.
You need to keep this in mind, because when you save the rendered image in 32-bit HDRI format, the real scene-based data will be saved. When you open the saved image in the 2d editor, you will see the same tone state that you saw in the Frame Buffer, but this time you can tone-map HDRI yourself using 2d editor tools. So, if your current rendering looks dark or overexposured in Frame Buffer, do not rush to interrupting it, reconfiguring your scene, and re-rendering the image again, because with a high probability you'll be able to fix it later in post-processing.
32-bit File Format for HDRI
Once the rendering is complete, we need to save visualization data in the appropriate file format to access the full dynamic range. Several HDRI formats are available, but the most functional and widely used is a format called OpenEXR, so we will use it as the best choice.
It can not only store high dynamic pixels data with 32-bit floating point precision, but also supports alpha and other render channels. In this tutorial, we will only use flat raster data, but it is good to know that such functionality is also available.
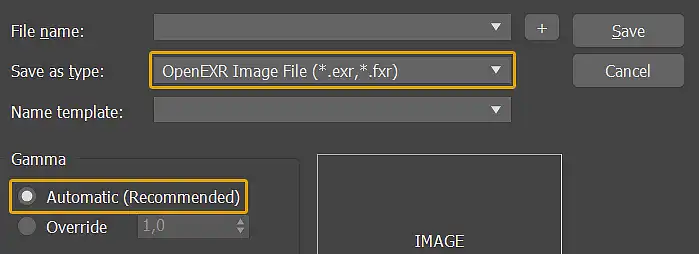
So, the visualization is done, save it, without gamma altering and choose OpenEXR Image File as saving type:
In the OpenEXR Configuration dialog that opens, find the Main Render Output: section and set Format to Full Float (32 bits / channel), (NOT Integer):
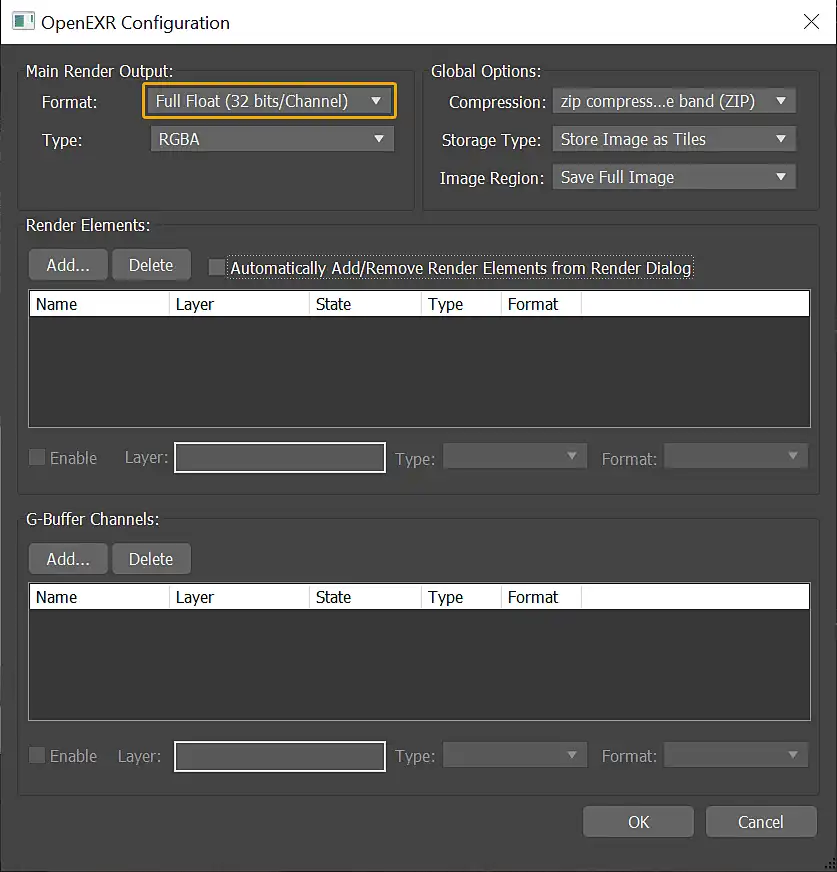
You can also set Type as RGB instead of RGBA, where A means "alpha" if you do not store the alpha channel, but this it doesn't matter to our example, so leave this and all other settings as they are by default.
Click OK. The 32-bit HDR image will be saved and we are finally ready to play with it in the 2d editor.
HDRI Post-Processing / Editing
Test Scene Description
For this tutorial, we have created and render an interior demo scene that shows all the problems that HDR has to solve:

There is a huge excessive brightness on the window opening and on the side wall, as well as deep dense shadows inside the room. So this visualization just screams and forces you to reduce the brightness of the light source in the window, as well as add an additional light inside, to illuminate interior more. Maybe this is something you will actually do without the benefits of HDRI. But hold on, we have a ticket to the HDRI haven for you.
The interior scene itself is quite simple. It's just a box with a window opening, where we put one rectangular light source. Outside - a primitive model of a roof with one wall directly in front of the window, illuminated by global ambient lighting of environment.
.EXR File Download
We don't share the scene file itself, as some of you may use other versions of 3ds Max and V-Ray, some of you just use completely other software for rendering and modeling. But below you can download the .exr file we received from our renderer so you can conduct your training experiments on it. This is the fastest way for you to get started.
Opening .EXR
Now, open *.exr file in Photoshop. If you follow an advice and leave RGBA, Photoshop will treat your file as an image with alpha and you will see the following OpenEXR Read Options dialog:
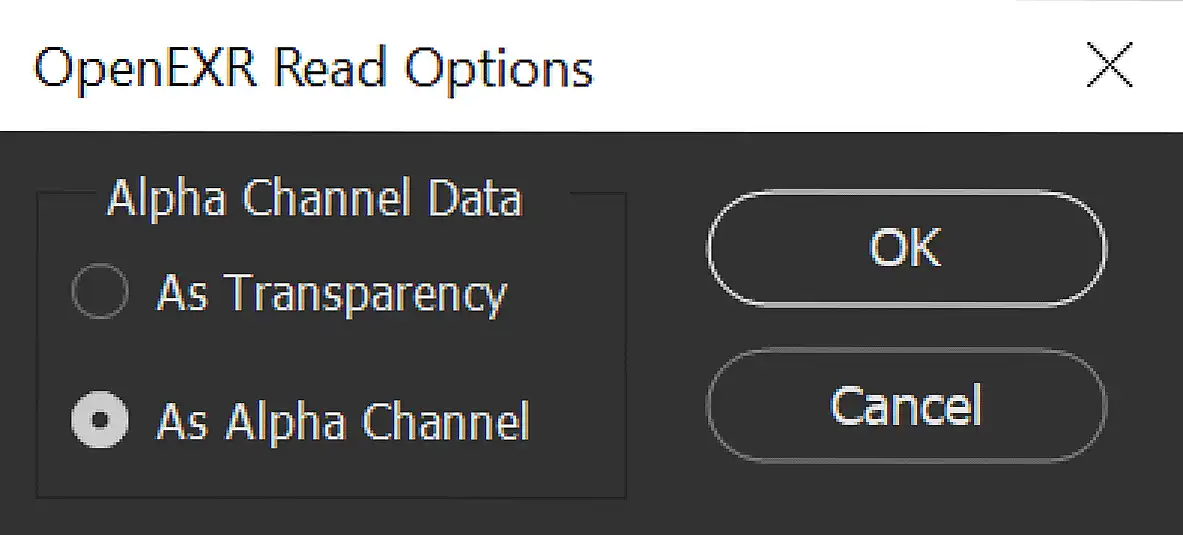
The choice of what to do with Alpha Channel Data is quite obvious. If you want to immediately see your image in Photoshop with transparency, select As Transparency, if you do not want to apply transparency, but just want to save it as an alpha channel for future use, select As Alpha Channel. If your render has no transparency at all, it doesn't matter what you choose, so leave the default selection and click OK.
Exposure Correction Tools
Adobe Photoshop has a tool that is literally called Exposure. It located at Image > Adjustments > Exposure... and has only three sliders to tweak, they are: Exposure:, Offset: and Gamma Correction:.
Try playing with these sliders and see how they affect the brightness of the image, and enjoy how deep you can now go with real HDR data at your disposal.
When we are dealing with overexposure, the best slider for work with is an Exposure: one. Just move it to the left and all overbrights will gone. Of course, this will affect the overall exposure of the whole image, so the whole image will become darker and dimmer too.
When we are dealing with underexposure, we can also use the Exposure: slider, but for most situations the slider Gamma Correction: works even better. It can easily dilute dense shadows without burning highlights all over the image.
Like with Exposure:, move Gamma Correction: slider to the left but this time the image becomes brighter. Of course, this will also affect the overall brightness of the whole image, so the whole image will become brighter and less contrasting.
In our situation, and for most situations that you may encounter in your practice, you will not need to affect the whole image at once. The Exposure tool from the Image menu only affects the current layer as a whole (if no selection is applied) and burns the results into the pixel layer itself forever, so you can't re-adjust it again.
The way out of this is to use a more advanced version of Exposure tool in a form of a separate re-adjustable layer. It allows you not only re-adjust it at any time, it also comes paired with a mask, so you can apply exposure compensation through the exact mask only where you need it and how much you need it.
To get an access to this tool, go to the Layer > New Adjustment Layer > Exposure. Another and more convenient way is to directly use the Layers panel:
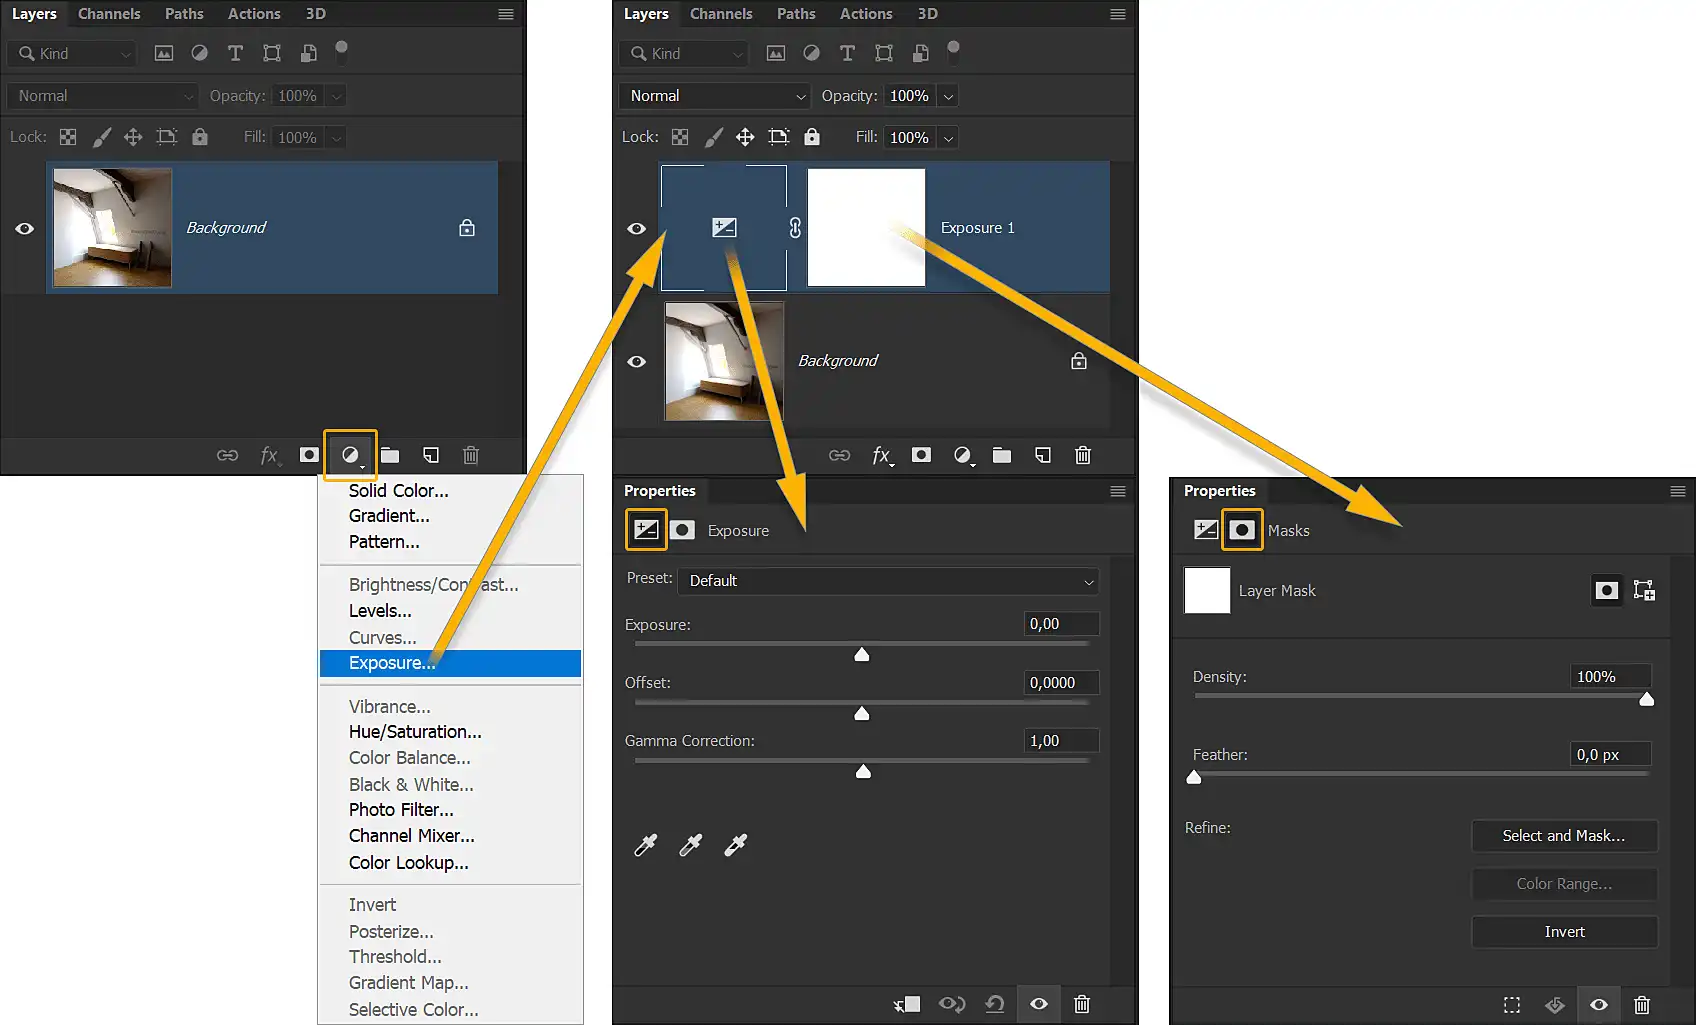
General Technique of Selective Exposure Correction
We will not delve into how to use Photoshop in great detail, because you either already know how to use it, or you will easily understand how to manage two sliders yourself. But here is technique we use in general:
-
Add
Exposureadjustment layer -
Move appropriate slider (
Exposure:/Gamma Correction:) until you get rid of the unwanted effect (overexposure/underexposure) in any part of the whole image completely -
Select adjustment layer's Mask
-
Fill the Mask with completely black color:
-
press D key to set Default Foreground and Background Colors (white and black)
-
press Ctrl+Backspace hotkeys to fill current selection (whole mask) with black Background Color
-
-
Start painting in white on top of the mask, in a desirable areas, selectively applying the adjustment layer's effect to the image.
For example, we typically use the Brush tool with low Hardness & Opacity to gradually apply an effect to an image. If you need to fill a rectangular shape on the mask, for example, use the Marquee tools to create and fill the selection of desired shape, use Pen tools to create your own shape selection etc...
We also strongly recommend using a graphics tablet for 2d painting. This is optional, but veeeery handy.
Removing Overbrights from 3D Rendering
It's time to get rid of these ugly artifacts of excessive brightness. They are the result of local excessive exposure to the light source in the window. So we need to edit the exposure of these spots. Apply the Exposure adjustment layer and use the `Exposure:' slider with the appropriate mask applied. We used the technique described above and here's what we got:

Compensation of Underexposure in 3D Visualization
There is no more "atomic explosion" around the window, but there is still excessive darkness in the corners and general low lighting of the interior as a whole. Let's fix this by applying another Exposure adjustment layer, over the existing one, and using Gamma Correction: slider this time, with the appropriate mask of course:

By the way, you're not limited to using only the Gamma Correction: slider to boost image lighting. You can also use the Exposure: slider by moving image exposure to light tones (the slider on the right), but do it very gently to not "over-burn" your image again.
Saving HDRI with Layers
When you finish editing, you will probably want to keep the precious results of your honest work. Although the OpenEXR format contains channels, it does not support layers. But this is not a problem at all, as this can do another, even more popular format - TIFF. So when you press Ctrl+S, just select the TIFF (*.TIF;TIFF) option form dropdown and save your 32-bit HDRI as a *.tif file.
TIFF is a very popular format, and it has everything you need to work with 32-bit image data. Obviously, this is the best default choice. So this is the best default choice. For example, Photoshop's own format, "PhotoShop Document" or simply PSD, is also capable of providing the same functionality, but it is less popular because it is more specific to Photoshop. In any case, if you plan to use only Photoshop or another product from Adobe to edit 32-bit images, PSD is also a good choice.
We hope you have already composed a great result by eliminating excessive brightness and extra darkness from your own render or from our OpenEXR HDRI, but just in case, here's the tiff file with what we got in the end:
You can download our TIF file and examine it to make sure you understand everything correctly or, maybe, just because of simple curiosity.
Converting 32-bit HDRI to 16-bit / 8-bit LDRI
If you try to view any 32-bit TIFF using any standard image viewer, you will not be able to do so. You will see the black or white default background of the image viewer itself, but not the image you expect. This is because standard image viewer software is designed to view only standard dynamic range (LDR) images. This means that you cannot use a 32-bit image in the usual way as before. Send to clients, publish on web pages, 3d galleries etc.
To be clear, 32-bit data is actually only useful for editing, as you can only see the tone-mapped or "displayable" version of HDRI. This means that you will not see what is behind the selected LDR. Even when editing HDRI in a 2d editor, you still see only displayable range of colors and slide it back and forth over a full range with the exposure editing tools. In turn, this means that storing layered HDRI data without editing purposes is a huge waste of disk space. Because what is in behind displayable range is simply not visible, but occupy space without purpose. HDRI files, especially those with many pixel layers, take up a lot of space. One 32-bit 4K multi-layer TIFF can easily take up more than one GB of space.
Moreover, many daily editing tools are not available for processing 32-bit data. For example, try using a really life-saving Photoshop's tool - Brightness/Contrast... in a 32-bit image, and you will instantly find that it is inactive. This is a very important tool for most post-processing actions, and you can't use it. Not good.
Therefore, the logical solution is to reduce the bit size of the image for further editing, viewing and storage. To do so, go to Image > Mode > 16 Bits/Channel or 8 Bits/Channel.
16 or 8 Bits/Channel?
Here the choice is not entirely obvious. The fact is that 16 Bits/Channel is not only available for use with standard 2d editor tools, but it can also be viewed in most image-viewing application's. But at the same time, a 16-bit image still takes up a lot of space compared to an 8-bit image. So our advice is to make all the deep exposure adjustments in 32-bit mode, and then switch to 8-bit, for final editing and saving of the layered file. Of course, converting a 32-bit image to a lower bit version is not reversible. All data outside the selected bit range will be cut off permanently, so keep this in mind. In any case, if disk space is not critical for you, you can edit and save the 16-bit version. This gives you a little more room for color correction compared to the 8-bit.
Conversion Options
Then you convert the 32-bit layered image to a smaller bit version, Photoshop usually asks your next question. "Reducing the document depth can affect the appearance of layered HDR images. Merge layers before changing depth?":

This means, for example, that the adjustment layer values applied to the 32-bit version of the pixel data cannot be applied correctly to the lower bit image. For example, if you don't merge your Exposure layer and convert the image to 8-bit, the pixel's color data will will become 8-bit, but the Exposure adjustment layer will apply the same correction values to it as it did before the conversion. Of course, you can't achieve the same brightness changes from an 8-bit data layer as you do from a 32-bit one. Instead, you will get the same clamped results as if you never had 32-bit data, as if you simply applied exposure compensation immediately to an 8-bit low dynamic range image. So, you should either merge all the layers into one in advance yourself or select the Merge option from the dialog box.
But this is not the end of the quest. The HDR Toning dialog (this time the last one) will also appear:
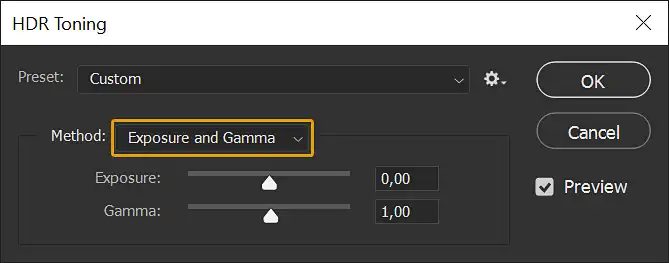
In this dialog, Photoshop "worries" about you in case you forgot to apply your custom tone mapping yourself. But since you haven't forgotten (hopefully), you should select Method: Exposure and Gamma then click Ok without changing any sliders. This way, your LDR image will look the same as before conversion. You should also try other modes, such as Local Adaptation. Sometimes the default settings in this advanced toning mode can give very interesting results, they can be even better than what you come up with yourself. So feel free to experiment with what works best for you.
And that's it, after this step you can do with the image, what you usually do with any other image of low but displayable dynamic range. For example, after the final editing is complete, save the JPEG or PNG version for easy sharing.
Summary
-
Render scene as usual, but make sure no HDR values clamping is used.
-
Save 3D visualization results to an full float 32-bit/channel OpenEXR file.
-
In a 2d editor, that supports HDRI processing, open a previously saved OpenEXR file.
-
Selectively adjust an exposure of the image as deeply as you need, utilizing all the power of 32-bit data.
-
Save your image as layered 32-bit TIFF.
-
In order to use all available tools of 2d editor, reduce file size and make image displayable, convert it to 16-bit / 8-bit.
-
Complete fine-tuning of an image with the usual 2d editor tools.
-
Save current TIFF as well as its JPEG or PNG version for easy sharing.
-
Enjoy easily rendered and then simply fine-tuned image without exposure artifacts!
Conclusion
In this tutorial, we learned a deep exposure correction technique over already rendered images, without need of re-rendering them to improve scene lighting. You can clearly see how we can easily deal with any overly bright and overly dark area of the image, right at the stage of image editing. For a more revealing effect, here's an interactive comparison slider with "before" and "after" images:

No doubt, if you've never used HDRI rendering before, you didn't know that such post-processing was even possible. Remembering how we tried to deal with overbrights or get an evenly lit scene, by using multiple re-setups, by adding additional light sources, performing numerous and lengthy re-renderings before achieving satisfactory results. It was a nightmare compared to what we can do now with incredible ease. With HDRI, you can be sure that even if you have some flaws on a rendering, you will be able to perfect the rendered image later with ease and much faster than by any other "raw" 3D means.
For example, it took us about 20 minutes to fix the exposure of a previously shared 32-bit TIFF file with two adjustment layers. Mostly to create masks and because we had to limit ourselves to just two adjustment layers for the demonstration purposes of this tutorial. But you are not limited by such conditions and can do everything you need, with as many layers and adjustments as you want.
This doesn't mean you have to be a less accurate CG Artist from now on, but it definitely means that the 3d visualization workflow will be more forgiving in terms of perfectness of results, and in terms of speed. If you set an overnight rendering or spend money on render-farm job, you will be able to sleep well, because if there were some problems, you will be sure that you can fix them later anyway. Of course, it is better not to have them from scratch at all. But only those who do nothing are not mistaken.
The HDRI rendering workflow provides new and previously impossible opportunities. For example, you can fake the intensity or even "turn on" a light source that doesn't exist on the render, just by drawing a highlights where it is needed.
And, of course, all the described approaches can be applied not only to stills, but also to animations as well. You can easily render your animation to an OpenEXR sequence and edit its exposure later in the video editor of your choice.
We hope you appreciate all irreplaceable possibilities offered by HDRI rendering and 32-bit image post-processing.
See you in the next tutorials!
Share
Please share if you like it!