Gamma 2.2 Quick Setup for 3ds Max & V-Ray

Feb 25, 2019 Update
Poster for the quick tutorial describing the gamma correction settings for V-Ray 1.5 and 3ds Max 2008 gamma 2.2 workflow.
Advertisements

In order to use gamma 2.2 with 3ds Max + V-Ray, just follow these few easy steps:

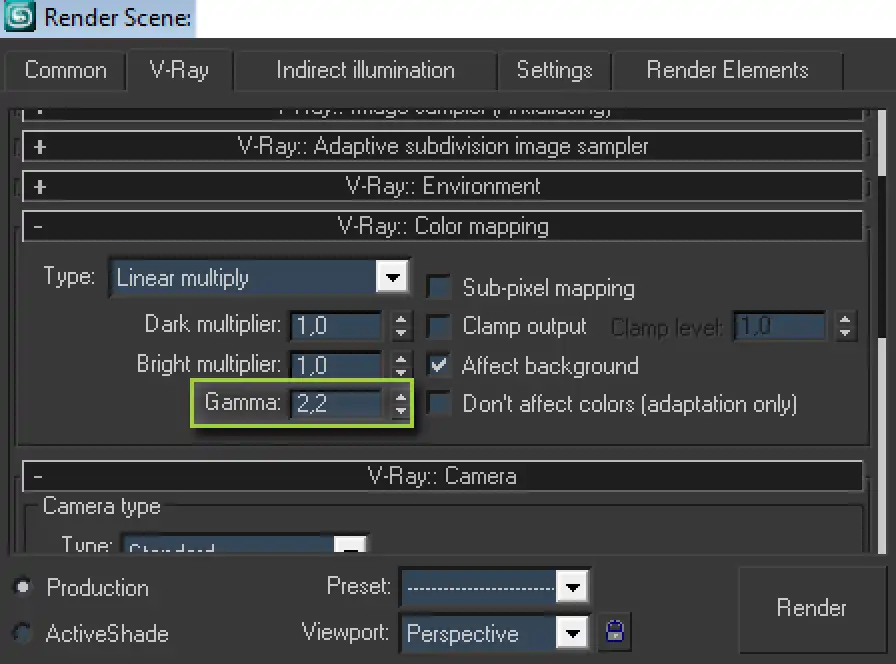
1. Change the Gamma value in which V-Ray renderer works. To do this find the drop-down tab "V-Ray: Color mapping" at the "V-Ray" tab in "Render Scene:" (F10) dialog and change the value "Gamma:" from 1.0 to 2.2.

Screenshot of 'V-Ray:: Color Mapping' rollout in 'Render Scene' 3ds Max panel with 'Gamma' set to 2.2.

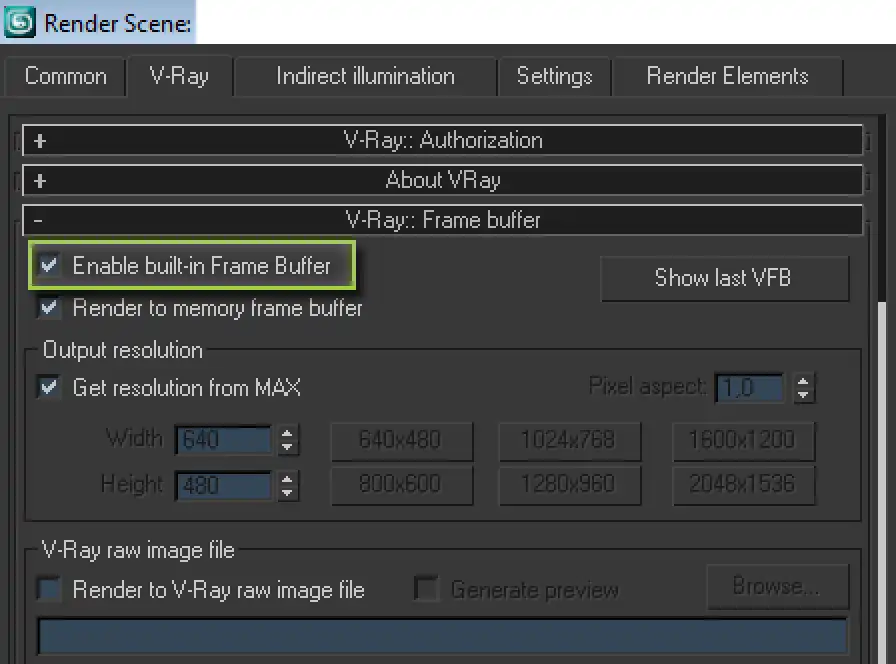
2. Enable V-Ray Frame buffer in order to be able to see the results of gamma changing. A feature of V-Ray renderer is that the color mapping gamma correction works in the Frame buffer only. So, set "V-Ray: Frame buffer" checkbox ON at the "V-Ray" tab in "Render Scene:" dialog.

Screenshot showing of how to enable V-Ray Frame Buffer in 3ds Max render settings.

3. Change gamma value for 3ds Max.

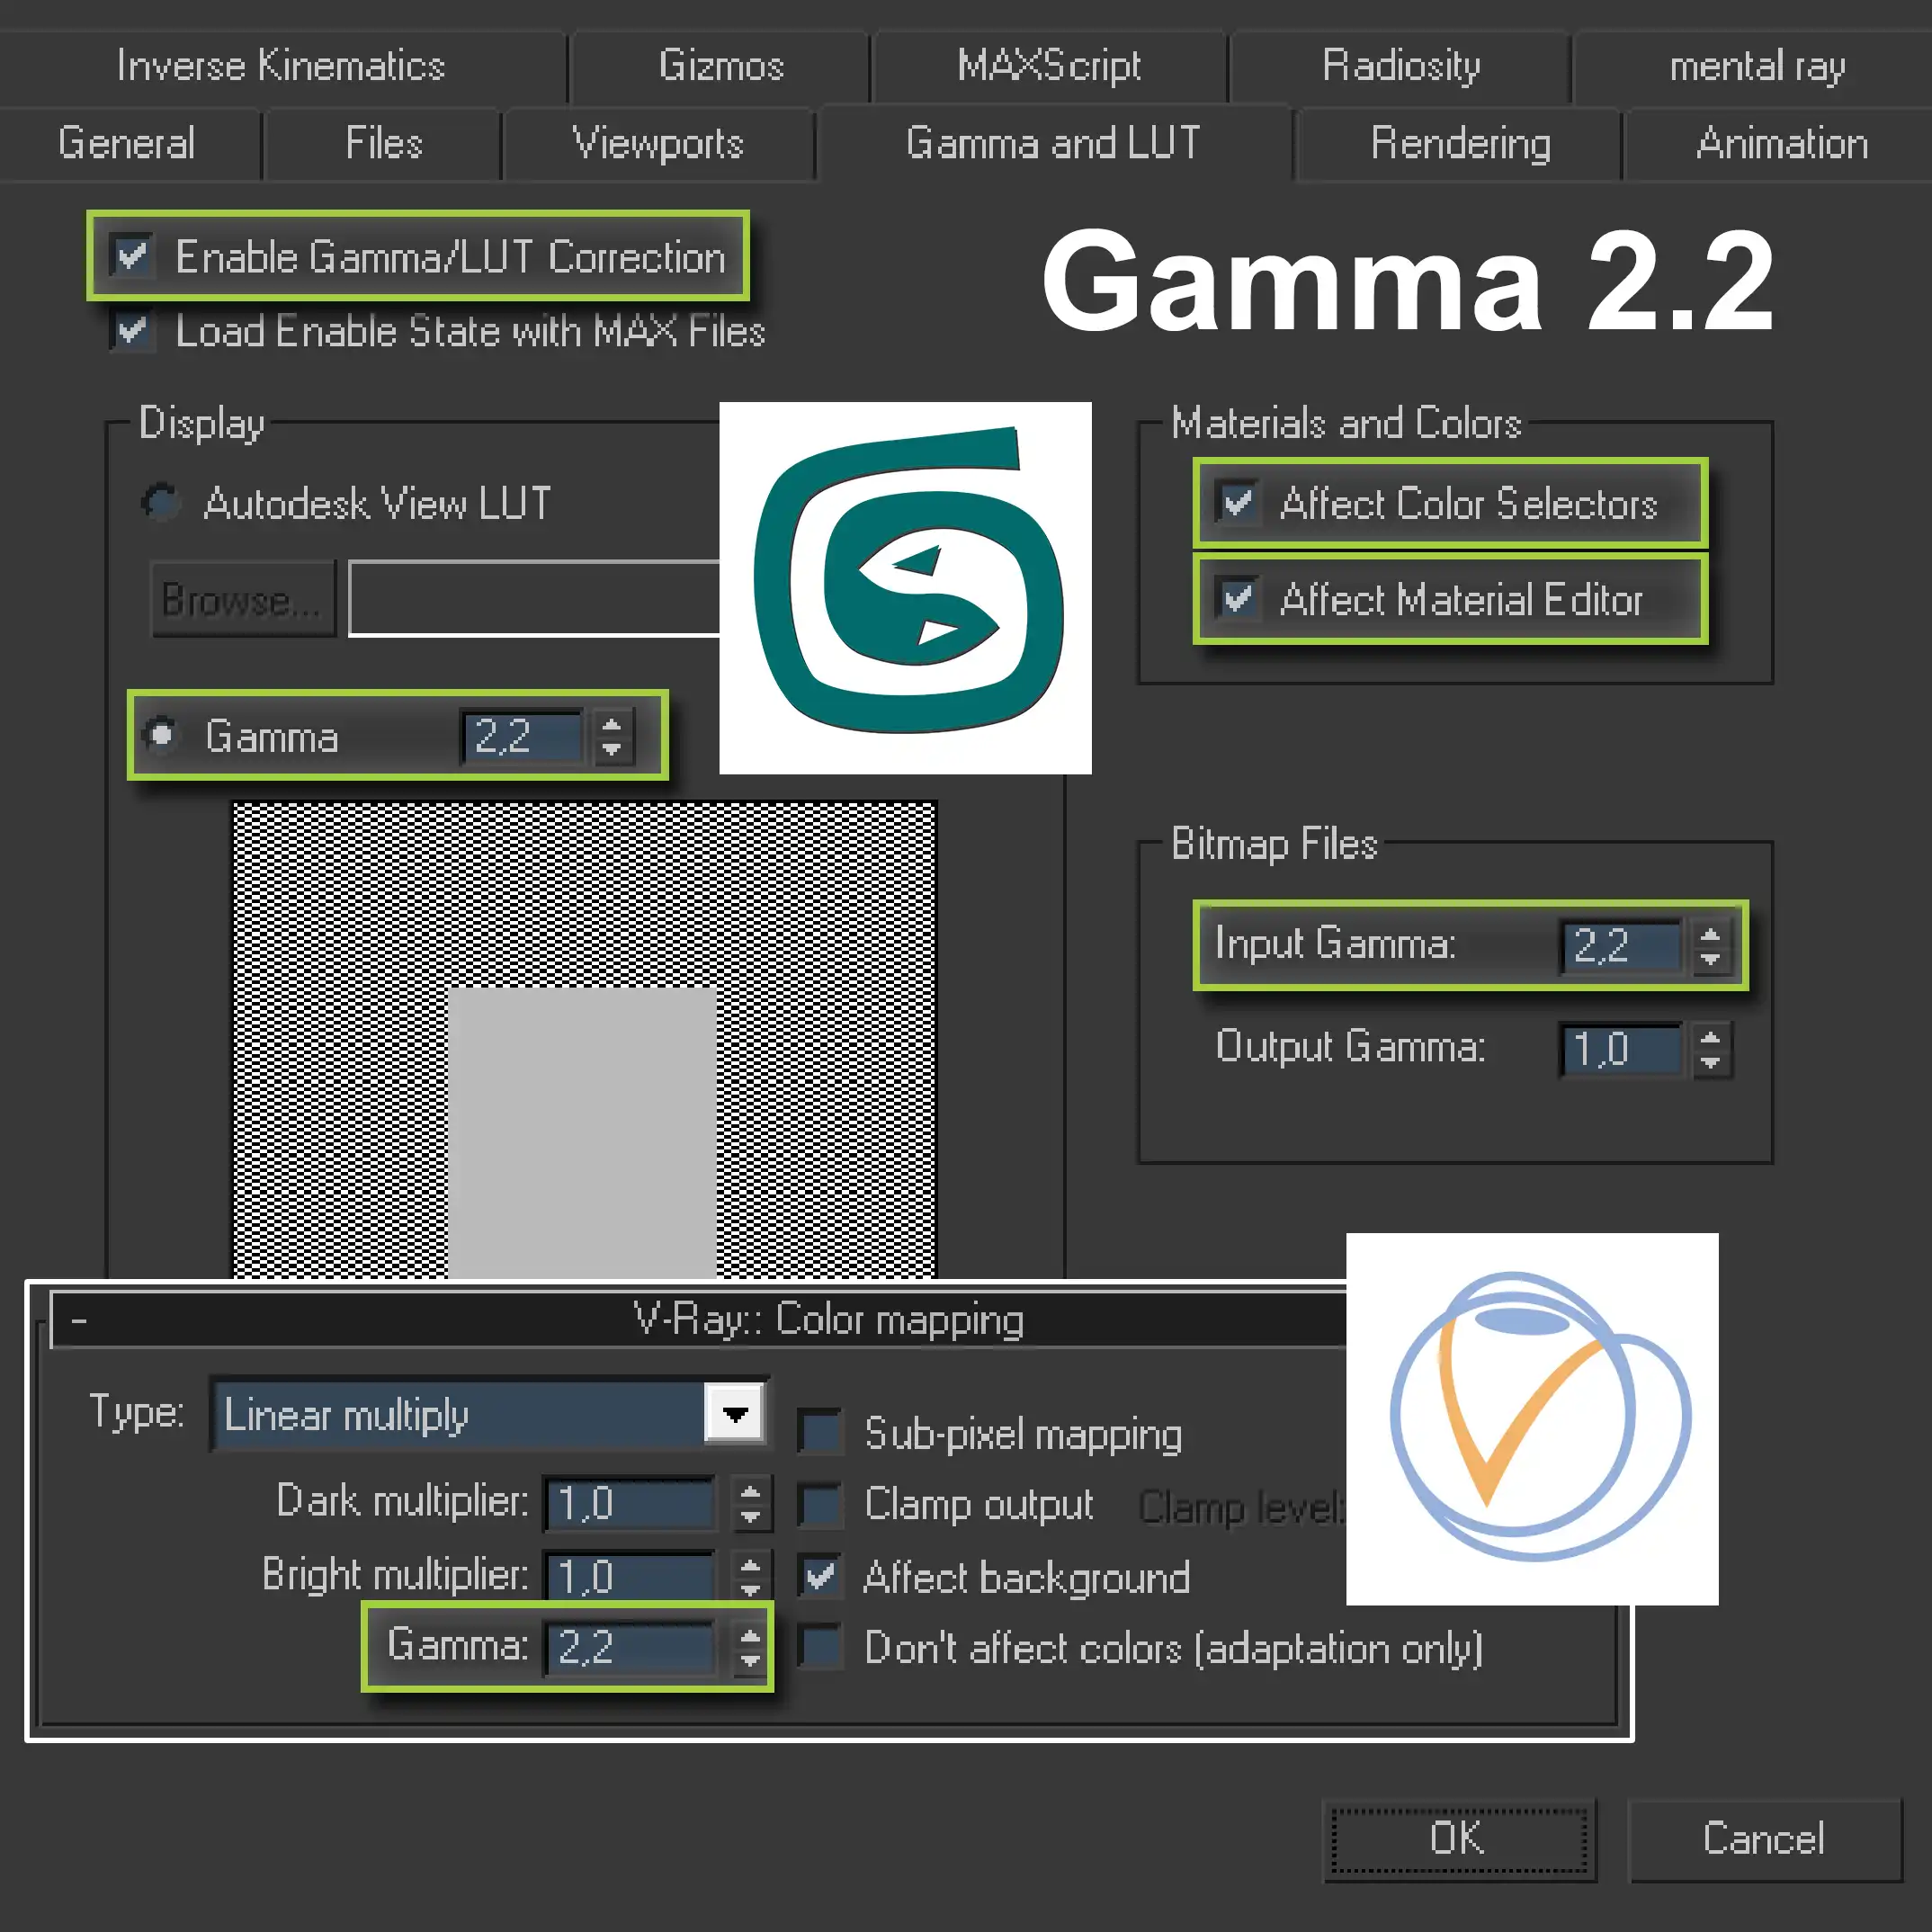
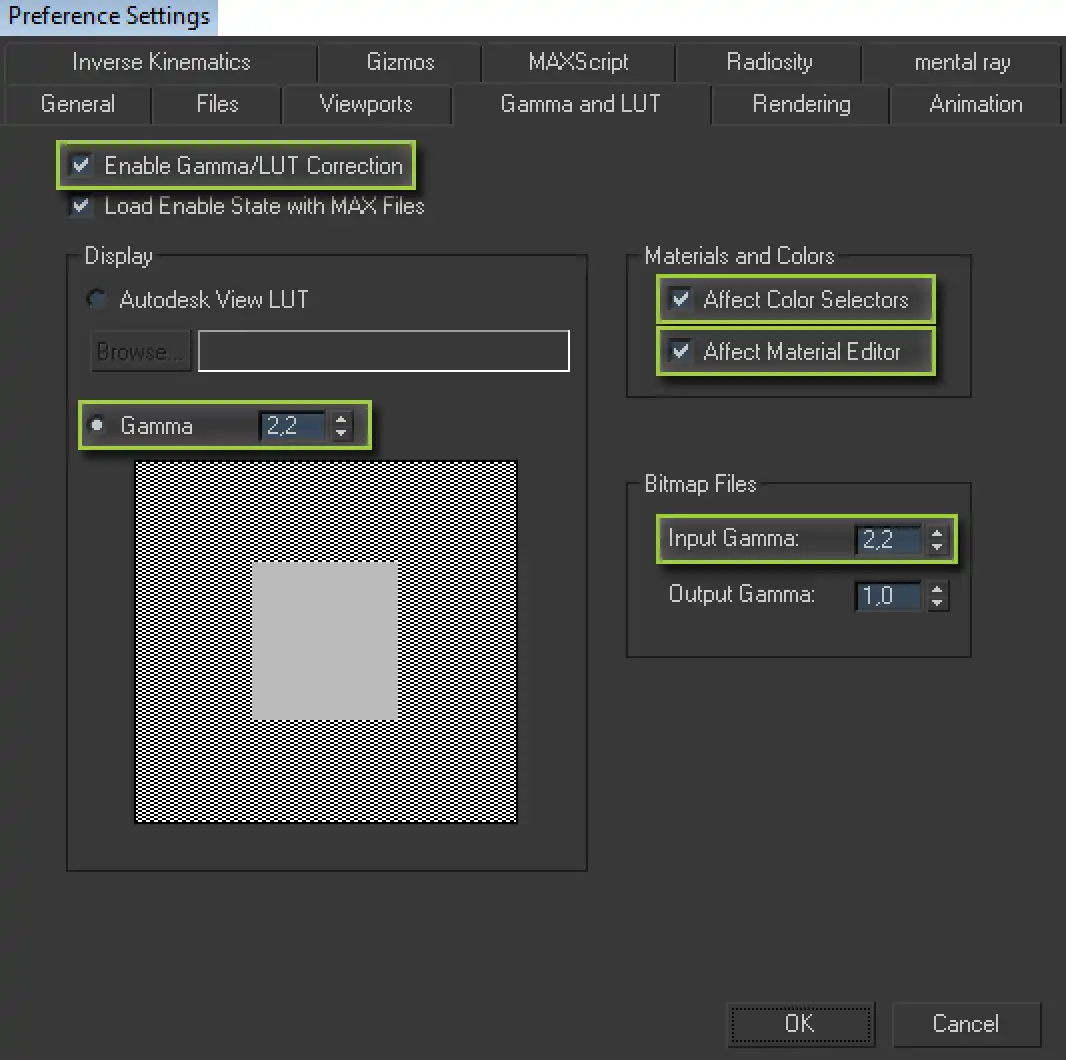
3.1. Adjust gamma of textures at the input of 3ds Max. For the texture gamma correction at the program input you should change the default value of "Input Gamma" from 1.0 to 2.2 in the Customize > Preferences ... > Gamma and LUT. Do not forget to enable "Enable Gamma / LUT Correction" option to access the gamma settings.

3.2. Set the correct gamma 2.2 display mode in the 3ds Max. To set the correct display of materials in the "Material Editor" and gradients in "Color Selector" you should also use the settings in the "Gamma and LUT" tab. For this the 2.2 value of Gamma in "Display" segment and checkboxes "Affect Color Selectors" and "Affect Material Editor" in a "Materials and Colors" segment must be set.

A screenshot showing all the check marks and values ​​must be set to enable gamma correction 2.2 for input and output maps in the 3ds max Look-Up Table located in Preferences Settings menu.

Nowadays, Gamma 2.2 has become an industrial standard for the most of 3d professionals. We hope that this quick tip will help you to adapt your workflow to Gamma 2.2!

Advertisements
Comments
ISR
Apr 7, 2010
I would like to know how to save an image in jpg or bmp from the buffer. I have two separate buffers windows. And the quality of an image in the VRay Frame buffer is differ from one in 3ds Max standard buffer. What buffer should I use?
RenderStuff
Apr 7, 2010
ISR, if you use a standard frame buffer, you will receive an uncorrected gamma image to saved. For the settings above, you should usee the V-Ray Frame buffer only.
ISR
Apr 8, 2010
But I still don't understand how can I save what I render to the buffer as bmp or jpg???
RenderStuff
Apr 8, 2010
To save an image from a clipboard (V-Ray or Standard), locate the floppy disk icon, click it, and the "Save Image" dialog box appears. There you can select the desired format and the path where to save an image file.
fromchina
Apr 14, 2010
why the number of gamma is 2.2? what is relationship with the bitmap's gamma?
RenderStuff
Apr 14, 2010
In most images, really important information is concentrated in light tones, where black tones take up the same amount of space, but contain mostly indistinguishable details. Therefore, software and hardware developers put forward the idea of ​​gradient compression. When most of the gradient space is given to light tones, at the same time black is "squized" in a small area. Gamma correction is the algorithm of such gradient compression. So, in short, Gamma 2.2 is about compressing the image gradient in order to reduce the size of bitmap images. The number of 2.2 is the amount of compression that the developers have decided is optimal and accepted as a standard for storing and displaying images on various devices. That's all. If you want to know more, read the full guide to Gamma 2.2.
Tatiana-San
Jun 5, 2010
Thank you!
Nikhil
Aug 25, 2010
i have done what you have shown but after rendering its shows perfect color in render frame buffer but after saving the file the jpg/ image gets more bright/white
RenderStuff
Aug 25, 2010
Nikhil, this is because you save the image using gamma value that differs from one the system use to output to a frame buffer. Particularly, if you use standard max's frame buffer, it saves not the shown image, but an image corrected with a gamma specified in a system parameters. Double check the Output Gamma value that is on the Bitmap section in the Gamma and LUT tab of the 3ds max system preferences. Make sure that you have exactly recommended in the tutorial value, which is 1, not the 2.2 or any other. But anyway we recommend to use not the standard max's, but a V-Ray Frame Buffer. Using it do not cause such problems. It saves exactly shown picture. Also make sure that you do not override the gamma value for jpg format when saving. The window of saving jpeg has a two special options: Use system default gamma and Override. The Use system default parameter must be chosen. In any case we strongly recommend to read the full Using gamma 2.2 tutorial and find the detailed description of all possible issues ;)
bora
Aug 26, 2010
Hello, some users might ask" why the hell my gamma setting does not seem as calibratred , the gray box is clearly visible even though i have input 2.2 to it." i think you should mention adboe gamma for calibrating monitors as a first step. infact i my self will be gratefull if you can recommend any better software solution other than adboe as it is absolute.
RenderStuff
Aug 27, 2010
Hello bora, The unified color display concept on all devices and monitors is a truly great thing. But, unfortunately, this approach is very idealistic. In spite of many steps performed to achieve the overall color display similarity there are differences, and sometimes very evident. Not many 3d artists are critically interested in ideal display of their images on the ideally calibrated monitors, as often their renderings are shown not only on their monitors, but on usual, as a rule, not calibrated monitors of their clients and colleagues. But anyway, the desire to make your monitor and visuals have ideal uniform colors is very appreciated. We ourself have calibrated monitors with adobe gamma. This is the way of progress and we hope the technology will achieve it one day!
PNIN
Feb 8, 2011
And what is the purpose of using these gamma correction? What gives?
RenderStuff
Feb 9, 2011
Hello, PNIN. The fact that a gamma correction and why is it necessary to read detailed tutorial about how to use gamma 2.2 with Vray ;)
денис
Feb 18, 2011
with a gamma 2.2 I got an bleached renders with no contrast...how to deal with that?
RenderStuff
Feb 18, 2011
Denis, yes can deal with that, by readind a detailed tutorial of how to render with gamma 2.2. If you will repeat all cneckmarks and numbers shown on screen and read litlle bit of theory, you will understand what are you doing wrong right now.
Seema
Aug 23, 2011
Really very nice and detailed tutorials,..........thnx a lot for sharing these......... :)
dimentiy08
Sep 8, 2011
Thanks guys, really helps, here would be the same detailed lesson vray Fizikal chamber. * THUMBS UP *
Anton (RenderStuff)
Sep 8, 2011

Hello!

VRayPhysicalCamera shall be replaced by the Camera of Standard. This is the best guide to the VRayPhysicalCamera;)

RenderStuff
Sep 16, 2011
You're welcome, Seema :)
HAMZA
Nov 23, 2011
can we set Gamma setting after applying all texture and material and what vray color mapping we can use or any color mapping i can use. Thanks
RenderStuff
Nov 23, 2011
Hi HAMZA, You can change the Gamma setting any time you want, it is used on the rendering, not on creating, stage. As for the what V-Ray color mapping to choose please read by the given link.
Bahodir
Dec 14, 2011
Hi , i got some problems in process of renderin', some models are rendered with kinda segments,sometimes in some scenes only, what's reason?
RenderStuff
Dec 14, 2011
Bahodir, there are plenty of reasons, but we can't help you unless we know the exact situation. The segments is surely not the Gamma setting issue.
Yan
Jan 13, 2012
Good afternoon! Thank you very much for the article, very interesting. Tell me, please, why in many forums, with the manipulation of scale are advised to use an additional plugin color correct? Or tick "Affect Color Selectors" and "Affect Material Editor" just need to do this?
Anton (RenderStuff)
Jan 13, 2012

Hi Yang!

We do not discuss rumors from other forums.

Do everything exactly to a tee, as described in this lesson, and you all will be as it should.

For a deeper understanding of the work space gamma of 2.2, read the compleate tutorial .

It all described in detail, including the appointment of checkboxes "Affect Color Selectors" and "Affect Material Editor" in the segment of "Materials and Colors";)

Yan
Jan 14, 2012
Hello, Anton. Once again I express my gratitude for the interesting lessons. Thanks for the answer. I stayed one more stupid question. Tell me, after all the manipulations of scale whether brighten material in material editor window?
Anton (RenderStuff)
Jan 14, 2012
Yes. Balls, samples of materials in the Material Editor, will be given to the Gamma 2.2 and will appear lighter in comparison with the balls with a gamma of 1.0. Although correct to say that, rather balls with gamma 1.0 look dark, but with a gamma of 2.2 - such as the need to be right from the start. As for the monitor to display the nominal, it is a gradient in the range of 2.2;)
Andrew
Feb 14, 2012
Thank you for a really sensible and high quality lessons and explanations before until I found your site was a bunch of misunderstandings of many parameters, read all your lessons in one breath, realize that it's much easier :) There is one small matter: when using VrayHDRI material, more precisely in his preferences, too, have a value of Gamma, by default = 1.0 vlyaet on it? Do I need to iznenyat 2.2? Thank you :)
Anton (RenderStuff)
Feb 14, 2012
Hey. It allows you to adjust the gamma HDR cards installed in VrayHDRI. HDR image originally perceived right in the parametric map VrayHDRI, and do not require gamma correction.
Drew
Jul 9, 2012
I agree with all of your settings, but you should also check the "Don't affect colors (adaptation only) checkbox in the V-Ray Color mapping rollout. "When this parameter is on, the color mapping will not be applied to the final image, however V-Ray will proceed with all its calculations as though color mapping is applied (e.g. the noise levels will be corrected accordingly). This can be useful, for example, if you know that you will apply some color correction to the image later on, but wish to keep the rendering itself in linear space for compositing purposes." Using this method you get quite a bit less noise in the dark areas because the calculations are made using the "lifted" image.
pietras80
Sep 10, 2012
Hi, I've seen that other cg artist set up input gamma 2.2 and output gamma 2.2. Is this correct??
Maks (RenderStuff)
Sep 10, 2012
Hi pietras80, The approach with both input and output gammas set to 2.2 also works, it is theoretically correct. But, on practice, the gamma correction workflow described here is much more convenient. That is why we advise to use exactly the one from current tutorial.
pietras80
Sep 11, 2012
Thnx for respond. I use gamma from the tutorial and works great. Greetengs from Poland :)
rdx
Feb 11, 2013
Hey hi ....m still confuse when i use gamma 2.2 wht is texture properties 1.0 or 2.2
nickalexkid
Mar 14, 2013
Hey guys, please one more question... I have set the values as they appear on the tutorial. Question: when do i see the right image on the vray frame buffer? when i have sRGB button pressed or unpressed??? thank you for your time...
Maks (RenderStuff)
Mar 18, 2013
Hi nickalexkid, You see the correct image when the sRGB button is UNpressed 😉
This discussion has been closed.