V-Ray vs Cycles Comparison
Brief visual quality comparison of imagery generated by two popular render engines. They are the industry standard V-Ray, which comes as a plugin for most 3D software packages, and the Cycles renderer, that already built into Blender. This making-of style article describes the process of converting 3ds Max scene into Blender, while maintaining the same camera angle and lighting conditions. At the end of the article comes a final comparison of results obtained with both visualizers, and, of course, it contains answer to the question, is it time to switch to a Blender completely? Based on a real project. Article will be especially interesting for experienced users of 3ds Max and V-Ray, as well as for those who are still hesitant about which software to choose to do the job.
Contents
Introduction
For many years I have been using 3ds Max and V-Ray as the default tools for my daily work. But lately, Blender's free 3D editing software has become increasingly popular. Not only because it's free, but also because it has fewer obligations to users (more on that later), and thanks to this, Blender developers embody unconventional, the most modern, extremely useful and bold ideas, despite the fact that it brings significant and sometimes breaking changes in functionality and workflow. In tools for modeling, in a way you manipulate the viewport, in UI, in variety of hotkeys, etc.. These changes make Blender a super handy tool. Therefore, Blender can no longer be ignored as a serious competitor to any 3D editor for commercial work. So while working on one of my latest projects, in particular the Pig Skull 3D Model, I decided to add the Blender option as an alternative to the native 3ds Max format.
Originally, 3D model topology, unwrapping job, material tweaking and white rendering studio setup for presentation imagery, as you can already guess, was done using 3ds Max and V-Ray.
To have a second "native" format as close as possible to the original, I have the idea to convert an already made 3ds Max scene to Blender, while maintaining the same "pixel-to-pixel" camera frame shot, same studio geometry and of course, the same light sources location and intensity values relative to each other. This allows me to setup material in Blender, making sure that Scull 3D model will looks in Cycles the same as in V-Ray. And of course, it will be interesting to compare V-Ray I'm experienced with and free open source Cycles I'm actually using for the first time in commercial project.
So, the Cycles developers describe their creation as a physically based production render. So let's find out how ready the Cycles renderer really is to produce photorealistic images.
3ds Max Scene to Blender
The first step is to export an entire scene. The original scene setup is fairly simple. It is a white backdrop made from a plane primitive and five VRayLight Planes around the Pig Skull 3D model as a lighting setup.
There are not many options available for exporting a whole scene. I personally consider the FBX format to be the most suitable for such operations. It can hold geometry, universal material options, helper objects and cameras. This is exactly what I need, except for one thing. It does not recognize V-Ray lights.
Without thinking long, I came up with an easy workaround - replacing VRay Lights with one-sided geometric planes of the same size and orientation. So the scene was exported as it is, except that instead of lights there were geometry planes. Then I opened Blender, deleted all the default objects, and imported the scene from FBX.
As planned, I replaced all the geometry planes with the Area Lights of the same size and orientation using Align Tools, and then set the same Power values as it was in original scene to achieve the same balance of scene lighting.
During import, Blender recreated all the materials from FBX as Principled BSDF nodes with BaseColor (Diffuse) in them and also kept the correct names of the materials. Because this asset relies entirely on PBR texture sets, all I had to do for each material was to remove all excessive nodes except the Principled BSDF with Material Output, and then automatically assign texture sets using Node Wrangler to Principal BSDF node. As a result, all the original materials were restored in a few clicks.
Additional Camera Alignment
Another thing to do before proceed to rendering was to set up the same camera frame. In original 3ds Max scene, I use Standard Target Camera, but in Blender, there is not such a thing as camera target. There is just free Camera. In the imported scene, the original Standard Camera was replaced by a Blender's Camera with correct location but with wrong orientation (rotation). Thankfully, the Target of the 3ds Max Standard Camera was still imported but as separate Plain Axes Empty. Again, the workaround came instantly. I select the Camera and apply Track to constraint. As a Target of constraint, I pointed out Plain Axes Empty. The orientation ot the Camera has become exactly as it should be.
A last thing to do is to set the Focal Length of the Camera. So I copied the exact number from the Lens field of a 3ds Max Standard Camera and pasted it into the Focal Length field of Blender Camera. And... Boom! The shot matched just perfect.

On the left is a screenshot of 3ds Max Nitrous viewport, Safe Frames on, Standard Target Camera. On a right, is a screenshot of Blender Eevee 3D Viewport Editor, Camera imported and additionally aligned. This is literally what I planned to achieve, but to be honest, I didn't expect to achieve such an exact match so easily between two scenes in different and competing software. Just incredible.
V-Ray vs Cycles
The moment of true is come. It's time to hit the "render button"! So I switched the Blender rendering engine to Cycles - production ready path tracer, and started tinkering the render. Actually I watched the results directly in the viewport at first, because it is much more productive than "hitting" the F12 on each change. The use of F12 was postponed for the final rendering and compositing stages.
In 3ds Max version the Displace modifier is used, but in the Blender version I decided to make displacement wia shader. They utilize different units to determine the amount of displacement. Therefore, it is very difficult or impossible to get exactly the same results. So for a better comparison consistency, I turned off displacement in both formats.
Initially, the visualization was overexposed, almost completely white. So I played with Color Management a bit and picked a following settings. The Standard type of View Transform and Exposure value of -1.45. And again! Boom!


As you can see, the Cycles version turned out to be flatter and less detailed in terms of the highlights and shadows. To achieve results similar to V-Ray, I played with the Compositor a bit.
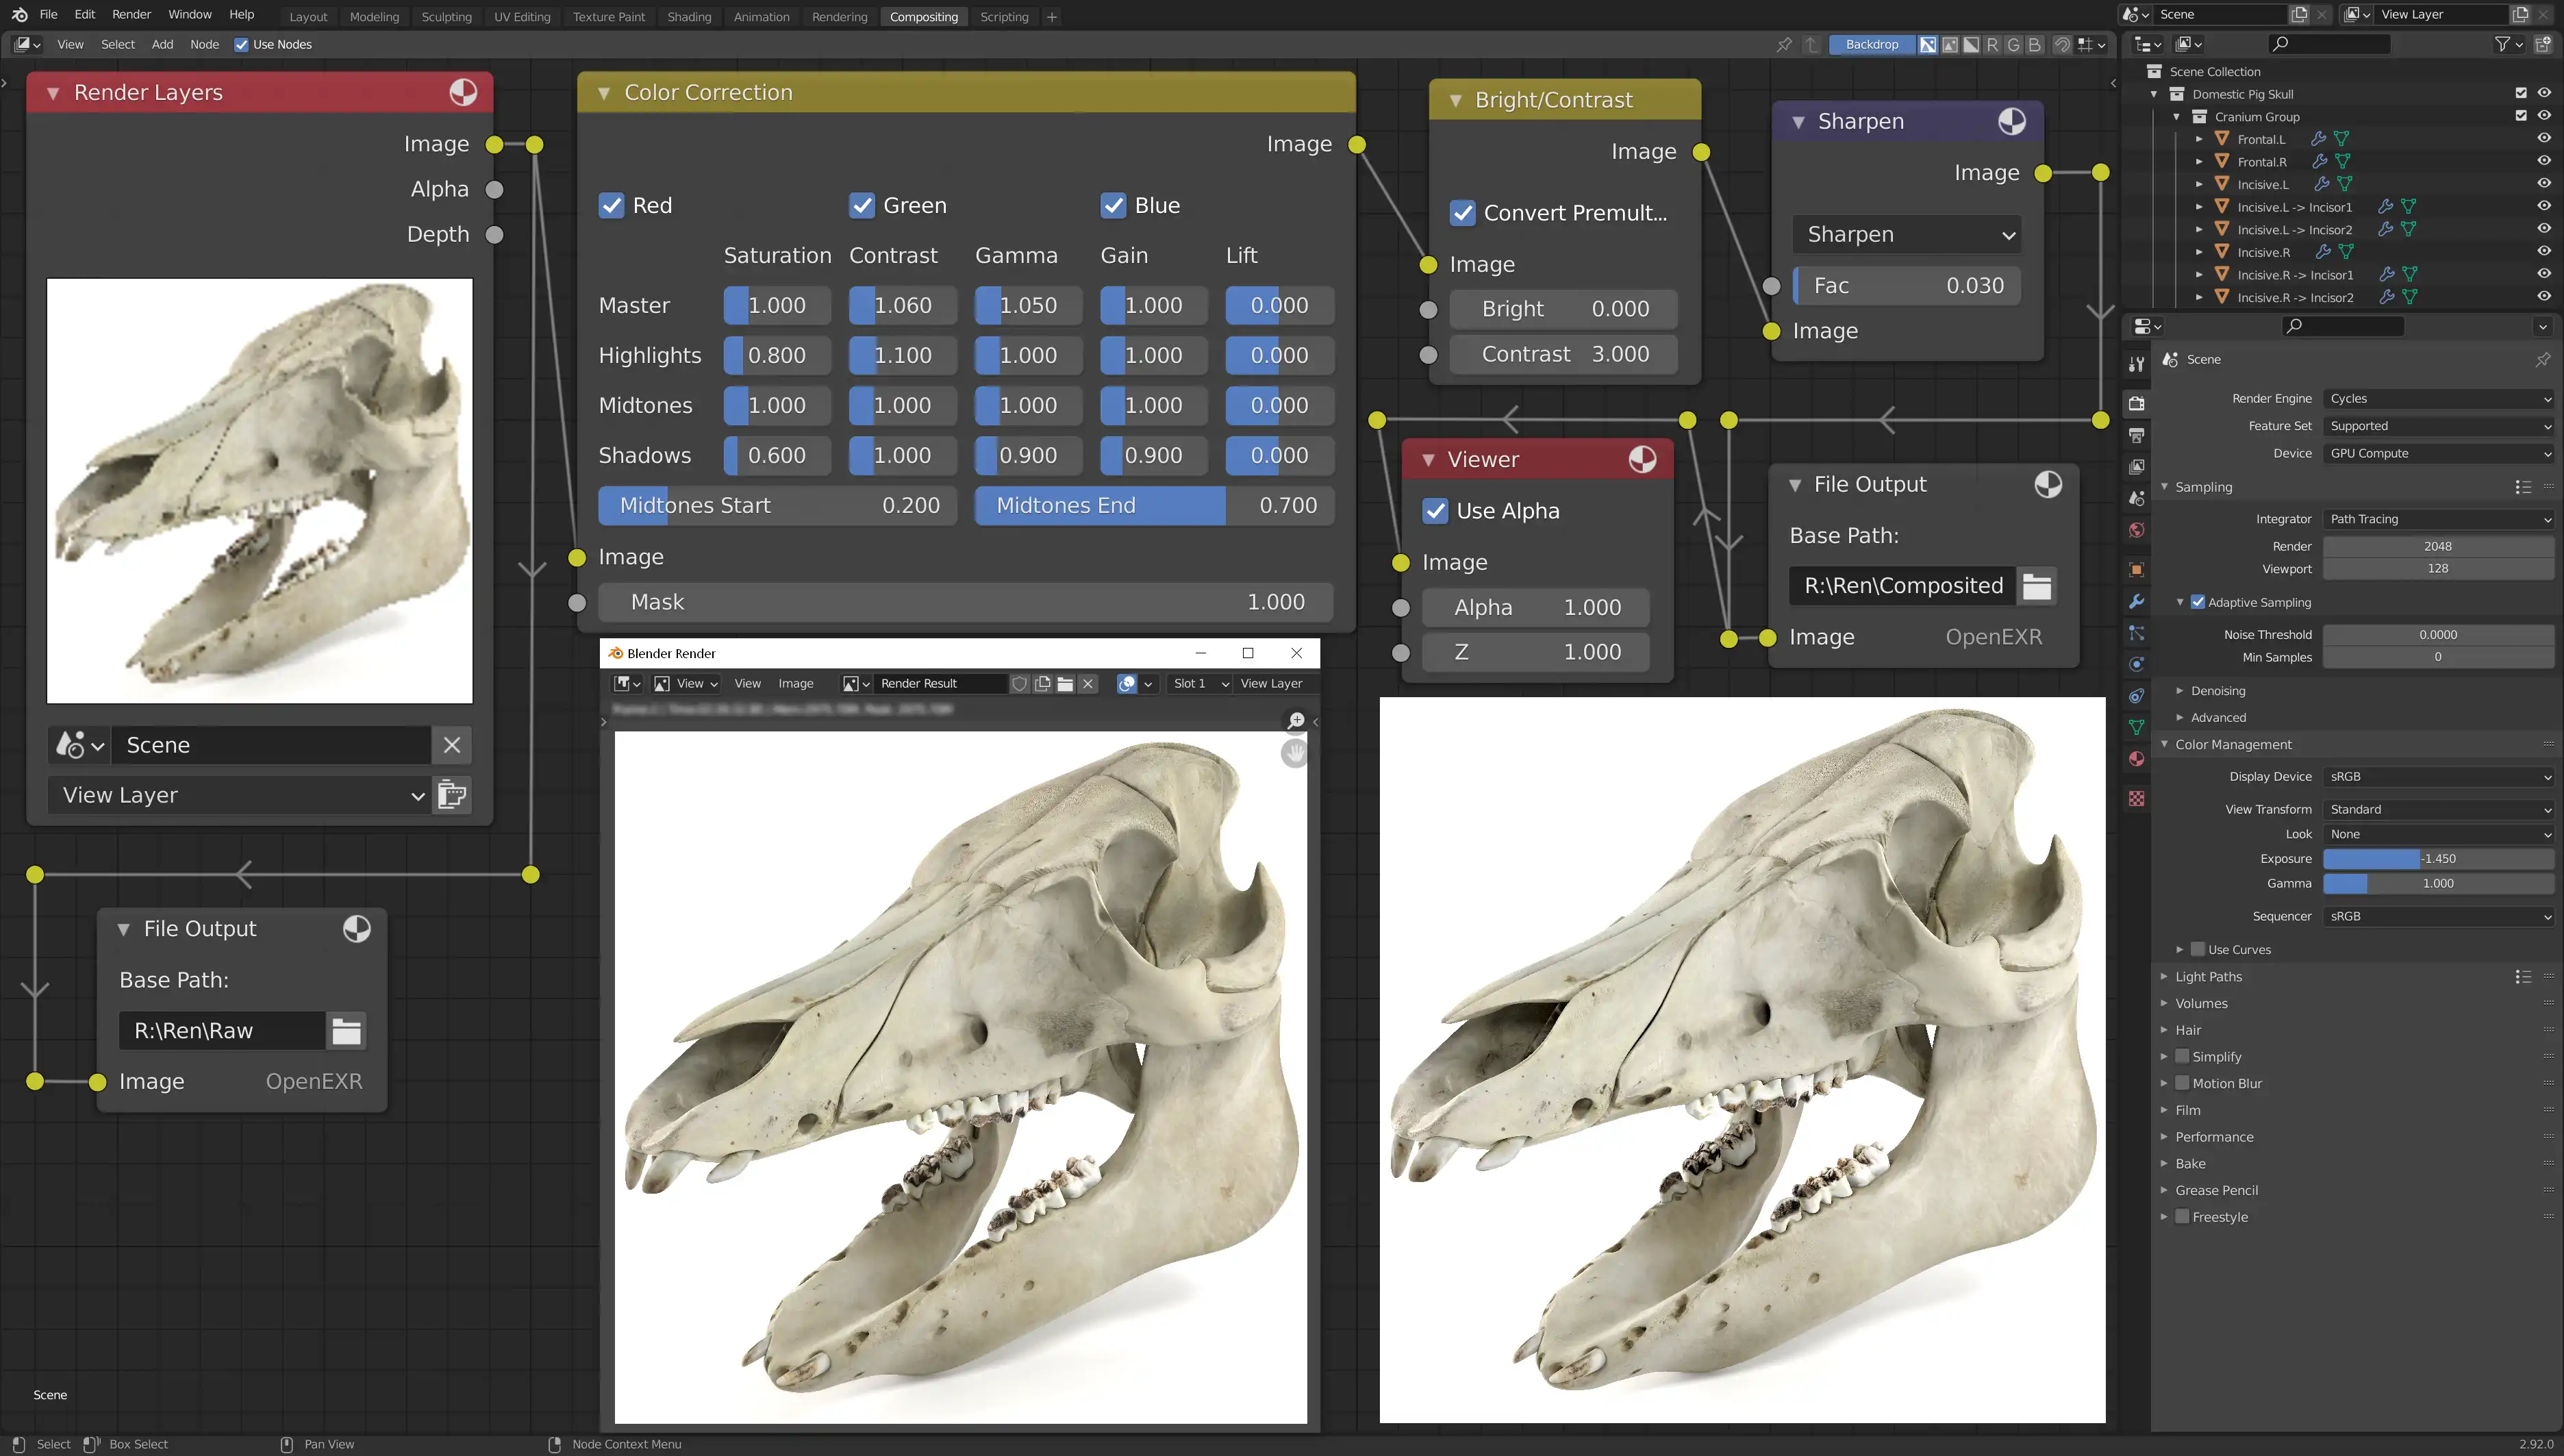
The final composited result you can see below.

It definitely is more interesting than the raw output. Of course, much better results can be achieved with deeper tweaking in the Compositor, anyway, the goal was to compare the raw results of V-Ray and Cycles, so I was quite satisfied with the results of this spontaneous comparative experiment. Hope you too.
Conclusions on Render Results
I will not use fuzzy expressions to avoid a direct answer to the question of what renderer produce better results. Obviously, V-Ray has generated a more photorealistic image with default settings and with the same balance of light source multipliers. The only settings I touched on in V-Ray were the Global illumination engine and Color mapping types. Particularly, I have used Brute force for both bounces and Reinhard Color mapping type with Burn value of 0.6.
So far, my biggest claim to Cycles as a production renderer is the available types of color mapping. For comparison, V-Ray has Exponential as a sluggish type of mapping, Linear multiply as most color burning type, and Reinhard, which allows you to balance between with it Burn value. The Cycles Filmic Color Management type can be compared with Exponential as well as Cycles Standard can be compared with V-Ray's Linear multiply. But there is nothing in between.
The Filmic was rejected because it too dull, so the only option left was is a linear approach of Standard. No matter how hard I tried to adjust the Exposure to avoid color burns, the result was either flat with dim highlights or satisfactorily bright, but with burnt over-saturated colors.
Can Cycles be used as a high-quality photorealistic production renderer? Of course, but with some additional compositing.
Will I replace paid V-Ray with absolutely free Cycles for my commercial work? As long as the developers of the Cycles or perhaps some side developers of the free Blender Aadd-on, don't come up with something similar to V-Ray's Reinhard color mapping option, most likely not. Anyway, the Blender constantly evolving, so maybe in the near future the V-Ray over Cycles as the main production renderer will be an opinion to rethink.
One might say that this particular 3d model of an animal's skull with coarse dry bone surface material is not the best subject for photorealism testing. And I don't think that's right, because we actually had a bright object on a white background without the ability to emphasize the shape of the contours with a contrasting background or bright glossy highlights. So the work was done almost entirely with the play of light and shadow. This is a very difficult situation. The simpler the object, the more trickier you have to be as a 3d artist to make it look real. And both renders did their job pretty well, of course, V-Ray did it noticeably better.
Blender as Additional Tool for 3D Artists
If you're like me, and 3ds Max or any other commercial 3D editor is your main tool, should you replace it with Blender?
Returning to what was said earlier, Blender is completely free, and in fact, since you don't pay for it, its developers don't really owe you anything. If they decide that any feature is not relevant today, they can simply eliminate it at their own discretion, no matter how many artists and companies have previously relied on it. Technically, this feature will probably still be available as an addon, which you can still install manually, but it will no longer be officially supported. Therefore, sooner or later it will be impossible to use due to the incompatibility of some next Blender version. And this is the main phenomenon of Blender.
At first glance, deleting a familiar feature may seem like a bad thing, but in reality, many of the things we're used to can quickly become obsolete. Sometimes you may not want to relearn things in a new way, but removing legacy software functionality will provide the best possible performance and ensure you use the latest approaches in the industry. The more modern the approach, the better your productivity is.
And it is this philosophy that continues to make Blender less predictable in the long run, but more productive and efficient with each update now. This means that if you continue to ignore it and use only your "good old" 3D editor, there will be some point that more agile 3d artists will take your place, using the latest tools and doing their job more efficiently, because they do not burden themselves with clumsy software that preserves outdated features for backward compatibility, and it is this behavior that prevents the introduction of new features instead.
Take, for example, 3ds Max. If you look at, say, screenshots of 3dsmax 7, you will instantly recognize it if you are familiar only with latest versions of this application. In 2004 this kind of UI was cool, but hey, it's 2021 outside. Gluing several Metro panels on top does not make the old interface modern. It is static, unchanging. To make two viewports instead of default four, you need to go to settings, change the layout...pfffff.
Scene Explorer, oh, Layer Explorer, no, Scene Explorer - Layer Explorer, that's it! This is a separate thing to discuss. How such a simple tree-like interface can be so unsuitable for use with those unwanted spontaneous collapses and reorders of groups & objects... The startup time of 3ds Max takes probably 10 times longer than it should be, simply because it loads things, the existence of which you do not even suspect, have never used them and never will. The list is endless... Today's, 3ds Max is the Frankenstein, sewn from patches on top and between outdated functionality. Of course, I don't know the real reasons, because I'm not an insider, I'm just a user. But, from my point of view, it looks quite clear, because obligations before users, before large studios, that bought their product, a 3ds Max team can not just throw out old things. They still support them to guarantee that the workflows of their clients, developed over the years, remain unchanged. This is the price of stability.
So, should you replace your current 3D editor with Blender? My answer is no. You can get the best from both worlds. For example, productivity from Blender and stability from 3ds Max. It makes sense to consider Blender as an additional tool in your arsenal. This is especially true because Blender is free. When you need to do 2D work, you're probably using a separate tool similar to Photoshop. If you want to do texture painting, you maybe use one of the Substance suite tools. And you're probably not thinking about replacing your 3D editor with Photoshop or with Substance Painter, so why should you do this with Blender?
I have been using Blender for several months now. As the main tool for modeling, retopology, uv unwrapping and even as sculpting tool, but still do the final visualization in 3ds Max and V-Ray. So I use both.
There's no chances that I'm going back to 3ds Max to do in it what I'm already using Blender for. I really don't believe that 3ds Max will ever catch up with these perfect tools. But I still feel quite comfortable doing 3D visualization step in Max.
By the way, I studied Blender using the CG Masters crash course called The Blender Encyclopedia. I especially recommend the episodes from Chris Plush. Actually, it's the best explainer I've ever listened to. This trainer is really extremely talented in explanations. But, give my advice, as someone who goes through all the episodes of Blender Encyclopedia, when another dude comes into play, it's better to just get the title of the episode and find the topic elsewhere on the Internet. This will save you a lot of time and nerves. Really.
Here is a free sample from The Blender Encyclopedia with Chris Plush.
Hope you enjoyed this mini Making-Of and V-Ray vs Cycles battle. If you do, please, share it with others. A handy gadget with some social share buttons can be found in the lower left corner of the page.
See you in the next article!
P.S.
If you are a super loyal 3ds Max user and for some reason do not want to use Blender, there is a Cycles for 3ds Max version. I personally haven't tried it yet, but you definitely can do your own experiments.
Share
Please share if you like it!