Correcting VRaySky With ColorCorrect

Aug 13, 2020 Update
Visualization results comparison with VRaySky by default and VRaySky with reduced saturation using ColorCorrect.
Advertisements

Preface

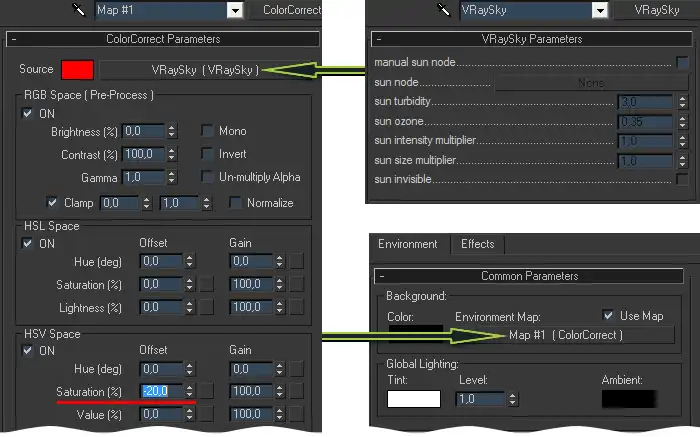
While working with V-ray renderer it's often arises the need of using a V-Ray specific map - VRaySky to illuminate 3d scenes. The scene illumination with VRaySun + VRaySky is actually the most common approach to V-Ray users. In most cases a standard settings of the map is quite sufficient. But sometimes the color saturation is too high. It gives a strong yellow or blue light. Unfortunately, a combination of ozone and turbidity parameters only, does not always provide the desired result. But as a way out of this situation is the ColorCorrect using. In practice, adjusting the VRaySky map Saturation value with ColorCorrect is the most flexible way to manage VRaySky illumination.

Problem

The VRaySky map, while placed in the environment slot, will generate a blue ambient lighting, trying to mimic the illumination from a real sky dome. This is a great tool overall, but it has one downside. This tool seems to force the user to use their vision of "physical correctness". According to the principle, "if the sky is deep blue, it should probably generate the same oversaturated blue ambient light." But it's hard to agree with. Especially looking out the window. In the real world, the sky is just a big mass of transparent air. Only because of its large mass you see the sky as blue one. You can see this effect on flat piece of glass. If you look at its flat surface, it will be transparent, if you look at its edge, it will look green. But even if powerful direct light (sunlight) is passed through very thick glass, it will not come out of the glass as a saturated green light, as if it had been filtered by a green filter. In fact, the light that pass through a thick glass, is expected to be a little greenish, but it will definitely will not be oversaturated green. The same we have with the super bright sun rays passed through the layers of air. Little bit of a blue, but mostly a white, because sunlight rays is the whole spectrum of light with a slight predominance of yellow. Plus, the human eye (brain) adapts to the illumination of environment and makes "color corrections" by itself, so you mostly perceive "usually white objects" (white piece of paper for example), as white, even if the ambient light has a color shade different from white.

The same we expect form photorealistic renders. The white piece of paper, must be the white on a render, not a blue one. The default "V-Ray style" approach is to oversaturate the scene with blue lighting from VRaySky first, and then "to do something later" with it. In particular, a typical "fix" is to use white balance on the camera, while applying unwanted color correction to all scene materials, even where you don't want to.

Solution

In practice, it is much more correct to just create the right lighting from the beginning, so that you do not have to fix it later.

The ColorCorrect is a great way out of this situation. It's enough to wrap VRaySky with ColorCorrect to control a final color. Just insert a VRaySky map into Source slot of ColorCorrect and then adjust the Saturation [%] value until the annoying blue color bleeding is gone.

ColorCorrect + V-RaySky using

And that's all folks!

Advertisements
Comments
ashrul
Mar 24, 2010
great idea! i always found that sometimes there were too strong blue color when i use vray sky as my envy map. n here are the solution. thanks bro...
Еллесар
Feb 2, 2011
Thank you-)
Lamu
Feb 5, 2011
ckazhite please, as you can open a window VraySky Parametrs?
RenderStuff
Feb 9, 2011
Hello, Lamu. VraySky Parameters - This scroll parametric parameters HDR VRaySky card. To see the parameters of a scroll of the map, like any other in 3ds Max, you must open it in the Material Editor;)
Anton
Feb 21, 2011
I try, it is impossible! You could not even write again in more detail the sequence? And then the picture is clear all like, but in practice it is impossible.
RenderStuff
Feb 21, 2011
Anton, a hint advanced level and assumes a basic level of knowledge, in this case about VRaySky. Most likely you have a question not in the ColorCorrect, namely that you are not fully familiar with the scheme of VRaySky. If you have mastered the technique of lighting scenes via VRaySun ligaments and the VRaySky, the trick described in the tutorial, you will immediately understand :)
Anton
Feb 21, 2011
Thank you, I'm still a bit figured out on their own, although it is not sure what is right to the end. In general, it is not enough lesson on proper lighting scenes (for interiors, including a) because under scheme 2: 2, it looks and it turns out quite differently.
Rodion
Feb 24, 2011
This problem, after I reinstalled my system in Max had a problem related to the visualization VraySun + VraySky. When using the sun I automatically accept VraySky it is displayed in Evmirovment tab. And when I visualize or all dark blue, or yellow + texture of the object is not visible. Tell me what could be the problem and how to solve it?
RenderStuff
Feb 24, 2011
Rodion, this lesson - tip the advanced level and assumes a basic level of knowledge.
Rodion
Feb 25, 2011
I thought maybe it would help me in the end did not help. You could tell me what's the problem? Watched threads on various forums have not seen similar problems. Some were outraged that they had the shadow of a blue tint, but the sky they were normal, and I have either all yellow or all dark blue + no texture on the object he just black. If you please tell me what the problem is or where to find the answer?
RenderStuff
Feb 25, 2011
Rodion, to make the right decisions as to what you watch on the visualization, you just need to understand the essence of the work VraySun + VraySky. Otherwise, it simply can be no question of using these tools. Unfortunately, at the moment, we do not know any interesting lessons or guidance that could simply and clearly explain the operation of these instruments. For this reason, we will write a detailed, comprehensive and clear coverage of all a lesson on using VraySun and VraySky. In any case, you must understand that to present the whole theory here in the comments just not physically possible. To describe it, you will need a multi-page guide with illustrative images. In short, VraySky - HDR is a parametric map, imitating the scattered light of heaven. More information about its parameters you can read in V-Ray help . The main parameter that you need to understand is pusth slot Sun node, clicking on which you will be asked to select the source of light, the geometrical position in which the stage will depend on the strength and color VraySky glow. VraySun - directional light source designed to simulate the glow of sunlight, similar to the built-in 3ds Max Target Direct. More options c VraySun you can read in V-Ray help . Do it as you do. Then, from the tab Environment Environment and Effects window, using Drag and Drop, drag VraySky and tossed it into the empty balloon material Editore, instensom. So you will be available to its parameters. We click on the node and slot in of Sun viewport choose VraySun. Then Sun node name appears VraySun. This would mean that VraySky now associated with VraySun and on its geometrical position will change color and intensity VraySky glow. Now temporarily disable itself VraySun, removing the check mark from its setting Enabled. So you turn it off completely and on setting the time, get rid of his bright% B St.5cheniya prezhigayuschego scene. After that Sun moves and do test renders, you will see how the Sky glow color. Then, when you will pick up the best light of heaven, back plug Sun and changes its parameter Intensity multiplier. By reducing it, and pick up the desired brightness of the sun. And necessarily involve the GI, or you just do not see the work of Sky, which is the source of the secondary light (GI). What is the GI and read how to use it in a lesson the V-Ray Indirect illumination .
Lamu
Mar 20, 2011
Thanks for the answer!
ASRockus
Aug 10, 2011
Hello RenderStuff. Just yesterday, I puzzled how to get rid of the excessive blueness! Now everything is clear, thank you. But there was another question: If the Sun in the lower stage is lower, then there is already a yellowish tint, and how to be with him?
Artem
Aug 10, 2011
ASRockus, if you're talking about the color of the sky is cool "turbidity" in the least. Well, the same adjustments of color can change the HUE value))) But the color of the sun more difficult. In fact, for greater flexibility, instead of Wray dignity can juzat any other directional light. and it has to be played with in its temperature (color) and of other settings. Just plug in Vreyshedous settings. ^^
ASRockus
Aug 10, 2011
Hi Artem. Less than the value of 2 does not deliver. And about another source, it's like? in conjunction with the Sky? I do not quite understand, if not difficult to verify.
Artem
Aug 10, 2011
All the same only instead of Vray Sun you use Target Direct, in its turn on the shade and instead of the Shadow map rollout General Parametrs absorbs Vray Shadows. Then do whatever you want, change the color intensity of the size of the light source and so on. For soft shadows rollout VrayShadows Params put a check in front of Area Shadows. Blur shadows depends on the values ​​* size Hope helped)
ASRockus
Aug 10, 2011
And the intensity of the source (say Target Direct) has to turn in his own parameters Sky.V parameters twisted (Targ. Dir.) Zero effect it. Did I do that? Thank you!
ASRockus
Aug 10, 2011
And if you use the Target Dir + Sky., Is missing on the floor or the wall (depending on the direction) of the light area of ​​the opening of the window, as is the case with the use of sun + sky. Or something I do not understand (I'm still just learning) :)
Anton (RenderStuff)
Aug 10, 2011
Hi. VRaySky - it's just a parametric map. Same as any other parametric map of 3ds Max. Its parameters only its same properties can be changed. It's just that it is one of the parameters of the container is controlled by the vector with the object and purpose. This container can be any object that is the goal. This may be at least a light source, though Target camera. Irrelevant. Importantly, using this vector to define a container space of the scene from which the directions will change color parameters VRaySky, as well as, its brightness and the brightness of the sun at the point it. That look, it looks like VRaySky card: http: //www.spot3d.com/vray/help/150SP1/vraysun_sky_param.htm See right bright spot, clearly mimics the solar disk? that is the location of the disk to the VRaySky, it depends on the direction of the control container only vsego.Nikakogo impact on the parameters of the object that defines the vector, VRaySky not imeet.Sun intensity multiplier - only sets the brightness of this point, and with it the entire map VRaySky.Esli vector for VRaySky you set the direction of the light source, the brightness can be adjusted only by his own settings;) And light up from Target Direct, you can not see because you have not configured it as needed. First, the spirit its direction so that it shines is in the direction in which you want it illuminates the area on the floor or the second attitude stene.Vo its intensity, to see the spot glare from the rest of the lighting in the third stsene.V , specificity Target Direct is that it illuminates only a fixed area of ​​the stage space and you need to extend this zone to one that completely cover your window aperture;)
ASRockus
Aug 10, 2011
Thank you for the clarification ogromennoe (as always clear, and objective) .Vot why I did not see "light in the window" and changes in the scene when the intensity parameter wrap at Target Direct, the whole thing in this scroll Hotspot / Beam, Falloff / Field right? Thank you!
Anton (RenderStuff)
Aug 11, 2011
Yes exactly ;)
Roman
Oct 29, 2011
RenderStuff, and you do not plan to write a how to use the Color korektom. And it does not work that it set it up with Vray sky / I can not remove the yellow tint of the light. : |
Maks (RenderStuff)
Oct 29, 2011
Roman, see the adjacent lesson about how to use the ColorCorrect .
Roman
Oct 29, 2011
Here I am tried korektirovat color VraySky dragging it in the Output type of card, and output together with the dragging VraySkay slot Environment Map? Create automatically replacing VraySky. Well of course the editor VraySky materials VraySan assign manually. Then you can adjust an output color directly to the map curves. As for me is much more convenient and clearer work with color channels than ColorCorrect. Well this is my opinion. I advise you to try. * THUMBS UP *
Roman
Oct 29, 2011
I forgot to say. When you drag the Output card from the slot investments VraySky Environment Map, select the type of instans copy.
Anton (RenderStuff)
Oct 29, 2011

Hello!

To be honest, it's completely unclear what exactly caused the difficulty in understanding ColorCorrect.

Nevertheless, the variant suggested by you, theoretically completely analogous to that described in the article, with the only difference being that in the role of the corrective map, Output should be used instead of ColorCorrect.

However, unfortunately, only theoretically ...

The main misconception about VraySky is that you need to adjust its color. But this is stupid. The color of VraySky is excellent. He is exactly what the light of the sky must be - blue. Its correct to absolutely nothing. The main problem of VraySky is that its blue color is saturated with a rhyme, that is, it has too high saturation.

Returning to Output, this card does not control the color saturation. With Output you can only increase or decrease the brightness of the RGB color channels.

Theoretically, in order to reduce the saturation of a certain color, it is necessary to dimmer its channel. For example, in our case, VraySky is saturated with blue and we theoretically need to mute the blue (B-channel). However, in practice, pulling the B-channel schedule, in RGB mode, at the Output card, we do not translate the VraySky color to a more gray one, as Saturation does in ColorCorrect, but only change the color balance by driving the saturated blue into dirty yellow-green: D What will be worse than VraySky without correction. In addition, making one of the channels dimmer, together with it, the overall brightness of VraySky also decreases.

Using ColorCorrect, not Output, the value of Saturation changes with a single numeric field. Everything is extremely simple. In the Environment you put ColorCorrect, in ColorCorrect you put VraySky. Then in ColorCorrect you change the value of HSV Space Saturation. All!

Roma, we are glad that you joined the discussions of our lessons, however, be more careful with advice that could mislead other trideshniki. Do not give unconfirmed advice based only on your own IMHO. Unfortunately, the Output option does not work as it should. To correct VraySky, you should use ColorCorrect.

If you have any difficulties in mastering ColorCorrect, then click on the link that Max gave you and there ask questions about the work of ColorCorrect. We will help you to understand everything;)

Naugal
Nov 22, 2011
And how can VraySky The adjusted by maksovskogo ColorCorrection? and that due ColorCorrecta 3dmax Design 2012 takes off ...
Anton (RenderStuff)
Nov 22, 2011
That is completely analogous. Doing the same things and that with the ColorCorrect, and then twist the Saturation slider to the left to desaturate VraySky so far as is necessary. To correct VraySky, described in this lesson, ColorCorrection fits no worse ColorCorrect;)
moroz
Jan 4, 2012
Hello, Render Stuff! The issue of such a plan: Do you need to tie VRay Sky with VRay Sun in the Colour Correct?
Anton (RenderStuff)
Jan 4, 2012
Hello! Meaning ColorCorrect, in isklyuchitalno color saturation correction of VRaySky. No relation to the most conjunction VRaySun and VRaySky, ColorCorrect not. According to this VRaySun VRaySky and to do all that without ColorCorrect;)
moroz
Jan 4, 2012
Yeah, that is, we connect them, and then just saturation Wray sky twist in minus correctness of color and throw in invayroment pravelno ??? I know? Just lesson you on screen did not show, and I hesitated a little bit =)
Anton (RenderStuff)
Jan 4, 2012
This is a PRO level tutorial. It initially assumes that you already know well how to use the VRaySun and VRaySky and not explain the basics of working with these tools. I advise you to read some basics first. Do not go into the jungle. Understand the basics. If something is not clear, ask the question right here.
sadat
Oct 7, 2012
i cant say how much i'm happy now....thanks.
Nagger
Jul 12, 2013
Thank you...
Rakesh Yadav
Feb 1, 2014
thank u..
vaibhav soni
Mar 14, 2014
very very thank you dear !
bashir
Dec 27, 2014
Vary helpfull tutorial
This discussion has been closed.