Ray Casting & Memory Allocation in V-Ray 1.5
What is Ray casting and why data organizing into BSP tree speeds up rendering. Why 3D visualization requires a lot of memory. Why a memory allocation failure causes V-Ray crash, and how to prevent it by not buying extra RAM, but using a batch geometry loading technique, to render heavy scenes. What's the difference between static and dynamic geometry types for mesh objects. Why dynamic raycaster slows down rendering and how to define dynamic memory limit.

This series of tutorials was originally written in 2010. Then the working version of V-Ray was 1.5. The idea of this series is, firstly, to explain all the important concepts of visualization in simple language on illustrated examples, and secondly, to provide a package of initial values or so-called "universal" settings for the renderer which are tested in practice, suitable for most scenes and allow you to achieve best balance between quality and speed (rendering time).
Since then, in the latest versions of V-Ray (currently V-Ray 5), some settings have been renamed, moved to other sections, hidden or completely removed from the user interface.
To learn more, read the Main 2020 Update.
This is a tutorial series intended to guide you through all the basic V-Ray rendering settings. It successively describes all the V-Ray-related tabs located in Render Setup: ... (F10 key) dialog.
You can use the navigation menu below to learn more about other tabs settings from other chapters.
V-Raytab: Antialiasing & Color mapping in V-Ray 1.5Indirect illuminationtab: Indirect illumination in V-Ray 1.5Indirect illuminationtab: Irradiance Map in V-Ray 1.5Indirect illuminationtab: Light Cache in V-Ray 1.5Indirect illuminationtab: Rationale for the Choice of GI Engines in V-Ray 1.5Settingstab: DMC Sampler or Speed vs Quality in V-Ray 1.5Settingstab: Ray Casting & Memory Allocation in V-Ray 1.5
Contents
Introduction
This is the last tutorial we have planned for this series. It explains the main technical problem that any professional 3d visualization artist encounter with at leas once, ie the almost unlimited greed of any 3D renderer to consumption of RAM. As well as ways to solve it by toolset available in V-Ray. This will allow you to complete the rendering of a very complex scene, no matter what, but of course with some trade-off in speed of rendering.
Together with that, all the basic settings of the V-Ray:: System rollout will be explained, especially those related to data and memory management.
Rendering Process Crash Problems
So, anyone who makes very complex scenes, interiors with classic furniture, stucco or exteriors with lots of vegetation, heavy traffic, etc., already knows what will happen if there is not enough RAM during rendering. The entire 3D application can simply crash, losing all computed data. This is a very annoying "thing" that can immediately cause frustration and disappointment, even in very psychologically strong and calm people. IThis can make most V-Ray users nervous, it can even completely disarm someone, killing any enthusiasm to continue any further work on the current project. This "surprise" is especially unexpected when it is a commercial work with a clearly defined and concise term.
Why is this happening? What causes this error? Can’t you do anything simple? Can it really be true that to complete a big project we inevitably need to increase the amount of RAM, installed in computer? Is it true, that the only way out is to go to the computer store and buy a few more sticks of RAM?

To answer these questions, let's look at how V-Ray uses memory and what management tools are available.
In any software, memory management and the way data is organized and structured is a very complex and routine topic that goes deep into programming. Well, at least it is a true for 3d artists. There is absolutely no sense to go deep into describing the data arrays and the ways of addressing to them. But, it's good to have a general idea of how things works to manage the memory settings available to the user. Especially considering that the user is completely limited to the proposed interface options. Fortunately, V-Ray expose to us some of its system settings to manage.
Raycasting Basis of Rendering
Before start the rendering, V-Ray must load the scene geometry into RAM for operative using it during calculation of the final image. This is the initial aspect of the entire rendering process. After realizing such necessity of renderer, the importance of memory management in the rendering immediately becomes clear. But, of course, we wouldn’t just stop on this and will follow the order of rendering step by step.
Once data is loaded into memory, V-Ray rendering can begin. The calculating of each pixel starts with the basic operation - "probing" of scene geometry. This is done by using a special algorithm, the so-called ray casting. The essence of this algorithm is that the camera emits "rays" for each pixel of rendered image, which (rays) fly into the space of the scene until they intersect (hit) the geometry of an object in the scene to determine exactly what scene geometry is actually visible from this camera. Each hit of the ray is recorded, and thus the render engine generates data on the location of the geometry in the scene, its basic properties and other information necessary for further rendering.
Disadvantages of Unorganized Data
The process of calculation of the single raycast, i.e. the ray intersection with geometry and the determining of its properties, is not time significant. However, the number of raycasts during photorealistic rendering can exceed manyfold the number of rendered image pixels. For example, the HD 1920x1080 resolution render is made of more than 2 million separate pixels. This scale changes the situation fundamentally, making the raycasting process very resource-intensive.
Let us take a formal analogy to the technically complicated raycasting algorithm. This analogy will greatly help us understand the specific problems of memory management in V-Ray.
So, let’s imagine the scene geometry as a set of usual green tree leaves, and the raycasting algorithm as a tireless ant, which have to find the most delicious yellowish leave amongst all green ones. In our analogy, this yellow leaf will embody the needed data about the geometry, hit by a raycasting ray.
Initially, the data on the scene geometry, which will be loaded into memory, is arranged randomly in terms of raycasting process. Let us similarly suppose that all the leaves were chaotically thrown into pile.
Our hard working ant knows that he needs to find a yellow leaf among the myriad of unnecessary for him green ones. How can he do this? Of course, he will have to go sequentially through a bunch of green leaves, starting from the closest to one, until he find the one and only yellow leaf.
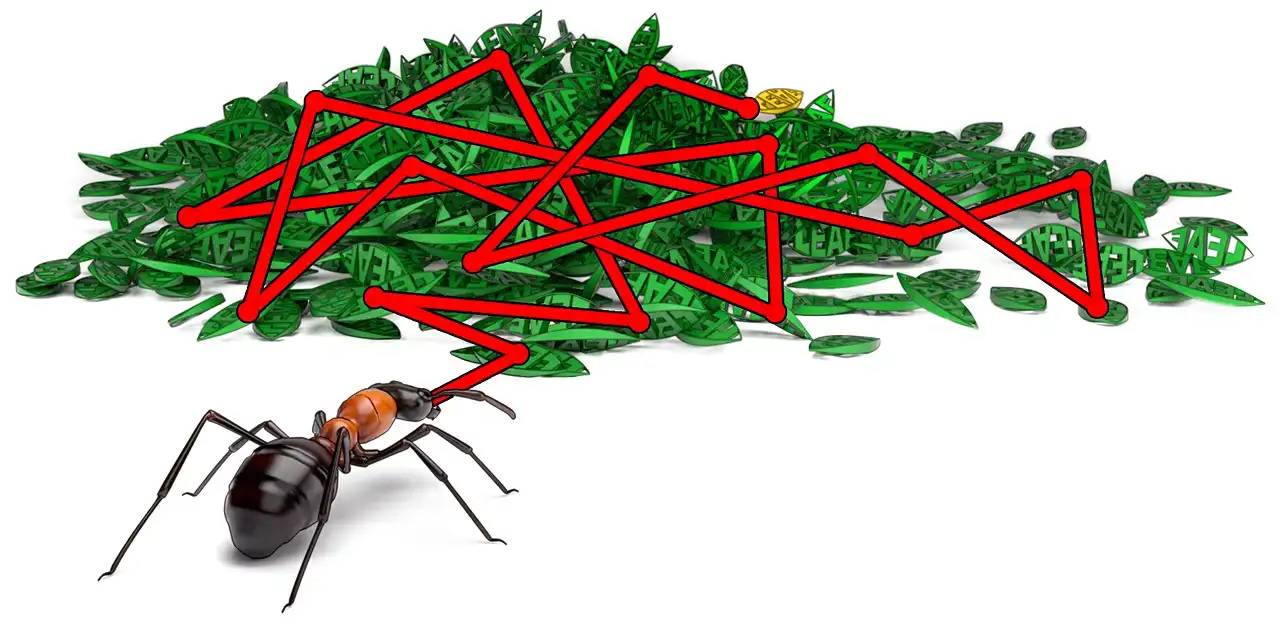
He will have to approach first leaf and see whether it is yellow. Then, come up to the second and look if he needs the second leaf. After this, he has to go to the third one, and again check if that is yellow. Thereby, our ant needs to go through literally every leaf until he finds the desired yellow one.
The situation when the ant reaches the yellowish leaf at the beginning of his search is probable. However, there is also absolutely no guarantee that the yellow leaf not be the latest in pile. In such case, to find a single yellow leaf, our ant would have to go over the whole pile of greens.
A similar situation can occur with unorganized data on the scene geometry. Raycasting algorithm will be forced to sequentially go through all the geometry for determining the properties of a single point in the scene, which was intersected by raycasting ray.
This method of finding the required information is too tedious for our imaginary ant, as well as for the computer’s CPU, which instead of actual rendering has to busy oneself with non-rational searching of data in memory.
Convenience of Data Structured in BSP Tree
To expedite the process of determining the properties of the scene geometry by raycasting, V-Ray organizes all the geometry into a special convenient structure.
V-Ray lays out the geometry on the "shelves" of the hierarchical tree structure into RAM. This structure is called the Binary Space Partitioning tree or simply BSP tree. It is a special method of presenting an array of data as a binary tree structure.
The BSP general idea is that scene with all geometry is subdivided into two parts. This action creates the two branches extending from the origin (the scene), which is called the Root of the tree. After the first subdivision, each of the data branches emanating from the root, are again divided in half, forming new branches. Points from which the new branches emanate called the Nodes of the tree. The process of dividing the geometry of the scene and the record the tree structure branches in memory lasts as long as it reached the limit, which is set in the BSP tree parameters. The result of the last division of branches is called the Leaves of the tree. In that way, V-Ray creates the branched structure of the whole scene geometry, which is great for the quick search of the properties of the required area in the scene.
For the obvious presentation of how this happens, let's go back to our entomological example. The analogy with leaves and leaf-seeking ant perfectly illustrates how the initial organization helps in finding the needed data.

If we do not throw the leaves to a disordered heap, but carefully arrange them on the branches of a tree, we can significantly speed up the process of finding a yellow leaf. In such situation, our ant, avoiding all unnecessary branches, can go straight to the needed destination. That happens because he does not need to check all the leaves. Instead, he can almost immediately see the path that could lead him to the place where the yellow leaf grows, and quickly climb there by his strong legs.
According to this principle, V-Ray structures the geometry in the scene, catching the one more opportunity to save our precious time, even on such seemingly insignificant operations.
The basic principle of rendering at this level is quite simple: load, structure, found the necessary properties, and render :)
Now that we are familiar with the principle of data structuring for raycaster, we can move on to the next step in understanding of how to render a heavy scenes with V-Ray.
Static Raycaster or Loading Entire Scene Geometry
As we already know, to start the rendering process the scene geometry must be loaded into memory. In the previous chapter, we looked at the tree structure, the accelerator of raycasting process.
However, as we mentioned at the start of the lesson, there is one rendering issue left. Everything goes smoothly during rendering, as long as the RAM amount, physically installed on your computer, is enough to contain the whole scene geometry.
The fact is the V-Ray has different types of raycasting algorithms. The simplest of them is the so-called Static Raycaster. It loads the geometry of entire scene into memory at once.
Imagine that we are going to start rendering a scene with many millions of polygons, so for its entire loading the available RAM amount is not enough. What happens then? Unfortunately, in this case the one of the most unpleasant V-Ray surprises occurs. It is the program crash.
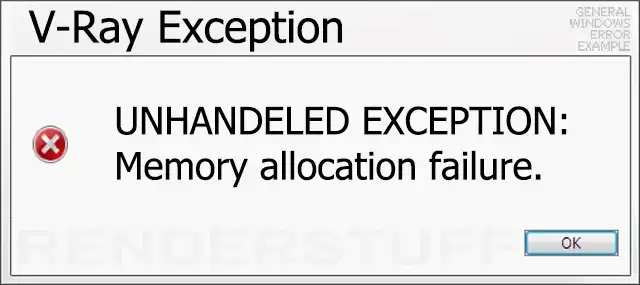
A general (not a real specific screenshot) example of a crash report window showing the unhandled exception caused by memory allocation failure.
A Software crash is the unexpected abnormal termination of the program due some critical error that software can not handle. In V-Ray (actually in any software), this happens when an available RAM is already depleted, but V-Ray is still trying to allocate more to load all the geometry into memory. Because this is physically impossible (no more free RAM available), further allocation causes an error and crash. The message about creating in memory the geometry tree structure «Current Task: Building static raycast accelerator...» is usually the last thing you can see before the failure. After that, the rendering is interrupted, 3ds Max spontaneously crashes, and system is showing you an error message box.
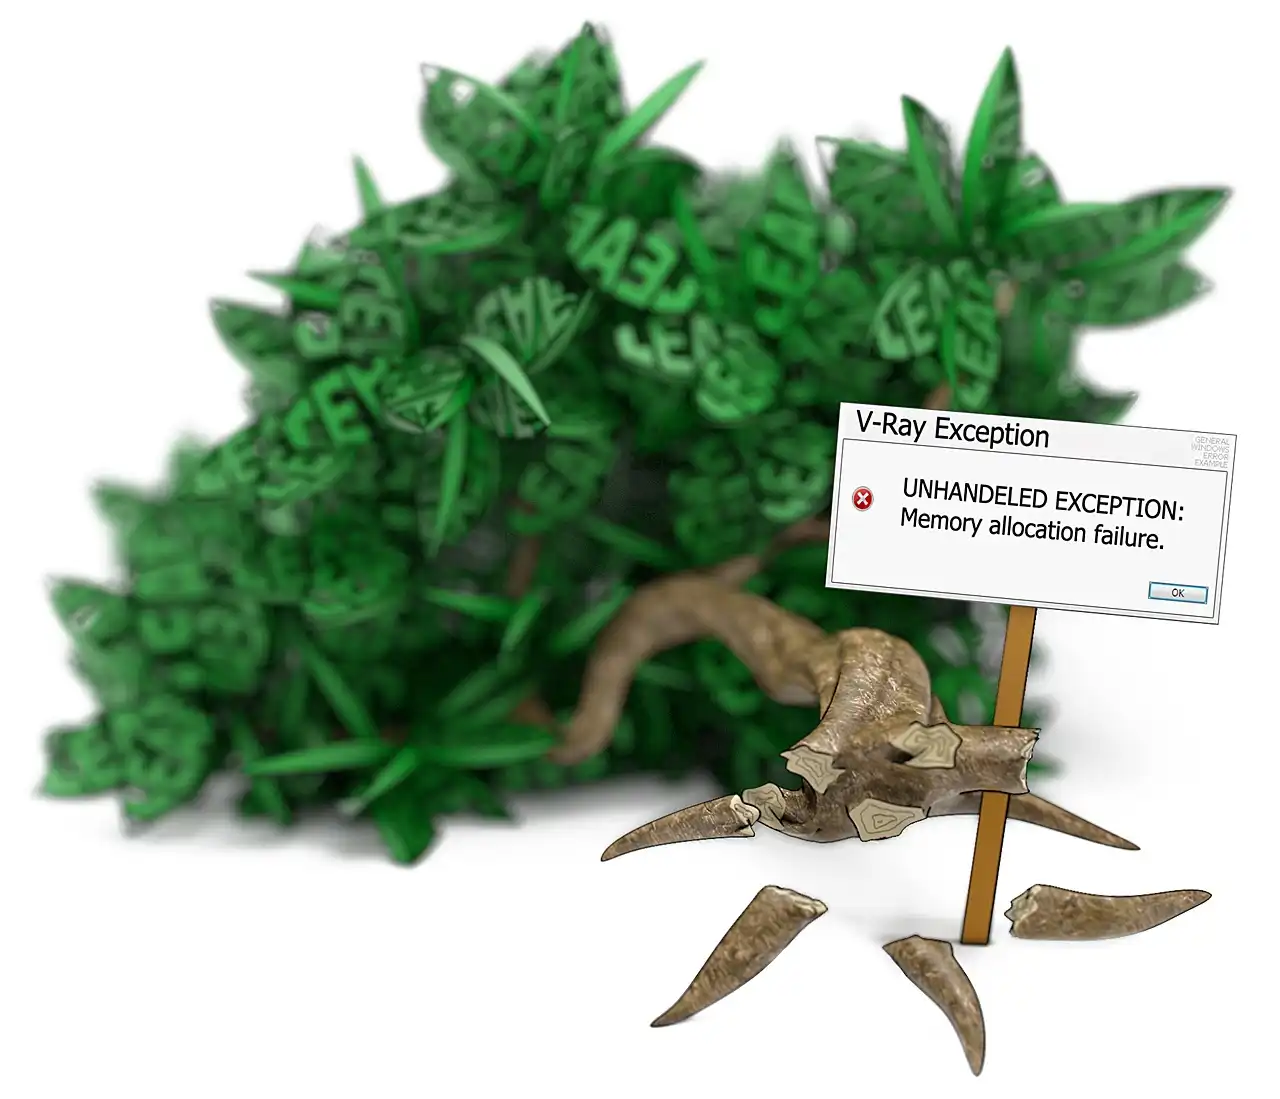
For example, by our analogy, it is an attempt to grow too many branches with leaves than a tree root can withstand. Then the crown of the tree becomes too heavy and eventually uproots a whole tree from the ground.
The only way out of this situation without increasing the amount of RAM is to abandon the one-time entire scene loading approach. Instead, we need to partially load the geometry into memory, that is, only a certain part of it, which is currently needed to render the current part of the image at the current time. Not the whole geometry of the entire scene in advance.
As might be expected, V-Ray has such a way to load the geometry into the memory. This method is embodied in a special, dynamic type of raycaster, which is designed exactly for such situations.
Dynamic Raycaster or Loading Geometry in Portions
In contrast to the basic raycasting engine called Static, the Dynamic Raycaster allows us to load only a certain part of the geometry, needed for rendering of the current image part.
Dynamic raycaster loads into the memory only a certain portion of the geometry, not exceeding a specified number of megabytes. Once the loaded portion has been used in rendering of the current image area, the occupied part of the RAM is cleared and the new piece of geometry loads to the freed place. Obviously, the new geometry portion will be used to render the following part of the image.
Rendering using dynamic raycaster eliminates the memory overflow problems not only due to the exact memory limit. Dynamic raycaster knows how to use the operating system’s potential in memory management. This means that even if the current image area calculation needs to load objects, the total size of which exceeds the established memory limit, the operating system still is able to allocate a resource for the successful continuation of the rendering. In particular, Windows use so-called paging (or swapping), which is the ability to "virtualize" memory by storing data not into memory, but on a drive.
Despite the aforementioned advantages of dynamic geometry loading, we must realize that if dynamic raycaster was the really universal solution, then an unreliable crashing static raycaster would be simply needless. However, V-Ray uses the static raycasting engine by default.
Not surprisingly, versatility is not without costs. The loading and unloading of the data spends our precious time, as any other operation. Even if we set the ideal (for our situation) RAM limit, the use of dynamic raycaster will significantly increase the overall rendering time. Moreover, if paging will be used, it will slow down rendering even more.
Consequently, you should use static raycaster by default to get the maximum computational speed without interrupting a rendering process to batch loading of geometry and only if the memory, installed in your system, is not enough to successfully render a scene, only then dynamic raycaster should be used.
This is the whole basic theory of raycasting that you really need to know to work with V-Ray system settings. Now it's time to consider the actual settings we have at our disposal.
Raycaster Params: Binary Tree Settings
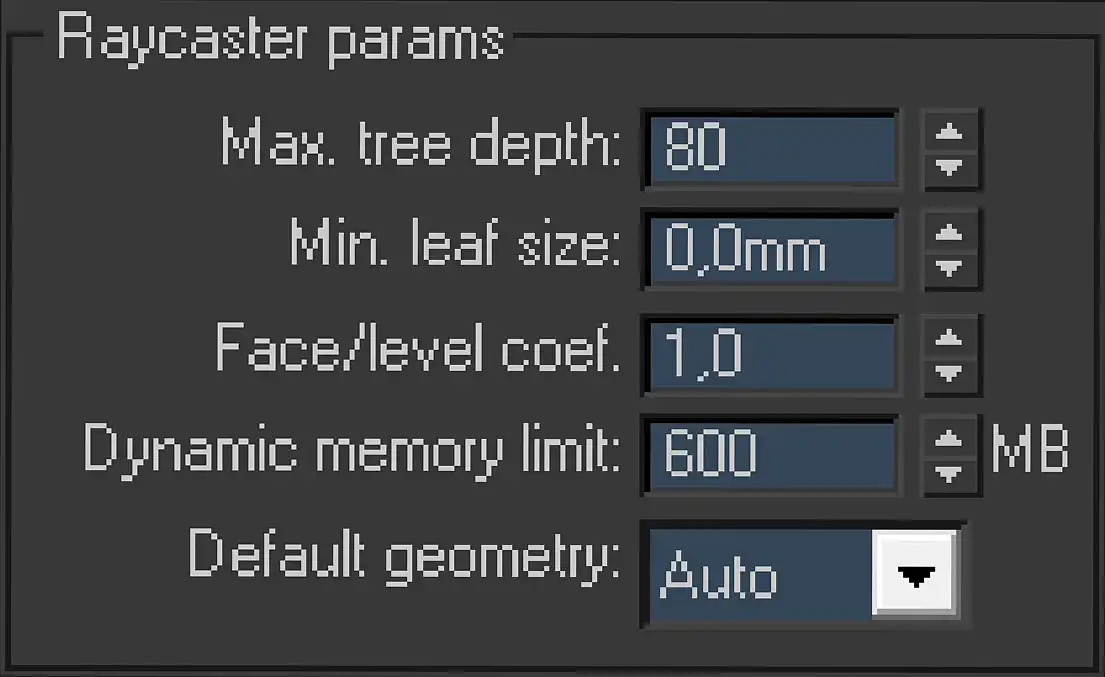
Screenshot of Raycaster Params section of V-Ray:: System rollout located at Settings tab of 3ds Max Renders Scene dialog.
The first three parameters describe the properties of the raycasting acceleration structure, the BSP tree. They are quite abstract, so let’s begin with determining the effect of each of them.
Max tree depth: is a parameter that limits the depth of the branches of a tree. It specifies the number of divisions of the scene space. The numeric value of this parameter reflects the maximum number of levels from the root to the leaf. The higher the Max tree depth: value, the more branches the tree will have.
Min. leaf size: limits the structure of a binary tree by a minimum size of the leaves. This option allows us to stop the division of the geometry in the scene by setting the value of the minimum leaves size in system units. Small Min leaf values size let not to limit the branching of the tree, and thus it grows as much as the previous parameter defines.
Face/level coef. determines the maximum number of triangles (minimal units of geometry) contained in a single leaf node. Smaller values of Face/level coef. can produce more branched tree, with lots of leaves.
As we know, V-Ray uses the organization of the scene geometry in a form of a BSP tree to accelerate the raycasting process. It is logical to assume that the deeper our tree structure, the smaller its leaves, and the smaller the units of the geometry each leaf contains, then the more space in memory we need to hold tree’s branches and the greater is the potential raycasting speed it can provide.
However, there is a limit in such acceleration. After a certain threshold, further division is not reasonable, since the excessively branched structure of a BSP tree makes the work with itself too difficult. The raycasting algorithm may spend the computational resources for walking through the huge BSP tree, ruining all the gain in speed.
So, what is this limit and what is the best BSP tree size for getting the maximum raycasting speed?
The answer for this question is not very encouraging. Only experimentation work can help in finding the optimal BSP tree parameters. There are no fast settings for any scene. For best raycasting speed, the each specific scene must have the individual BSP tree settings.
When rendering still images, the messing with numerous experiments on the above parameters is completely unreasonable. Just because the spending lots of time for saving the same time is nonsense. You may agree that it is an absurd to make 10 times the final rendering in the search for BSP tree optimal settings, to eventually make the same rendering the eleventh time 10 minutes faster.
However, the parameters of a BSP tree are not just a demonstration of technical abilities of the rendering engine. Their purpose becomes clear when it comes to animation. Suppose we need to render sequence of 1000 frames. Then we can safely perform an experimental selection of optimal BSP tree parameters. Even if the choice of the best values will take up to 10 or 20 final renders, and the rendering speed of each frame will increase by 20 seconds, such effort is very useful. After all, this optimization can easily save about 5 hours of computing time.
In practice of static rendering, the need to change the values of these parameters exists only in theory. It can only make sense when we want to free memory to suit some other needs, so we reduce the size of the BSP tree at the price of slowing the rendering time.
In the best V-Ray settings, the parameters responsible for the BSP tree structure should be set to the default V-Ray values, without making any changes without well-considered necessity.
Raycaster Params: Memory Limit & Geometry Type
Dynamic memory limit: is parameter that determines the limit of memory available for dynamic raycaster, in megabytes. It defines the maximum amount of RAM to be used for every geometry portion during the work of the dynamic raycaster. Literally, established in this parameter number of megabytes is divided between computational threads of the current computer. Low values of Dynamic memory limit: can significantly reduce the raycaster performance; they may lead to the frequency increase of loading-unloading the geometry portions. Additionally, small values can cause the regular use of slow paging. From the other hand, the very high values may slightly slow down the renderer and greatly affect the comfort of work in operating system. The value of 60-80% of the total amount of RAM, installed on your computer, gives the best performance. That value we should use in universal V-Ray settings.
Default geometry: parameter determines the method of loading the geometry into memory. Here we can select the type of raycaster, which will calculate the geometry of the current scene. The Default geometry: parameter is a drop-down list from which you can choose the type of raycaster.
Before describing the Default geometry: options, we should mention the VRayProxy and VRayFur objects. The feature of rendering such objects is that no matter what is selected in Default geometry:; these exact objects are calculated by dynamic raycaster. Such a feature is implemented because these like objects are extra high polygonal, and it is better to load them by portions for avoiding the program crash.
Static is the most trivial raycasting mode. When we select Static, all the data about the scene geometry is entirely loaded into memory before rendering.
Dynamic is the compromise mode of Default geometry:. Dynamic raycaster does not load all the scene geometry into memory at once. It loads the geometry data by portions. The number of megabytes set in Dynamic memory limit: determines the maximum portion size.
Auto is the initial Default geometry: option. In this mode, V-Ray decides which objects in the scene are better to calculate with static raycaster, and which are with dynamic. This decision is based on the properties of the particular object. Whether this object should be calculated with Dynamic or Static raycaster depends on the polygons and instances number of this exact object. This is a hybrid method of loading geometry, which combines the work of Static and Dynamic raycasters.
If we compare the types of raycasters, then we can conclude that dynamic is the most unpretentious, but also the slowest raycaster. Using it, we are free from the 3ds Max memory overflow issues, however, due to the need to fill and clean the limited amount of memory continually, rendering speed substantially slows down. When rendering with static raycaster, it on its one manages all RAM resource, available to the system. Static is the most productive, but also the most unstable mode. If all the geometry can completely fit in memory, then the rendering is as fast as possible. After all, we do not need to dose the geometry, wait for clearing the memory to load the next portion of data, and use the sluggish paging. However, if we have more data than can fit in available RAM, it will immediately cause the downfall of the program. Just recall the picture with a broken tree.
Nominally, the Default geometry: set to Auto. The Auto is the most universal mode, so it is reasonable to use it in the Best V-Ray Settings.
Buckets Options
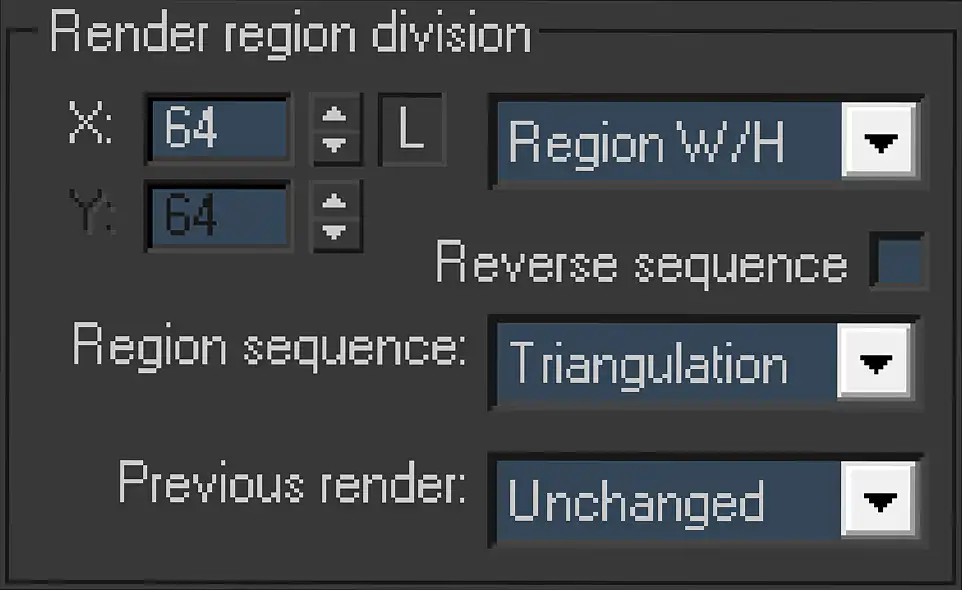
Screenshot of Render region division section of V-Ray:: System rollout located at Settings tab of 3ds Max Renders Scene dialog.
The bucket is a rectangular section or portion of a certain size into which the rendered image is divided. This is a special technique by which the work of calculating the whole image is divided into parts. This allows a 3d renderer to "submit" individual portions of the task to a separate computing process (processor cores) and calculate several portions of the same image in parallel. This is the main "trick" of how render engines implement multi-threaded visualization. The idea of such a partitioning is similar to the idea of how Number of passes function work in Light Cache. Buckets are those "little squares that quickly (and sometimes not...) running around" the frame buffer, gradually opening the final result of rendering to our view.
It may sound banal, but the actual rendering process, which is considered a model of multitasking, is not multi-tasked actually. The exact computation cannot be performed by more than one core, even with the multi-core CPU. You can imagine how long will the rendering last, if we use only a single processing core, while other are idle. This situation is completely unacceptable and, of course, we need a way out it. The solution for this is the equal division of the rendering process between different computing threads. The rendering is divided into many independent parts, in other words, into many small renderers, and the each of them can be computed by a separate processing thread. Thus, uniform computation is divided into several parts, allowing the full load of all computing pipelines of the system. This is how the little images, called buckets, render. When the bucket is rendered, it is displayed in a frame buffer. The rendering result is like a puzzle, assembled from small pieces into one final image :) In order for the final render does not look like a jigsaw puzzle or a mosaic, with clearly distinguished borders of neighboring cells, buckets are the subject for mutual interpolation.
Let us take a look at the exact buckets parameters.
X and Y values determine the size of the bucket in pixels horizontally and vertically. By default, these two numeric fields are dependent and equal. Although, it is enough to press the button L (lock) and the independent Y value becomes available. The X and Y determine the size of bucket in pixels until the drop-down list next to X is set to Region W/H. If it set to Region Count, then the numerical values in the X and Y determine the number of buckets, to which the final render will be divided horizontally and vertically.
Obviously, if the final image is divided into many portions, then the more computing resources V-Ray have to spend on interpolating their neighboring boundaries. At the same time, the small bucket is a guarantee that one rendering portion catches the minimum amount of geometry. That is good factor, because bucket is exactly that portion, which the dynamic raycaster loads into RAM. Reducing the size of the bucket can be useful, when filling the bucket objects exceed the limit of memory, available to a single thread. A smaller bucket could theoretically take less amount of geometry, so it can possibly save rendering from the use of paging. The long and short of it, this situation is difficult to predict, so the default values 64x64 and Region W/H are the best for starting V-Ray configuration.
Region sequence is the option that specifies the type of portions rendering sequence or, in other words, the pattern of buckets rendering. We can choose the one of the six rendering patterns - Top/bottom, Left/right, Checker, Spiral, Hilbert curve, and Triangulation.
From the name of the first four of them it is quite to guess a way they render. With the Hilbert curve mode, the buckets follow each other in a form of a snake out of blocks, just like in game on first mobile phones.
The last and the most interesting mode is Triangulation. With it, buckets plot the triangles of different sizes, consistently covering all areas of the frame buffer. The main feature of Triangulation is that its pattern gradually covers very dense image areas, what is very useful for dynamic raycaster work. With such a pattern, there is a high chance that the part of geometry used for rendering previous bucket, can be used for rendering the current one. This certainly saves computational resources, avoiding unnecessary operations of loading and unloading of data to limited memory amount. It is for this reason, even if you like a snake or a checker pattern, in starting V-Ray settings always use a Triangulation as a pattern for rendering buckets.
Reverse sequence can reverse the direction of buckets calculation. For example, if the rendering pattern is set to Left/right, the activation of Reverse sequence option will make the buckets computed from right to left, i.e. in the reverse direction. This feature does not really affect the rendering process. However, it can be very useful in cases when rendering of the scene stopped before completion for some reason. Then the rendering can be resumed by activating the reverse direction so we can continue to render the scene from the not-rendered part of the image. In the Best V-Ray settings, the changing of this option has no practical sense.
Previous render is an parameter to specify an action performed with the previous image into a frame buffer during rendering of the new one. The Unchanged mode allows us leave the previous rendering unchanged. Cross and Fields modes let us cover the previous render with the corresponding pattern. Darken and Blue modes allow us to darken or give a blue tint to the previous renderer for highlighting the contrast. The most useful of these modes is the default Unchanged, which allows us easily watch the changes in the new render, comparing to the previous. That is the mode we should use in the optimal V-Ray configuration.
On this, all the important system configurations of V-Ray end. Following zones and setups of V-Ray:: System rollout are secondary and do not significantly affect the actual rendering. However, we will surely learn how to use them also.
Frame Stamp Statistics

Screenshot of Frame stamp area of V-Ray:: System rollout located at Settings tab of 3ds Max Renders Scene dialog.
Frame stamp enables adding the stamp with statistical information to the image of final rendering. With this feature on, we can add to a render a stripe with different technical information. This info can be the current frame rendering time, the name of the CPU, the current version of V-Ray, and even the size of the final image in pixels. This particular feature is designed for special occasions. For example, it may be useful when testing the scene for determining the optimal size of a BSP tree. Enabling Frame Stamp also may help you to boast before colleagues the new computer and the speed it renders the most difficult scene. Of course, enabling this function is useless as for the starting V-Ray settings.
Distributed Rendering Setups
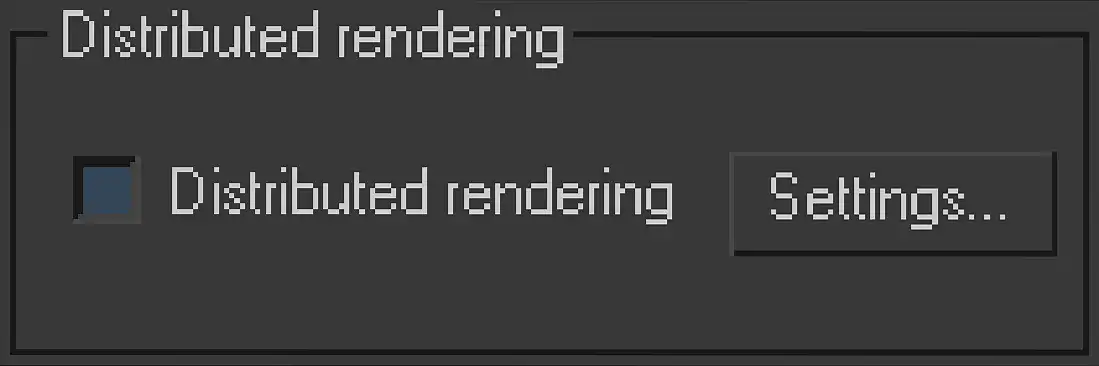
Screenshot of Distributed rendering section of V-Ray:: System rollout located at Settings tab of 3ds Max Renders Scene dialog.
A distributed rendering of an images is one of the most revolutionary features of modern rendering engines. Distributed rendering allows us to render a single image by using a computational power of multiple computers. To do this, the computers must be properly configured and be in a common network. V-Ray can distribute and send separate buckets to different available computers, and then collect the results of their calculation in a single frame buffer.
The Distributed rendering is a very interesting but quite complex topic. It includes an installation and configuration of additional software (V-Ray DR Spawner's), understanding how to deal with the local network (TCP/IP protocol, access permissions), how to share resources (scenes, textures, proxy servers) between computers involved in network rendering, understand the concept of render client & render servers / nodes, and more. So to speak, have a little system administrator skills. Of course, this topic deserves a separate article, but certainly goes beyond a scope of this tutorial. Therefore, in this section we have looked at Distributed rendering interface very generally.
For now, the rendering of an image by multiple computers is far from the idea of starting V-Ray settings, so we do not need to activate the Distributed rendering function.
Rendering Log
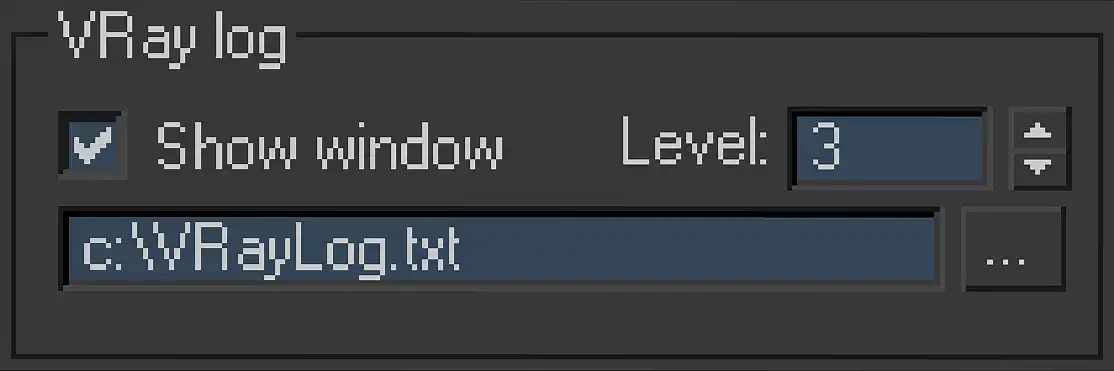
Screenshot of VRay log section of V-Ray:: System rollout located at Settings tab of 3ds Max Renders Scene dialog.
The VRay log area is fully responsible for a single function - to write and display the contents of the log file.
Unlike Frame stamp, the usefulness of this function is obvious. Enabling the Show window checkbox in the VRay log settings, opens the information window called V-Ray messages during rendering, which will show logs of V-Ray. It is very convenient to see information about the rendering process. Such information can be different warnings, errors, and just the statistics. For example, VRay log is indispensable in the process of configuring the aforementioned distributive rendering. V-Ray messages can clearly display which computers took part in the current rendering, and which are idle. Such awareness allows us to save a lot of time and prevent many problems on the initial stages of rendering.
VRay log additionally makes the records to a text file, the path to which you can specify in the box below the Show window checkbox. It can be useful if 3ds Max has suddenly crashed. In this case, we can always open the written file using any text editor and look for error messages, among which is the one that caused the crash.
A numeric value Level indicates the depth of the ongoing statistics. The one (1) in this parameter means that the log will contain only the error messages. Two (2) is the errors and warnings. Three (3) specifies that logs must display the errors, warnings and general informational messages. Four (4) in this parameter tells V-Ray to log all the events that happen during rendering.
In order to be well informed about the most important events during rendering, in the nominal starting V-Ray settings, the Show window option must be enabled and statistics Level should be set to three (3).
Miscellaneous Options
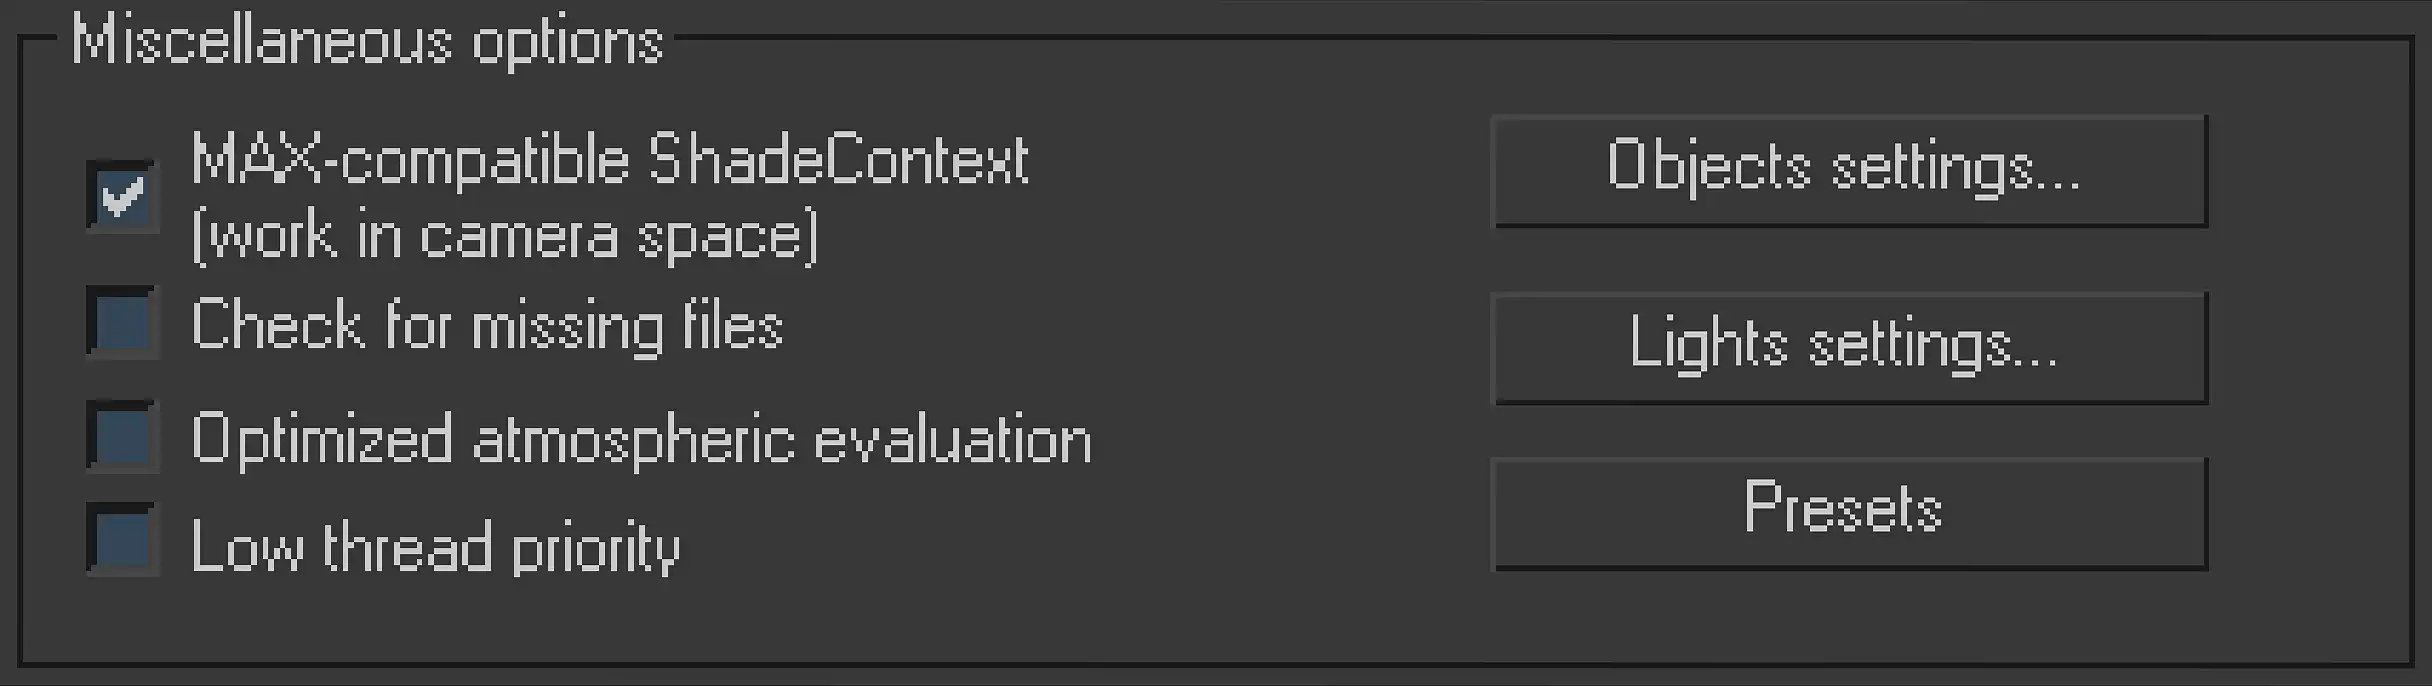
Screenshot of Miscellaneous options section of V-Ray:: System rollout located at Settings tab of 3ds Max Renders Scene dialog.
The Miscellaneous options is the last area of system settings and contains all the remaining secondary system parameters of V-Ray.
MAX-compatible ShadeContext (work in camera space) is a feature that allows V-Ray to work with so-called camera space.
The case is that V-Ray nominally performs all calculations in the scene space. In other words, the V-Ray itself uses geometry coordinates relative to the whole scene space. However, some plug-ins, especially the older ones, work with coordinates relative to the current camera. Activation of work in the camera space allows V-Ray to work with these plug-ins, bypassing the problem of incompatibility. That is why, in the starting V-Ray configuration, we must always keep the MAX-compatible ShadeContext (work in camera space) option active.
The option Check for missing files enables check for missing files, such as not found textures or proxies in the current scene. The result of this check is immediately displayed as a warning in the log. Nevertheless, we usually know about the missing files in the scene. Just remember the popping out list of missing files when the scene is loaded into 3ds Max. In practice, the missing files check before actual rendering is more annoying than useful, and therefore, we are better turn off this function when setting the starting configuration of V-Ray.
Optimized atmospheric evaluation is an option that disables shading on the scene objects that are inside or outside the zone of atmospheric effects. When the option enabled, renderer does not shade the objects, which are slightly visible through the opacity of atmospheric effects. The enabling of optimized atmospheric evaluation can save significant computational resources on skipping materials calculation for barely visible objects. In such case, V-Ray first calculates the atmospheric effect and estimates the visibility of objects in advance. Since that evaluation, the non-visible objects are treated like those that do not need the shading. Of course, the automatic determination of the objects visibility through atmospheric effect is not always perfect. There may be a situation, in which the object actually is visible enough, but still not shaded. In the Best V-Ray Settings, this function should nominally be disabled.
Low thread priority is an option that automatically assigns the low priority to the rendering process in the operating system. The same can be manually done using the Windows Task Manager on the Processes tab. Low thread priority option use can relieve the computer a bit, freeing up computing resources for other applications. It allows us to work with those comfortably, even during rendering. However, resource-intensive applications can still lag despite the activation of the Low thread priority.
Additionally, assigning the low priority to any process reduces its effectiveness and, as a result, slows down the computation speed, which is very unacceptable in most cases. Therefore, in starting V-Ray settings, this option must be turned off.
Last part of Miscellaneous options section are the Objects settings, Light settings, and Presets buttons.
Objects settings and Light settings buttons call the Options windows of objects and light sources settings, similar to those that can be accessed by clicking the right mouse button on the selected objects in a viewport. These features are not actually the V-Ray settings, so they have no relation to the optimal V-Ray settings.
Presets is a function that allows us to save the settings of the current scene to the V-Ray profile and its further loading into any other scene. Using this feature can leave us from routine of setting the same checkboxes and values from project to project. This function is directly related to the nominal starting V-Ray setup. If we configure V-Ray and save its setting to profile, then we can easily use them in any new scene.
This function is obvious even without further explanation, but, in any case, its practical application and its alternatives will be described next tutorial in detail.
GI Maps Out of Control
It should be noted that V-Ray:: System rollout settings do not affect a memory allocation for GI data in RAM. This means that regardless of what the BSP tree size is, what kind of raycaster we have selected, and what the memory limit is, the GI maps will be fully loaded into memory and will occupy there as much space as they need.
It is a real situation, when the render passed all preparatory stages, associated with loading geometry into memory, and even started GI maps rendering process, Light Cache for instance. Then, after a certain number of LC samples have been rendered, you have the same hateful memory error, because the memory that left after loading the geometry is simply not enough to meet all the needs of LC computing.
Unfortunately, there are no system settings to solve the problem of memory overflow during GI computing. However, some way out exists. The most obvious is to use a dynamic raycaster to limit memory usage by reducing the value of Dynamic memory limit:. There is also another compromise. We can go the way of subdivision, simply breaking the rendering of one image into several parts. It is possible to render entire image using region render option. For example, we can render first half of the image using region render, and then render the remaining half. Of course, if we render Light Cache only for half of the current frame, then it will take twice as less memory than when rendering the whole image at once.
Conclusion
If you think that with this tutorial we recommend you do not buy additional RAM, but simply use a dynamic raycaster. We must say openly that we have the exact opposite opinion. Because it's best to always have enough RAM to render scenes with static raycaster only. This is especially true if you are engaged in real commercial work and earn money on it (as a reward or salary). Consider additional RAM as an investment, as a tool that allows you to work faster and not worry about unexpected "surprises" in the form of application failures. The idea of this tutorial is, first of all, to show the theory of what is happening so to speak "behind the scenes", and secondly, to provide you with a "rescue ring" in case the deadlines are coming but you just do not have time to run to the store for additional memory stick. This tutorial also covers a situation where you have to visualize a really large-scale scenes and any physical (due to hardware limitation) amount of memory cannot cover your needs. Otherwise, install as much RAM as you can afford or really need, this will cover you back in advance.
We hope that this tutorial will save you if you face a difficult situation when the project deadline is close, but the visualization process suddenly fails. Now that you understand the basics of working with V-Ray system settings, you can handle very complex scenes rendering, almost regardless of the amount of RAM in your computer.
And that's all. If you were strong enough to go through all seven tutorials with us, whether you are a beginner or a professional, you could find something useful in them, and it will help you in your current and future work.
We wish you simple settings, as well as fast and beautiful 3D visualizations.
See you in the next tutorials, but this time, probably, from another series!
It looks like you're using a 32-bit version of 3ds Max and V-Ray, which can't use more than 2800-3000 MB of RAM due to technical limitations (maximum address in a 32-bit bus). In other words, your 5 gigabytes of RAM are not working right now. Make sure you have 64-bit Windows, and install 64-bit 3ds Max and the appropriate V-Ray, then you can use the full potential of your system.
Share
Please share if you like it!