DMC Sampler or Speed vs Quality in V-Ray 1.5
Balancing visualization speed and quality with just a few global settings. An explanation of what DMC Sampler is, its deterministic nature during blurred effects sampling, and how it affects rendering accuracy. What is the samples difference threshold and why does adaptive renderer utilize an early termination technique to stop the sampling process. How to speed up rendering and visualize drafts without having to adjust each effect individually.
This series of tutorials was originally written in 2010. Then the working version of V-Ray was 1.5. The idea of this series is, firstly, to explain all the important concepts of visualization in simple language on illustrated examples, and secondly, to provide a package of initial values or so-called "universal" settings for the renderer which are tested in practice, suitable for most scenes and allow you to achieve best balance between quality and speed (rendering time).
Since then, in the latest versions of V-Ray (currently V-Ray 5), some settings have been renamed, moved to other sections, hidden or completely removed from the user interface.
To learn more, read the Main 2020 Update.
This is a tutorial series intended to guide you through all the basic V-Ray rendering settings. It successively describes all the V-Ray-related tabs located in Render Setup: ... (F10 key) dialog.
You can use the navigation menu below to learn more about other tabs settings from other chapters.
V-Raytab: Antialiasing & Color mapping in V-Ray 1.5Indirect illuminationtab: Indirect illumination in V-Ray 1.5Indirect illuminationtab: Irradiance Map in V-Ray 1.5Indirect illuminationtab: Light Cache in V-Ray 1.5Indirect illuminationtab: Rationale for the Choice of GI Engines in V-Ray 1.5Settingstab: DMC Sampler or Speed vs Quality in V-Ray 1.5Settingstab: Ray Casting & Memory Allocation in V-Ray 1.5
Contents
Introduction
Hello everyone!
It is obviously that, that most of 3D rendering artists have to deal with setting up a rendering engine. The first thing everyone wants to know is how to set up a beautiful and photorealistic visualization, at the same time, to get a final results as quickly as possible. Ironically, after the first trial setup, everyone comes to the conclusion that "there ain't no such thing as a free lunch".
To put it concretely, clear, beautiful images are possible only at fairly high rendering settings. Fortunately, there are tradeoffs while working with V-Ray. After all, we measure the quality of each rendering by eye, not by some absolute scale or technical measurement. The specific situation with each individual scene is also important here. For example, noise is usually an unwanted rendering artifact, but sometimes it can give an extra cinematic look for the rendering.
But your really hit a snag, to go further, by spending an hours on locally adjusting a quality. In the materials, in the light sources, when each of them has only a small effect on the overall appearance of the final results and the overall rendering speed of the whole scene.
Being an flexible program, V-Ray's renderer has special tools that make it easy to control the global quality of rendering. In particular, we can use them to control the quality vs speed, by adjusting the precision of V-Ray renderer calculations globally. These especially concerned of blurry effects, from glossy reflections to soft shadows from light sources, which are vital for the photorealism of rendered images. The key to this global quality control in V-Ray is in the DMC Sampler, the settings of which we will learn in this tutorial.
DMC Sampler Features
Many people understandably try to crack the mystery of the DMC Sampler. The "DMC" abbreviation alone can confuse many rendering artists, especially novices, because of the involuntary association with something very complex and incomprehensible.
The DMC Sampler is nonetheless a very important tool in the arsenal of any experienced 3D rendering artist, from both practical and theoretical points of view. Despite its apparent complexity during first acquaintance, it is quite logical and unmysterious.
The samples related calculations, carried out by V-Ray, are based on a special algorithm, called Monte Carlo, which is used for the simulation of mathematical and physical systems in science. The essence of the Monte Carlo algorithm is that it performs repeated random sampling to determine the final result. V-Ray uses a modified algorithm, the Deterministic Monte Carlo (DMC) sampling. The DMC, in contrast to the classic Monte Carlo, makes not random, but deterministic sampling, which allows us to obtain results that do not change from render to render. In practice, DMC lets us to load the scene, render an image, close it, open it again, run the rendering, and get the exact same image.
The DMC Sampler embodies the main feature of V-Ray, its ability to adapt to the conditions of a particular scene. It is based on the principle of determining the insignificant areas on the final image and reducing the accuracy of their calculation.
Backbone of V-Ray Adoptability
Rendering of blurry effects by the DMC Sampler involves several key factors:
- Original number of samples, set for any effect
- Importance of this exact effect in a particular image area
- Amount of algorithm adaptability
- Allowable samples difference threshold
Based on these core data and two additional factors, the DMC Sampler decides how many samples are enough to render a particular effect.
From this, it follows that a number of samples established by the Subdivs parameter for any particular effect will not necessarily be the exact number of samples used in rendering. For ease of understanding, we can consider the set number of samples for any particular blurred effect only as an "order" to the sampler of how many samples this effect want to "consume". If we tune some material, such as VRayMtl, and set 25 Subdivs for reflection glossiness, then we can think that we have ordered 252, or 625, samples for the calculation of this effect. However, V-Ray can reduce this number during rendering. To learn why and how this happens, read further.
When rendering, the special algorithm comes into action and takes into account the different conditions. It estimates the degree of importance of the image area by itself. If this algorithm considers any zone of render unimportant, it automatically provides less samples than was ordered. It takes into consideration such parameters as material color, strength of the blurry effect, illumination of the object, and distance from the light source. This is the adaptability backbone of the V-Ray DMC Sampler.
DMC Sampler Controls
Controls of the DMC Sampler are located in V-Ray:: DMC Sampler rollout of the Settings tab in Render Scene (F10) dialog.
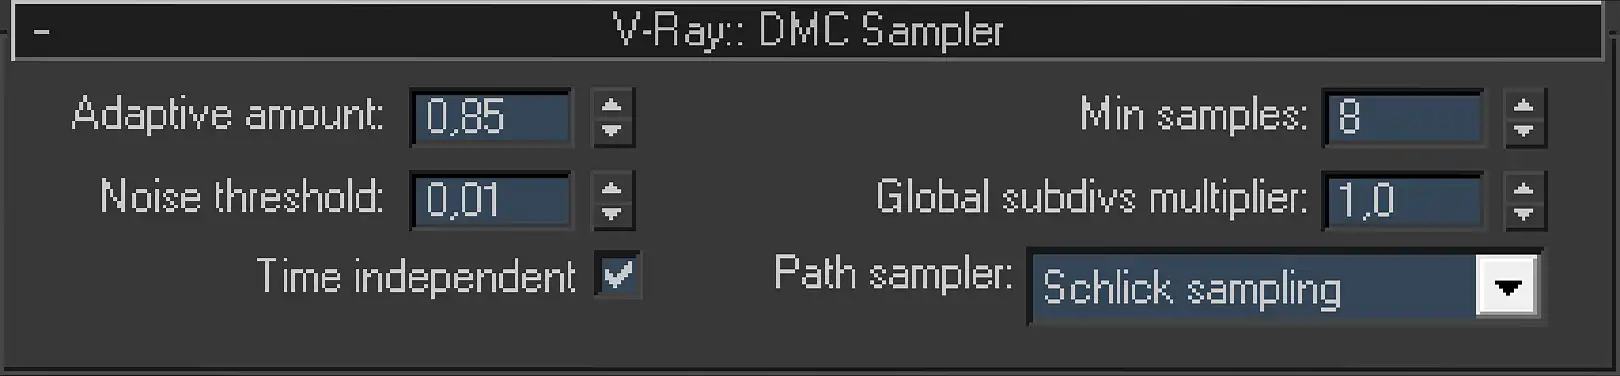
Screenshot of a V-Ray:: DMC Sampler rollout. Here presented six numeric parameters: Adaptive amount:, Noise threshold:, Min samples: and Global subdivs multiplier:, one Time independent checkbox and one drop-down list Path sampler:.
The Adaptive amount: is the first parameter that controls the work of an adaptive algorithm. It determines the degree of adaptive sampling techniques to be applied. This parameter is crucial in determining the initial maximum number of samples sufficient to render effects. In our example, the Adaptive amount: is the degree of "trust" in the self-reliant adaptability algorithm. In other words, the value set here determines how much we trust the automatic determination of zones of little importance and thus serves as an automatic samples reduction. By setting the value of 1 (one), we tell the sampler that we have full confidence in its determination of unimportant areas and that it has the right to reduce the number of ordered samples to the extent it sees sufficient. A value of 0 (zero) indicates that we do not trust this function of the sampler, and therefore zero equals a total absence of adaptability. Intermediate values allow us to choose a mean, allowing the sufficient adaptability with a significant savings of computational resources while allowing us to get rid of the inevitable inaccuracies inherent in almost any automation. In the optimal V-Ray configuration, the default value of the Adaptive amount: equal to 0.85 should be left unchanged.
The figures in the following example (625, 500, 145, etc.) are rounded and very approximate. They are given only for the convenience of understanding how the adaptability algorithm works. The actual number of samples will be different.
Let us continue to follow our example of set 625 samples to reflection glossiness. Suppose, based on the importance of the zone where this effect takes place and the degree of our trust in the adaptive algorithm, the DMC Sampler considered the ordered 625 samples excessive under these exact conditions, and so reduced the maximum. At this stage of our calculation of the blurry effect, we are left with a maximum of 500 samples.
Noise threshold: is the second key factor that controls the behavior of the rendering engine. This parameter specifies when to use the so-called early termination technique. In other words, the Noise threshold: determines when to stop the repeating samples calculating. As the previous Adaptive amount: option predetermines the maximum number of samples required for a satisfactory rendering, the Noise threshold: decides during calculating each new sample when it already has enough samples. It is important to note that the Noise threshold: works according to factual data. It examines the dynamics of change in the results with each new sample. If, for example, the 145th sample of the previously defined 500 has not made sufficient changes in the effect’s resulting value, the DMC Sampler believes that further "clarification" is unreasonable and stops rendering, despite having the 500 samples set as the maximum. So here is one more way to save computing time.
We specify the Noise threshold: in relative units. The higher the Noise threshold: value, the more severe will be the difference considered as the basis for early termination of calculation, and, consequently, fewer samples will be used for rendering blurry effects. A high Noise threshold: value will appear as noise in the rendering, regardless of the importance of its zones. Conversely, a low Noise threshold: value will allow the DMC Sampler to start early termination only when the newly received "clarification" is quite insignificant. The default Noise threshold: value is 0.01, and we recommend leaving it as is.
So, after the entrusted estimation of importance and the early termination technique do their work, our effect was calculated using only 145 samples instead of 625.
The Adaptive amount: and Noise threshold:, along with the originally set Subdivs parameter to a blurry effect, allow us to control the adaptability and hence the speed and quality of rendering. In addition to these parameters, the DMC Sampler contains a few extra settings that allow us to control its work further.
Additional DMC Sampler Parameters
A number of next parameters of the V-Ray:: DMC Sampler rollout are not that important in everyday practice, but can have a significant impact on the quality and rendering speed configuration in some situations.
The Min samples: parameter sets the minimum number of samples for each blurry effect in the scene. This parameter tells the renderer that, regardless of the circumstances, it does not have permission to allocate the number of samples below this minimum. It does not matter how many samples the adaptive DMC Sampler assesses for any effect or if the noise threshold were reached. The effect will be rendered with the minimum of samples specified in this parameter. For the optimal V-Ray settings, the Min samples: value of 8 samples is sufficient if the DMC Sampler tends to use few samples to cut down the time.
The Global subdivs multiplier: is the parameter globally affecting all the Subdivs in the scene. This option is literally a global Subdivs factor. If you set the value of the Global subdivs multiplier: to 2, the locally installed 25 Subdivs for reflection glossiness, in our example material, will be 25 × 2 = 50 Subdivs during the rendering.
This is the simplest and most intuitive option of the V-Ray:: DMC Sampler rollout, but it can cause confusion because, despite its global name, it only affects Subdivs some effects.
The Global subdivs multiplier: is a multiplier for the following blurry effects:
- Glossy reflections/refractions
- Irradiance map
- Brute force
- Area lights
- Area shadows
- DOF
- Motion blur
However, Global subdivs multiplier: does not affect Subdivs of following entities:
- Antialiasing
- Light Cache
- Photon map
- Caustics
Remember, in the universal V-Ray settings, the Global subdivs multiplier: factor must be equal to 1 (one).
The Time independent parameter is useful for animation rendering. Essentially, it enables rigorous, independent from the camera position, deterministic sampling that allows us to have constant noise from frame to frame. This saves the animation from the effects of flicker. This setting does not significantly affect the performance of the renderer. In the Best V-Ray settings, the Time independent parameter should be kept activated.
The final configuration of the V-Ray:: DMC Sampler rollout is the Path sampler: dropdown list, in which V-Ray gives us a selection of the samples generation method: Legacy, Latin super cube, and Schlick sampling. These methods have their own mathematical properties in obtaining samples. We do not need to go deeply into these without the necessity. By default, the Schlick sampling is best, and it should be used in universal V-Ray settings.
Practical Adjustment of Rendering Speed & Quality
Once we have reviewed all the settings of the V-Ray:: DMC Sampler, we can return to our main subject of how to adjust the speed and rendering quality globally by using the DMC Sampler tools.
The default values are pretty great for most cases of photo-realistic 3d visualization. With them, the quality and realism of the generated images is rather determined by a local scene Subdivs setups.
You rarely need to a settings of DMC Sampler settings in order to adjust its adaptability. Sometimes it is useful to raise the Global subdivs multiplier: because it is easier than spin-up Subdivs at each light source or the material of the scene. This is especially true if scene is large with lots of Subdivs holders (different materials, lights).
Draft Render Setup
The test or draft rendering can be discussed separately. When creating thumbnails and draft renderings, the DMC Sampler settings are indispensable. In such cases, you should sacrifice image quality to speed up visualization and get intermediate or draft results as quickly as possible. We can reasonably consider a playing with each local Subdivs for test of draft purposes as a waste of working time. It is much easier just to use only four DMC Sampler parameters to make scene draft and back.
As you can guess, for the draft visualization purposes, it is enough to increase a values of Adaptive amount: & Noise threshold:, and decrease values of Min samples: & Global subdivs multiplier:. And that's it.
Conclusion
In this tutorial, we learned about the adaptability of DMC Sampler, as well as how to globally control the speed and quality of V-Ray renderer, with just four simple settings.
We sincerely hope that by reading this tutorial, you will be much closer to understanding how to implement a fine tuning of V-Ray engine, and will be able to save a lot of your valuable time with draft renderings.
See you in the next chapters of this tutorials series!
Share
Please share if you like it!