Rationale for the Choice of GI Engines in V-Ray 1.5
A final overview (based on three previous tutorials) of pros and cons of GI engines available in V-Ray with accompany GI artifacts explained. You will learn why Irradiance Map is a great default choice for Primary bounces, Light Cache for the Secondary bounces and what are the benefits this GI Engine's have from working together. As well as justification for not using Brute force without need. You will also understand how to avoid noise and blotchiness of GI.
This series of tutorials was originally written in 2010. Then the working version of V-Ray was 1.5. The idea of this series is, firstly, to explain all the important concepts of visualization in simple language on illustrated examples, and secondly, to provide a package of initial values or so-called "universal" settings for the renderer which are tested in practice, suitable for most scenes and allow you to achieve best balance between quality and speed (rendering time).
Since then, in the latest versions of V-Ray (currently V-Ray 5), some settings have been renamed, moved to other sections, hidden or completely removed from the user interface.
To learn more, read the Main 2020 Update.
This is a tutorial series intended to guide you through all the basic V-Ray rendering settings. It successively describes all the V-Ray-related tabs located in Render Setup: ... (F10 key) dialog.
You can use the navigation menu below to learn more about other tabs settings from other chapters.
V-Raytab: Antialiasing & Color mapping in V-Ray 1.5Indirect illuminationtab: Indirect illumination in V-Ray 1.5Indirect illuminationtab: Irradiance Map in V-Ray 1.5Indirect illuminationtab: Light Cache in V-Ray 1.5Indirect illuminationtab: Rationale for the Choice of GI Engines in V-Ray 1.5Settingstab: DMC Sampler or Speed vs Quality in V-Ray 1.5Settingstab: Ray Casting & Memory Allocation in V-Ray 1.5
Introduction
Hello everyone!
This tutorial is a summary of the previous three tutorials on indirect illumination (GI) in V-Ray. Here you will find an explanation of why the choice was made in favor of Irradiance Map as Primary bounces and Light Cache as Secondary bounces GI Engine's. The actual choice has already been made in the section Practical GI Setup of the first tutorial on global illumination. So, if you are looking for specific setting values, you can skip this justification and look at the screenshot of the V-Ray:: Indirect illumination (GI) rollout setups there. But if you're wondering why one GI engine works best for the primary and another for the secondary diffuse reflection bounces simulation, with problems you may face with those engines, and how to solve them, welcome to read this tutorial further!
GI Engines Choice
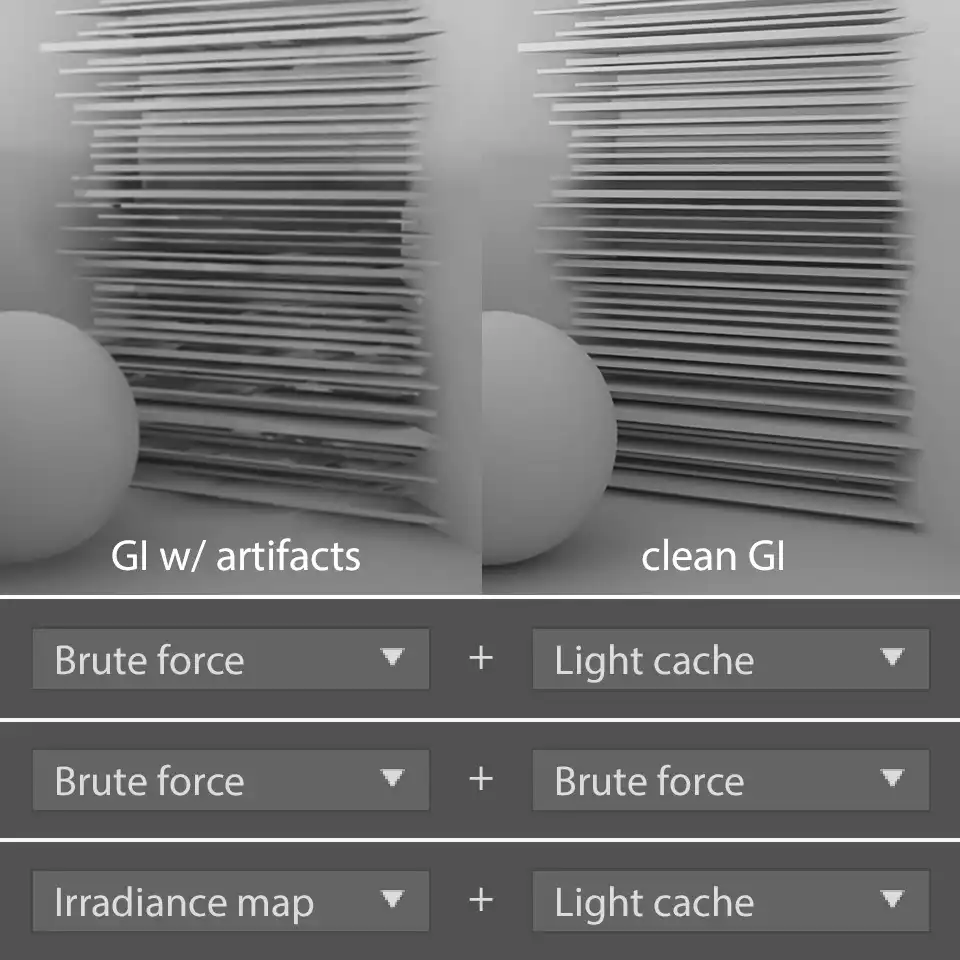
Despite the variety of GI engines in V-Ray, the real choice is quite limited and mostly predefined. We have an outdated Photon map, accurate but noisy and very slow Brute force and what's left. So it is a "voluntary-coercive" choice, and we actually follow it.
However, it should be noted that if your workstation is powerful enough or you have unlimited access on render farm, you can simply use Brute force + Light cache or Brute force for both. In terms of quality, last approach would be the best solution, especially in animations (no flickering problems at all).
But, let's get everything in order.
Photon map we immediately cut off for the reasons we described earlier. Obsolete, cannot generate GI from the environment, eager for memory, many artifacts. Don't use it, period.
The most versatile, capable of solving any problem, if you don't care about rendering time, it is, of course, the Brute Forceengine. However, the lack of built-in adaptability and the terrible usage of computing resources, as a consequence, simply do not leave the BF a chance to be the default solution. This is especially noticeable if you have a real commercial project and a real deadline. So to get the job done on time, you can't rely on BF, because with it you can easily break any realistic term. This is especially true for interior visualization, where visualization with BF can go on indefinitely.
Sometimes a tenfold increase in computation time with the same visual quality that can be achieved by smartly tuned adaptive engines is simply unacceptable in almost every sense. Only in very exceptional situations, when optimized engines simply do not cope with artifacts that are essentially related to their optimization, the use of "Brute force" may be reasonable.
And now our choice is simply narrowed down by the two remaining engines, the Irradiance map and Light cache.
Comparing IM with LC, based on what we already know from previous tutorials, it is easy to understand that the quality of GI maps obtained by IM is much higher than the quality of GI maps obtained with LC. This is mainly due to the determination of important details of the scene based on pre-passes and the high interpolation of IM samples. LC "cells", in turn, are poorly interpolated with each other. They also do not concentrate on detailed areas, but instead are evenly distributed on the geometry of the scene, not paying attention to detail at all. Thus, the GI produced by LC is coarser, and the pattern of its "cells" is quite obvious on a final rendering.
Of course, we can significantly increase the number of LC Sudivs to bombard a scene with myriads of GI "rays" in order to get a result comparable with IM. But, in this case, the computing time and resource that the LC consume will increase tremendously, and it will make no sense to use it instead of the exact BF.
Irradiance map algorithm is slightly slower, but generates a smoother GI compared to LC. The final rendering with IM comes out less disturbed, without visible noise in the GI component.
Another thing we also learned is that the first diffuse reflections or Primary bounces in the real world are the most energy-intensive. Subsequent reflected rays lose energy and, as a result, are less bright. That is, Secondary bounces have less effect on overall lighting, so they are less important. That's why V-Ray developers single out the first diffuse light rebound as "primary" among all, calling all the others "secondary", ie not very important.
Thus, a more accurate Irradiance map is more suitable as a Primary bounces GI engine. Plus, technically it can't be used as a secondary engine, remember? The Light cache is less accurate, but faster, and it is the only one left, so it naturally fits as the GI engine for Secondary bounces.
But that's not all, the real advantage of this couple is that the LC contains a flexible ray-tracing algorithm, and despite the fact that it is used as a secondary engine, it fires first, before IM. Upon receiving the ray tracing information, LC can share it with IM, so the IM can use it too. This way, the LC essentially can speeds up the calculation of the IM. The second huge advantage is that the LC provides a preview of much better quality than the IM. So, this connection works together, almost as a whole.
Complementarity and good speed with satisfactory quality are the reasons why we recommend this configuration of GI engines, as the default choice, suitable for most cases.
Common GI Issues
As you can guess, rendering time shortening by using an approximate computing GI engines comes at a price. Because IM + LC is a trade-off (compared to BF + BF), it has its drawbacks, or, say, visualization artifacts that we must be prepared to deal with.
Now that we have finished choosing the right V-Ray's GI engines, it is time to understand what problems we may get with our choice and how to solve them.
In general, global illumination has two major problems, or the two common types of artifacts. They are noise and "dirt". Dirt can also be called "smudges", "flakes" or "blotches", but these are all aliases of one type of thing - chaotic abnormal dark spots, especially densely concentrated on the small details of the scene.
Noise
The source of noise is quite trivial, it is the lack of GI samples. The HSph. subdivs: in Irradiance map and Subdivs in Brute Force and Light cache are responsible for this. Increasing the values of these parameters will reduce the amount of noise on the GI maps and, consequently, on the final render.
Dirt
Black, gray, and even excessively bright spots are mainly caused by mixing the Irradiance map component, rendered at low resolution, with the final visualization of higher resolution.
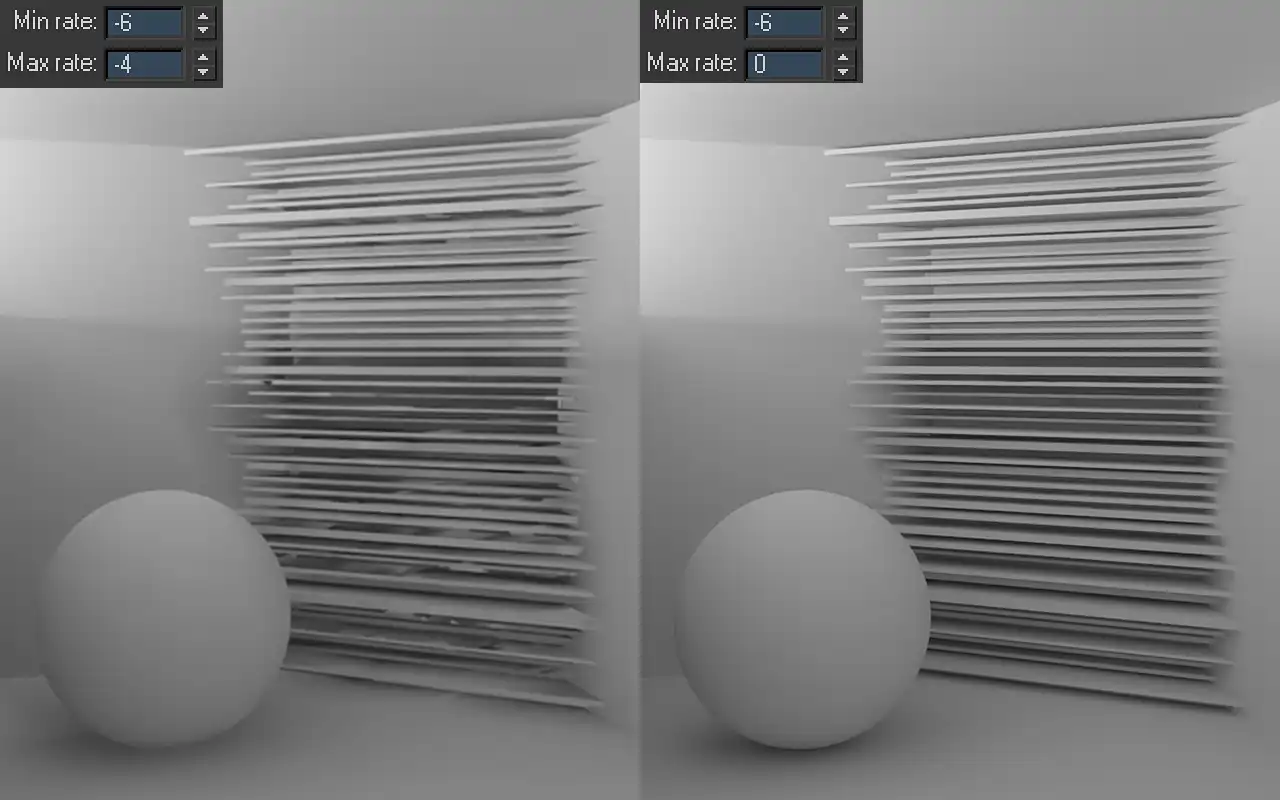
Two 3d visualizations of the same test scene. To dramatize the effect, the scene is constructed in such a way that the objects in the frame are illuminated only by the GI and without direct light in the frame. On the left, the scene is rendered with an Irradiance map on four times lower resolution (Max rate: -4) than the final render. On the right is an image with an Irradiance map rendered on full resolution of the final render (Max rate: 0).
Look at the image on a left. The problem is instantly noticeable. This is a fairly familiar picture for any professional 3D interior visualization artist. Especially clearly these artifacts appear in places where is no direct light and in highly-detailed scene areas, illuminated only by the indirect illumination. For example, they are often on the quaint white ceiling cornices, which are in deep recesses of the ceiling.
Lack of understanding of this problem nature, has led to appearing of extraordinary ways to fight it. The simplest of them is a blind rising up the HSph. subdivs: for IM, Subdivs for LC, changing units, sampling sizes, and just sky-high increase of Subdivs parameter for key light sources in the scene. More targeted was a significant overstatement of interpolation in order to blur the GI. However, the most convoluted methods consist in the following. The camera, intended for the final rendering was cloned and moved across the scene for have several frames of the object, which has the described artifacts. Further, using the scripts, which were actually made for other purposes, created one additional camera and its position was animated. This camera exactly repeated the position the primary and secondary cameras with each new animation frame. The result came out something like fly-through animation, in which the camera flied round the problem objects. Next, were rendered the primary and secondary GI bounces maps for each frame of animation, and simultaneously merged into two maps that are general for each type of bounces. Thus, more detailed and dense GI maps were obtained. After that, these maps were used for the calculation of the only final frame from the first original camera view.
Of course, such specific approaches may eliminate in some sense the problems with the GI, but they are just boring in their implementation and they take the lion's share of the scene setup time, while being inelegant and hasty solutions. It makes no sense to bore ourselves with agonizing adjustment and experimentation for each new scene, achieving a desired result. Understanding the essence of the problem, it is very elementary to fix such problems at similar or even lower computing time cost.
To realize the nature of the problem, we should return to the principle of IM. In particular, to its way of probing the geometry of the scene at lower resolutions. In most cases, as well as in the universal starting V-Ray configuration, undersampling is used even in the final IM prepass. That is, the color samples of IM are taken from a much lower resolution than the final one. After that, they are interpolated to the desired resolution, while also filling not sampled areas. In the example above, both images were rendered at a resolution of 400 by 500 pixels. The left image was calculated with the value of Max rate: equal to -4. This means that the final prepass of IM was made in 400 by 500 resolution, divided by 2, divided by 2, divided by 2 and again divided by 2. That is, in the resolution of 25 by 31 pixels.
Here is the same render, calculated in 25x31 pixels and then interpolated in Photoshop up to 400x500 pixels.
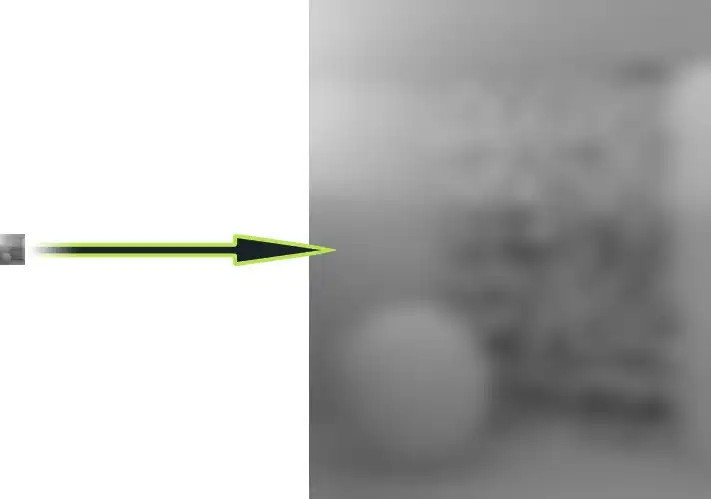
This image shows how smaller the Irradiance map usually can be compare to the final render, and what it looks like after its interpolation to the full resolution of the final render. The level of detail on the GI map, obtained in this way, is very poor.
Gray rectangle to the left is not interpolated render in the resolution of 25x31 pixels. Even with very high values of the interpolation and information about the geometry of the scene, get the small details from such low resolution is simply unrealistic. If two or even three white partitions of our grid at a resolution of 25x31, are marked with one black pixel, and the dark spaces between them all, for example, with one white, then no matter how we interpolate these pixels, after the interpolation they any way will look like blurry smudges. These spots produce those mentioned flakes on the fine details of the scene.
Now you surely understand that to obtain detailed IM and get rid of the stains in the corners, we need to increase the resolution of the last IM prepass. This was done in the previous example in the image on the right. IM was calculated with Max rate: equal to 0, i.e., on the final rendering resolution. The right example has no visible artifacts as well it has much more clearly visible shadows, which not blurred by low-resolution irradiance map interpolation.
If there are such artifacts in any part of the scene, most likely, there is no need to re-render the entire frame using more detailed IM. This will unreasonably take many extra hours of computation, giving essentially the same result in all areas where there are no problems. In order not to waste computing resources, it makes sense to use Region render and re-render only those parts of the image whose quality is not good enough.
Conclusion
We hope that we have finally put an end to the question of choosing suitable GI engines in V-Ray, as well as gained knowledge on how to deal with noise and dirt on the render.
We wish you a fast and realistic 3D renderings without artifacts!
See you in the next chapters of this tutorials series!
Share
Please share if you like it!