Antialiasing & Color mapping in V-Ray 1.5
The biggest secret of V-Ray 3D renderer is revealed: are there such things as universal settings for photorealistic visualization of interiors, exteriors or for the studio rendering? It will recommend specific values for better visual results. Explain the general concept of anti-aliasing and how V-Ray deals with the aliasing - unwanted phenomenon for any 3d renderer. It will also help you understand what is the color mapping in rendering process and how you can control it.
This series of tutorials was originally written in 2010. Then the working version of V-Ray was 1.5. The idea of this series is, firstly, to explain all the important concepts of 3D rendering in simple language on illustrated examples, and secondly, to provide a package of initial values or so-called "universal" settings for the renderer which are "battle-tested" on real commercial projects, a starting point recipe, suitable for most scenes and allow you to achieve best balance between quality and speed (visualization time).
The need to write these tutorials was dictated primarily because the official documentation was not very good. Back then, it was a weird website spot3d.com with very abstract and brief descriptions of features, and lack of explanatory examples. In addition, V-Ray's default settings were not universal at all.
The situation has changed for the better. The official V-Ray documentation for 3ds Max is now on the official website, no confusion about it. It has a great modern interface, the descriptions are mostly supplemented by illustrated examples, and there is even a tutorials section. So I definitely recommend going there first if you don't understand some settings.
Even more, the official V-Ray docs say that the default settings for new versions of V-Ray are the developers' vision of Universal V-Ray Settings. I would not give you any advice on, because they are not bad, just offer a different approach. But, for example, I personally do not consider it very convenient to use Adaptive Lighting, I prefer Full lights evaluation option. I would like to say that I also did not like the automatic subdivis calculation, I prefer to use local subdivis, but in V-Ray 5 controls on this is simply removed from the user interface, so there is no choice anymore. Now, you can access a materials and light subdivs via maxscript only. But, it's still interesting to know about those settings, even for newcomers, to see what's "under the hood" of the rendering engine. Now, then you need to control speed vs quality, you have to primarily use the Image Sampler settings.
The settings interface has been simplified. Many tabs have a green button labeled Default. If you click on it, it will change to Advanced. If you click it again, the label will change to Expert. With each change, additional new options, hidden by default, will appear. The V-Ray installation will add an additional toolbar to 3ds Max UI, called the V-Ray Toolbar. It has (had) an option called Quick V-Ray Settings, with presets for Exterior, Interior, VFX and Studio Setup:
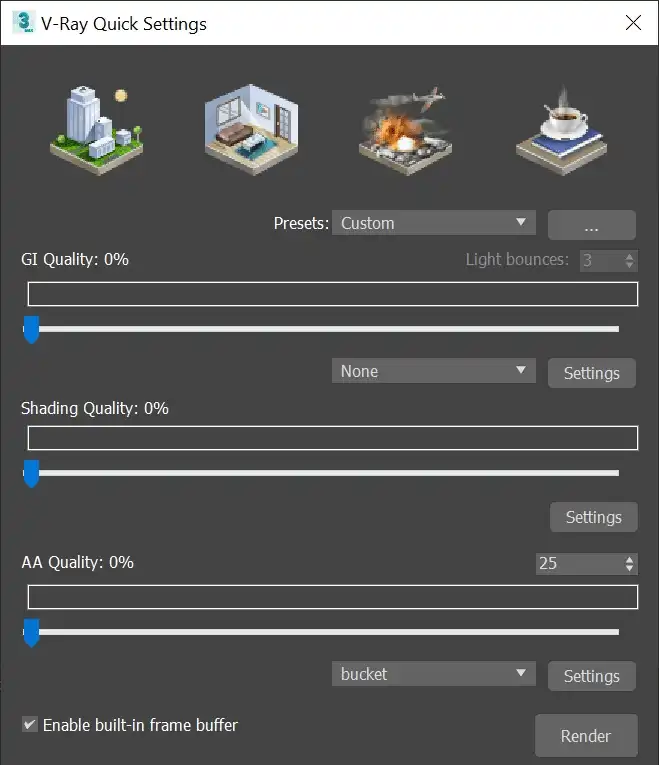
And guess what? It has been removed from the latest version of V-Ray. You can try to return it if you want. Right-click on empty toolbar space to open it context menu. There, select Customize.... In the Customize User Interface dialog that opened, choose Toolbars tab and under Category select V-Ray. Then find the Quick V-Ray render settings action there and drag and drop it to the toolbar. But is these presets worth using? This is questionable.
As you can see, V-Ray developers choose to reduce settings as much as possible. And this is the right way. As a CG Artist, I don't really want to play with all the renderer settings. Most of them are really pointless for the average 3D visualization artist. Take, Min Shading Rate, for example, W*F is that??? Do you really need to take your time to understand that thing? I don't think so. I want to focus on the details of the scene. The day when the renderer will not have any settings, instead it will automatically adapt to any scene or will just work equally well for all situations, without any tweaks at all, I will be very happy with that, so are you!
On the technical side, the changes are not as significant as you would normally expect in a decade, and should be mentioned separately. When V-Ray came out, it was the best production renderer ever created in terms of visual quality of an images it generates. To understand what this is about, just go to our 3D models section, scroll down the page and find the first published 3D models. They are mostly free, by the way. Some of them date back to 2009. Take a look at the visual quality of images of its presentations (previews) made in 2009-2010. Some of them are really photorealistic and do not differ from real photos of real objects. Then visit any CG architectural gallery or portfolio of talented 3D visualization artists with latest works to find out that the images there are not "more real". If you compare carefully, you will find exactly the same visualization artifacts. The same "flakes" on small details, the same noise in the shadows, or worse, ugly soapy blurring due to the AI-Accelerated Denoiser (a fancy name for a blur filter applied over quick noisy rendering), yuck...
This means that V-Ray was then already good enough to revolutionize photorealistic rendering, but nothing more revolutionary has happened since then. New V-Ray versions have become more user-friendly, some settings have been renamed, moved to other sections or deprecated. Several cool features have been added, including Progressive image sampler, which especially handy to use as an scene draft preview in V-Ray frame buffer (Start interactive rendering option). That's why, as I said before, you should refer to the official docs first, because some screenshots from this series of tutorials do not exactly or completely do not match the interfaces of newer versions of V-Ray. Screenshots of the V-Ray 1.5 UI versus V-Ray 5.0 interface, you know what I meant. But for the most part, the changes are "cosmetic" rather than a "game-changing". All of them are primarily about usability, less about new functionality and almost nothing to improve the results in terms of visual quality. The V-Ray toolkit has become much more comfortable to use, but it still can't create more realistic images than it did 10 years ago, it hasn't yet succeeded in surpassing his own achievements of that time, whether you like it or not. Maybe it will, but the time has not yet come.
What has really influenced the 3D rendering industry and approaches over the years is the growing computing power of modern hardware. Back in the day, 4-core processors were the ultimate dream for many 3D artists. The average workstation had only 4GB of RAM. So, two-day rendering of single static image from a scene well stuffed with high-poly objects or just a renderer crash with a "memory allocation" error was quite common things.
But now everything has changed dramatically. Even video cards have much more video memory than the system memory of those computers. 32GB of RAM is a fairly standard amount for modern desktops. Working with heavy scenes? No problem. Just install an extra 32GB of RAM, and that's it. Your system has 64GB, ready to accommodate a loooot of polygons. Technically possible, the price is quite affordable. Need to speed-up rendering? Pfff..., modern desktop CPU will easy provide you with 16 cores, 32 threads. Here you go! Want some more? The AMD Ryzen Threadripper 3990X, for instance, has 64-Cores and 128-Threads. Sounds like a joke, right???
If you have such resources, the renderer optimization techniques is almost pointless. For some scenes, you'll spend more time finding an optimal values for the Irradiance map or Light cache in order ro avoid artifact on final render, instead of just rendering a whole scene with the Brute force. The original tutorials contain an advice to use Irradiance map as primary GI engine and Light cache as secondary and corresponding tips on finding optimal values to achieve the best results of speed vs quality. But now, I myself just use Brute force for the both.
This is the case when you can not worry about the workflow, because the system gonna handle all heavy lifting of very complicated calculations in minutes. In addition, an embedding of the Intel Embree raycaster into V-Ray and other software optimization methods have provided truly noticeable rendering acceleration.
Does this mean you no longer need to optimize your settings to speed up the rendering process?
Yes and no.
Yes, if, for example, you render an animation and every few seconds on a frame multiplied by the number of frames gives you an extra few hours of waiting.
Most likely no, if you render only one static frame as the final product, and not limited by extremely tight deadline. You can, but you not have to.
Why do I explain all this? Because I want to show that although some things have changed, the very principles of the imagery rendering mechanisms remain the same, and all the concepts and many of the recommendations described in this series of tutorials are quite relevant for today, they are worth reading. Here you will find not only useful tips on V-Ray rendering, but first and foremost, an important concepts of 3D rendering in general. What is anti-aliasing, what is the bouncing of direct light, what is a GI map or raycasting, and so on. A little theory, a little practice, some advices. Because most (or rather, all) concepts and methods of 3D rendering have not changed in the last decade, you can successfully apply the knowledge you will gain here in 2021 and possibly far beyond. These tutorials are the trace of history on V-Ray in particular, and on the 3D visualization industry in general. In them you can see how it was decade ago, look at the disappearing settings, which you probably will never see again in the latest versions of software for 3D rendering.
If you don't use V-Ray yet, or you may have come across this page in a search engine looking for the "anti-aliasing" term and want to become a 3D rendering artist, or you already use V-Ray, but you think I'm very critical. It must be said that V-Ray is the best thing that has happened in the field of photorealistic 3D visualization. It was and is the world's best production (not real-time engine) 3D renderer so far. It has a free 30 days trial, so you should definitely play with it if you haven't tried this 3D rendering software yet. There are even versions for Blender and Unreal Engine.
Experienced 3d artists can say that there is another player on the market with similar image quality - the Corona Renderer. It is true, but in 2017 it was absorbed by Chaos Group - the same company that developed V-Ray. So now, it is a product of the same company and can hardly be considered as "other" or "alternative". It less pricey and has very similar but less functionality compared to V-Ray. Just fair deal, nothing special.
Anyway, I wish you an easy and exciting journey into the world of 3D rendering and I really hope that this series of tutorials will help you with that!
These tutorials were written in English by non-native speakers, so there are some related issues. If any sentence seems strangely constructed to you, do not get stuck, just follow common sense, and you will definitely be able to consume the essence of what is written about. I will try to take some time on editing a language of these tutorials, but since this is partly outdated or, better said, legacy information, for now I will focus on creating something new for you.
Please treat this with understanding.
Thank you in advance!
This is a tutorial series intended to guide you through all the basic V-Ray rendering settings. It successively describes all the V-Ray-related tabs located in Render Setup: ... (F10 key) dialog.
You can use the navigation menu below to learn more about other tabs settings from other chapters.
V-Raytab: Antialiasing & Color mapping in V-Ray 1.5Indirect illuminationtab: Indirect illumination in V-Ray 1.5Indirect illuminationtab: Irradiance Map in V-Ray 1.5Indirect illuminationtab: Light Cache in V-Ray 1.5Indirect illuminationtab: Rationale for the Choice of GI Engines in V-Ray 1.5Settingstab: DMC Sampler or Speed vs Quality in V-Ray 1.5Settingstab: Ray Casting & Memory Allocation in V-Ray 1.5
Contents
Versatility Myths
Hi everybody.
In this tutorial, we will look into the one of the fundamental and, probably, the most controversial and frequently raised subjects in the 3d rendering. It is the rendering engine setup. We will setup the V-Ray renderer for 3ds Max.
Among the many of 3d artists, especially the beginners, the two contrast myths about universal V-Ray setups exist.
One believes there are some simple setups, which are carefully hided from them by professionals by keeping the tuning secrets in a strict confidence. Only the chosen people know the secret checkboxes and values that allow creating realistic 3d renderings, which hit the awards and admiration of the all observers. That there supposedly are some settings, just like the "magic wand", which by checking some ticks in covert places lets to have the amazing results despite the actual quality of the 3d models, correct lighting setup or beauty and realism of the present scene composition.
Other think there is no any magic and all you need is the long and difficult work with the renderer parameters for each new scene. That firstly you need to run the rendering in a test mode, with the visible samples of the *V-Ray sampler *on and, by a sample map, long and boringly try the optimal settings to soften and eliminate aliasing; to loose the much time for trying than to start the competently tuned rendering. Then to begin the Irradiance map calculation with the enabled Show calc. phase option and to look intently at the Irradiance map sample passes, supposedly controlling the calculation process and many other shamanistic superstitions :)
Curiously enough, but there are no really universal one-size-fits-all setups. Like, actually, the separate settings for interior and exterior as well. But, there are some hints and tricks, on how to improve the quality of visualization in general. You will learn about them in this tutorial. There is nothing complicated here, everything will be explained in simple language. So, let's go!
Base V-Ray settings
At first, we have to make clear that there are starter settings, that may be beginning of the any rendering, for not to draw our attention each time to any possibly incorrect options. We got to fully concentrate on the actual scene setup. Only in some situations, when the rendering has some parasitic artifacts, we need some slight tuning to get rid of them. This is true not for V-Ray only, but is an absolute concept for any rendering application. To tell the truth, the correctly set lighting with a good scene geometry almost never give the unwanted surprises on the rendering, and in most cases you don't need to set anything but final resolution.
Just this like starter settings, that are really universal in 80% of situations, that truly simplify your work and embellish your renderings, will be discussed in this tutorial.
Getting started
So... Press the F10 button to bring the Render Scene dialog on screen.
Similarly, we can go to the Rendering option of the main 3ds Max menu, and choose the first Render item from the appeared there list.
Now we have the one of the most important tools and interfaces of the any 3d rendering artist opened.
Before beginning the work on the setting up V-Ray, we surely have to set it as a default rendering engine.
Just go to the tab named Common and open the Assign Renderer rollout. The items of this rollout allow setting the rendering engine for rendering, displaying the materials in Material Editor, and the renderer for the specific real-time or pseudo real-time engine for rendering the scene right in the viewport.
Click the ellipsis (...) button near the Production and near the Material Editor (if the lock button is released) and choose V-Ray from the showed list.

The screenshot of the Assign Renderer rollout of V-Ray tab that is in the 3ds Max Render Scene window. Here present the three options and the one Save as Defaults button. The options are Production:, Material Editor:, and ActiveShade:.
To set the V-Ray as a default rendering engine and to not do this each time 3ds Max starts, surely we need to press the lower big Save as Defaults button.
V-Ray Frame Buffer Rollout
The first thing that should be done to begin the actual V-Ray renderer setup is the activation of the specialized V-Ray Frame Buffer, which completely replaces and excels by functionality the integrated standard 3ds max frame buffer. It may be found at the same named rollout of the V-Ray Render scene window. To enable V-Ray Frame Buffer, the option Enable built-in Frame Buffer must be checked.
The using of the V-Ray Frame Buffer greatly eases the work with V-Ray by its functionality and convenience, as well as eliminates the possible misunderstandings with gamma correction.
In addition, it is important to leave active the Get resolution from MAX function. This step can free us from the need to constantly go to the V-Ray tab, V-Ray:: Frame buffer rollout and set the desired rendering resolution.
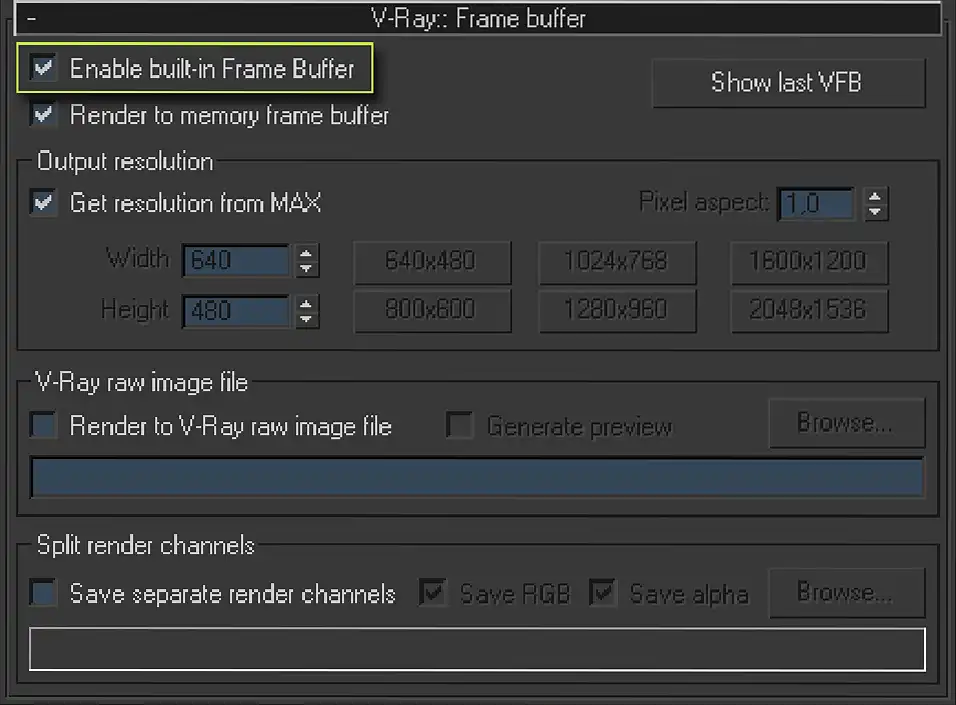
The screenshot of the V-Ray:: Frame buffer rollout of V-Ray tab that is in the 3ds Max Render Scene dialog. Here present the two options: Enable built-in Frame Buffer, Render to memory frame buffer, Show last VFB button, and three sections. They are the Output resolution with Get resolution from MAX checkbox, V-Ray raw image file and Split render channels.
The V-Ray raw image file and Split render channels are responsible for forming the formats, which needed for post-production using the compositing software, and they will be learned from the separate tutorial on rendering the render elements passes and compositing the cool realistic final image from them.
Anyway, the post-production using the Render elements is an unusual way to obtain the final rendering and it has nothing to do with the universal V-Ray settings. That is why we may leave these functions this time.
V-Ray Global switches Rollout
The next in line is a V-Ray:: Global switches rollout, it contains the parameters of the global scene influence. They are: presence or disabling the displacement, reflections, refractions, old cameras, light sources, Sky map compatibility, global material override (see the tricks of Wireframe Rendering in V-Ray), and so on.
This rollout is correctly configured by default and there is nothing needs to be changed. The one exiting parameter that may get one's attention is the Reflection/refraction parameter. This option is responsible for the global activation or deactivation the reflections and refractions in the scene materials. Even if the materials have the tuned reflections or refractions, the deactivation of this parameter will lead to complete absence of those.
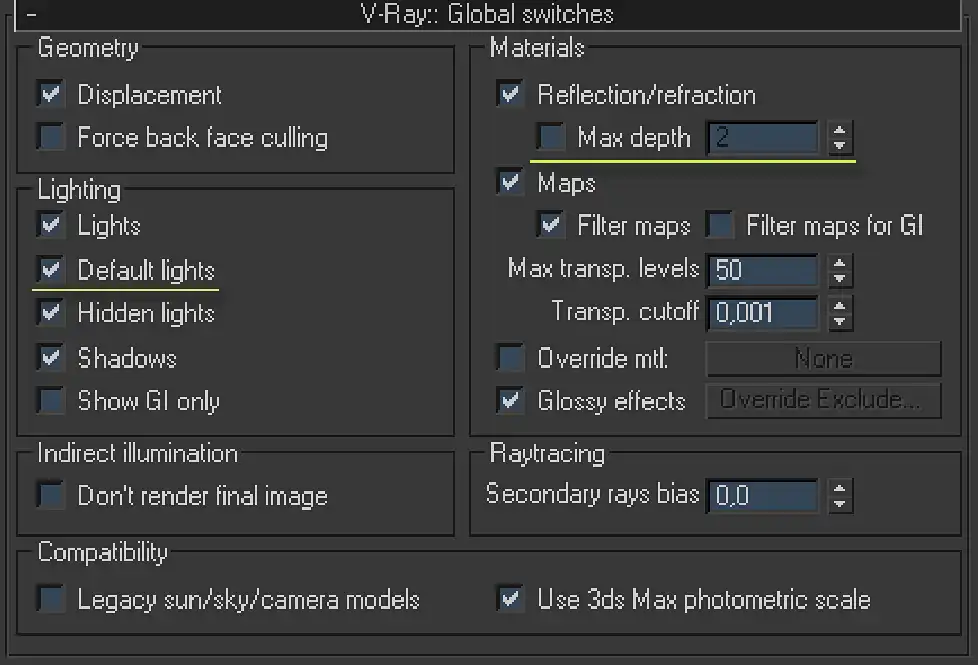
The screenshot of the V-Ray:: Global switches rollout of V-Ray tab that is in the 3ds Max Render Scene dialog. Here present the section Geometry, Lighting section with the Default lights option, Indirect illumination section, Materials section with the Reflection/refraction checkbox and Max depth on-off spinner, Raytracing and Compatibility sections.
Most interesting here is the Max depth parameter. This function globally sets the number of the secondary reflections or refractions in the scene. It is similar to the so-named parameter in the *VRayMtl *material. Using this function, we can lower the maximum number of the repeated reflections and refractions of the ray that is reflected of refracted by the scene objects. Such a measure may reduce the rendering time of the visualization of the reflecting surfaces, practically not affecting their quality, especially on the high glossiness level materials.
Yet it is worth to remember that in the complex scenes with the number of the transparent objects this may lead to appearing of the artifacts, such as rendering the material's Exit color instead of transparency. In such cases, the secondary reflections may be set locally on the each exact material.
In addition to Reflection/refraction, in this rollout is another key parameter that often misleads the beginner 3d artists. This parameter named Default lights. Many newcomers, by the "good" advice from other users, that not know much about the purpose of this parameter, always try to remove the check mark from the Default lights checkbox. Thereby they try to disable the standard light sources of the 3ds Max, which by default are always in the scene for the presence of nominal illumination in an empty scene or a scene that does not contain light sources.
Default lights are needed for rendering without light sources, set manually by the user, to look not solid black, but with the geometry of objects, already lit by default auxiliary light sources. However, the property of the default secondary lights of 3ds Max is such that they automatically shut off when the any source of light are in the scene. If we create at least one light source in the scene, the default lights will be disconnected immediately. A special case is when the scene is really having no sources of direct light and it is fully illuminated by the secondary illumination. But this case is not even a rare, it is probably unique, and this may be an exterior visualization, in which the diffuse glow of the sky is simulated by the special parametric HDRI map named VRaySky. VRaySun, which is a source of direct light itself, manages it and its presence in the scene shut off the default 3ds Max lights again. The deactivation of Default lights option in the V-Ray:: Global switches rollout is needed in very rare cases only, when you really plan to illuminate the scene by a secondary illumination only, without any sources of direct light in it. This is a very unusual situation and to worry about this option is not worth our attention, we will leave it as it is set by default.
V-Ray Image Sampler (Antialiasing) Rollout
The next parameters rollout is a V-Ray:: Image sampler (Antialiasing).
For making clear what kind of a rollout is it and what is it responsible for, we certainly need to introduce the concept of aliasing. Only after understanding what aliasing is, we can understand what the antialiasing is needed for.
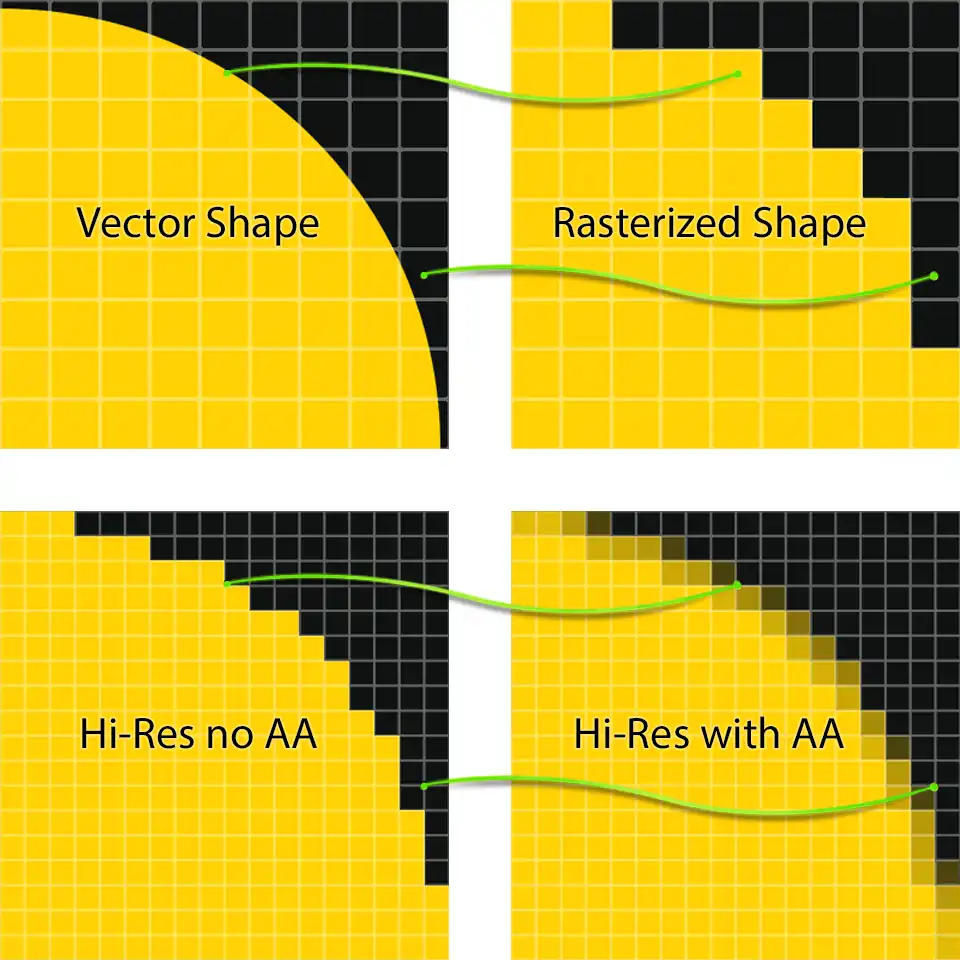
In the computer graphics, aliasing is a phenomenon that shows up in a form of jaggedness when converting the vector shape to raster.
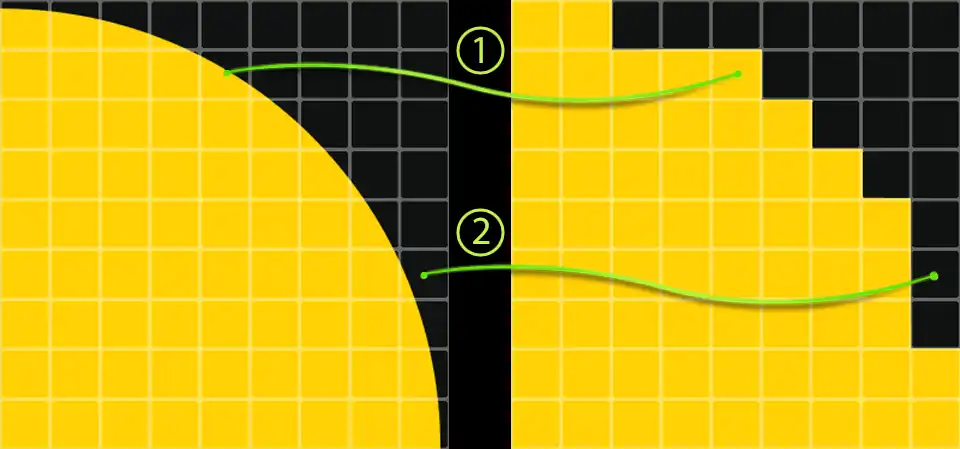
The presentation of the aliasing phenomenon. There are noticeable jaggs at the right yellow shape, which is the rasterized version of the left vector one. 1) comparison of the half-filled pixels presentation; 2) comparison of the insignificantly filled pixels presentation both in the vector and raster formats.
On the above figure, the each white transparent line contoured square represents the single pixel. To the left we can see the ideal vector figure combined with the pixel grid for better clearness. To the right is the same figure, but rasterized, that is described as the pixels. Pixel is a square of the one color. Notice that the ideal left shape on the border with the background occupy only the parts of a pixels, while the usual raster image can hold the pixels of a single color only, without any gradients or polychromy within one.
As mentioned above, a pixel is a square of one colour. During rasterization of vector shape, the colour of the obtained square is determined by the colour of its geometrical center. Returning to our example, when the vector shape intersects the pixel at its center (1), it will be fully painted in yellow. If the geometrical center of the pixel will be background's black, it will be painted completely black (2).
As you may know, the all three dimensional objects are vector in some sense, as in fact they do not have pixel resolution and can be rendered to any size raster images, and their shape is described by mathematical formulas rather than by the individual pixel's colors array.
You may try to lay a circle on floor with the baby bricks at home. Then you certainly would able to see that this like circle can be observed as a relatively smooth figure only from the far distance, while being jagged from the closer view. The same thing happens when we try to describe curvilinear vector shape with the square pixels. Pixels are the same bricks, and even with the best will in the world, the pixel-described curves will surely have jags. It is the presence of these jags is called aliasing. Certainly, the higher resolution, the greater the number of pixels we have to describe this shape and the smaller jags are, because the size of one jag will decrease relatively to the complete shape size. However, even much higher resolution cannot fully prevent from the aliasing effect. Though, in this way we can carry the relative pixel size to the so, that it will not be noticeable for the eye, and thus eliminate the unpleasant effect.
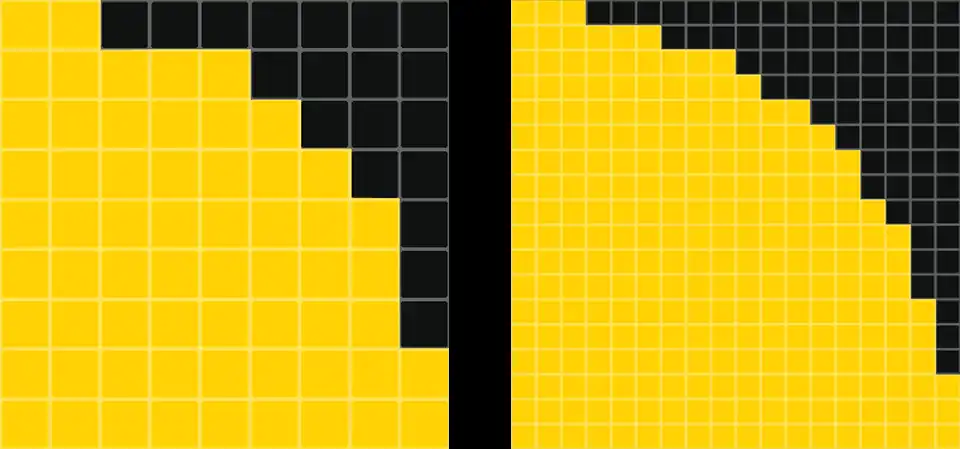
The higher resolution smoothing effect. The higher the resolution is, the smaller the jags and the rasterized shape looks smoother.
On the left, for clarity, is the same rasterized shape as on the previous figure, and on the right is also a rasterized shape, but with four times more pixels. It is easy to notice that on the right, the jaggedness less distinct, because of more and smaller pixels. Describing the vector shape with even greater number of pixels, the jaggedness could become even less visible.
Unfortunately, it is not always rational to produce rasterization of vector shapes in ultra-high resolution. That is why, to eliminate aliasing, the anti-aliasing mechanism was developed.
In short, the essence of anti-aliasing is that the pixel-jags painted not in the exact color of shape or background behind it, but averaged by coloring into a mixed middle color of both figure and background. Thus, this visually blurs the sharp edges of the figure. At the same time, the pixels of the shape itself and the adjacent background pixels are also averaged.
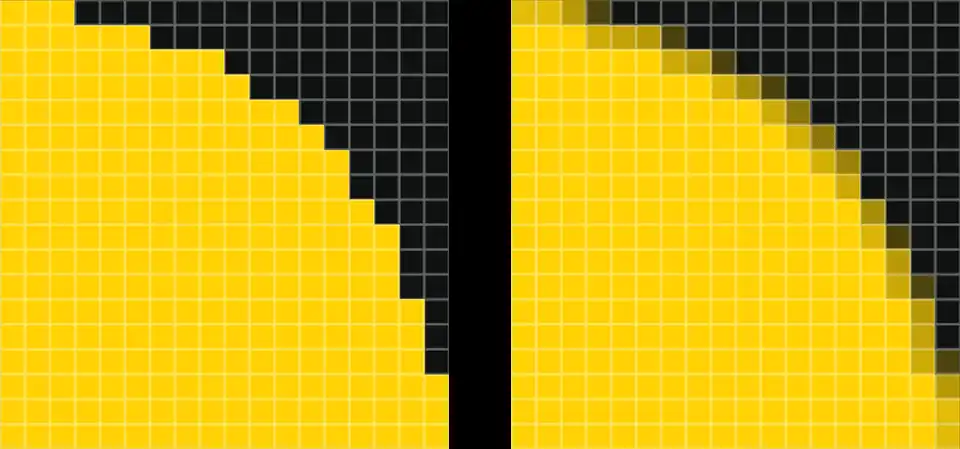
Antialiasing technique lets to have smooth shapes without noticeable jags on the rasterized pixel-presented image. To the left is the rasterized shape with the sharp edges, the the right is the same smoothed antialiased one.
On the left is the same rasterized shape, and on the right is the rasterized shape with antialiasing. It is easy to see that figure on the right, in consequence of the apparent blurring of pixels, looks much smoother and more curvilinear. Although, in fact it consists of the same pixels, but averaged slightly in color, thus creating the effect of transparency and little blur.
Rasterization process, i.e. the gathering the samples of colors from the vector shape to bitmap pixels is called sampling.
Antialiasing process uses the so-called supersampling method. Its working principle is that to determine the pixel color, not one color sample from the center is taken, but the pixel is divided into several parts, named sub-pixels, and color samples are taken from them all. Thus, pixel becomes not of just the shape or background color, but of the current mixed color of all subpixels.
The reverse process to supersampling, when to determine the color of few pixels just one point of vector shape in their averaged geometric center is taken, called undersampling.
V-Ray has several algorithms for the averaging pixel color at the boundaries of curved shapes. They are the Fixed rate sampler, Adaptive DMC sampler and Adaptive subdivision sampler.
That is to select the one of those algorithms of antialiasing, the V-Ray:: Image sampler (Antialiasing) rollout needed for. In addition, it is used for a choosing the antialiasing filter method.
Fixed, Adaptive DMC and Adaptive subdivision Image Samplers
When one of the antialiasing algorithm has been chosen, an additional rollout with its parameters appears, they are V-Ray:: Fixed image sampler, V-Ray:: Adaptive DMC image sampler and V-Ray:: Adaptive subdivision image sampler, accordingly.
Fixed is the simplest algorithm, which is roughly selects color samples relating on the sub-pixels colors, without any adaptivity. Its only option is Subdivs and it determines the number of pixels subdivisions, which will determine the final pixel color. The number of used sub-pixels is equal to the square of the Subdivs value. Fixed rate sampler is a brute force that has no adaptability in the calculation of the number of subpixels needed to form pixel colors. This algorithm calculates each case of AA with the same care, regardless of conditions. Therefore, this algorithm should be applied only in special cases, when the scene have number of DOF or blur effects, highly detailed textures and fine details, on which artifacts appear, from which you can not get rid of in any other way. Sometimes it happens that the calculation of adaptability of other algorithms may take longer than calculation with a fixed value. However, in other cases, for the lack of adaptation to the conditions, we have to pay by big time rendering when using the Fixed image sampler.
Adaptive DMC in essence is the same as Fixed, just with adaptability. The essence of his adaptability is the automatic determination of the required number of subpixels for each pixel separately, rather than use a fixed value, as in the case of the Fixed rate sampler.
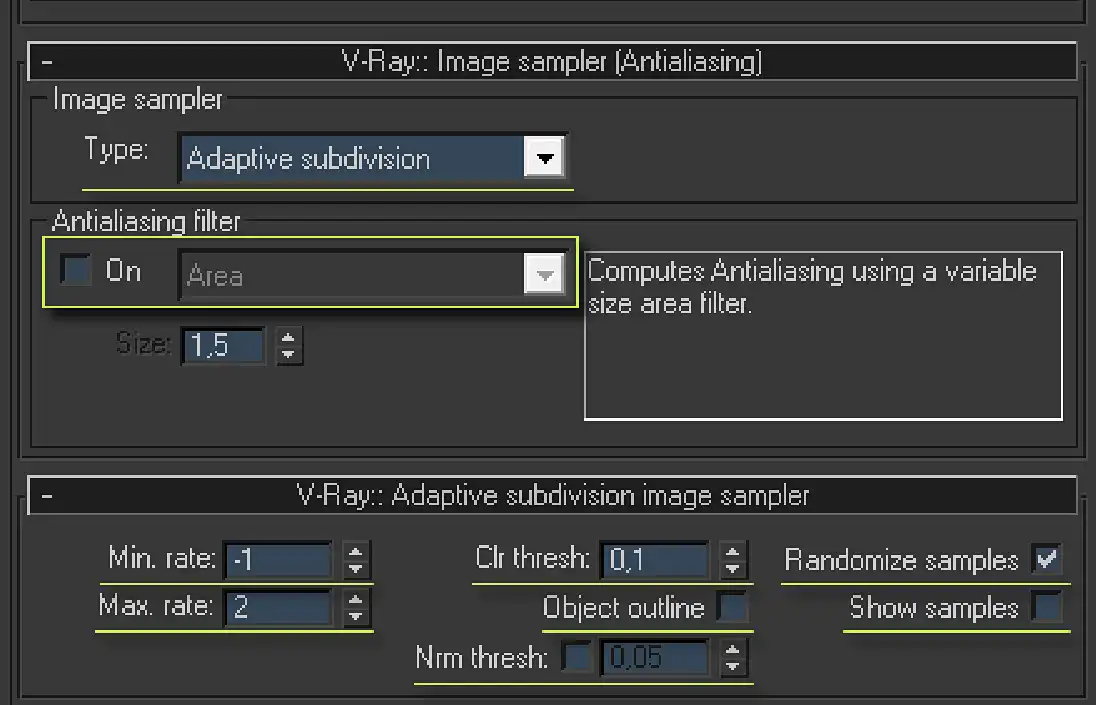
The screenshot of the V-Ray:: Image Sampler (Antialiasing) and V-Ray:: Adaptive subdivision image sampler rollouts of V-Ray tab that is in the 3ds Max Render Scene dialog. First rollout has the image sampler section with the image sampler types selector; Antialiasing filter section withe On checkbox and the type of filter drop-down list with the Size parameter. Second rollout consists of Min. rate, Max. rate, Clr thresh:, Nrm thresh: spinners and Object outline, Randomize samples, Show samples checkboxes.
The required number of sub-pixels, by default is selected based on parameters set in the V-Ray:: DMC Sampler rollout. Alternatively, based on the Clr thresh: parameter, if checkbox Use DMC sampler thresh is unchecked. The lower the value of Clr thresh: parameter, the lower is the adaptability, higher the quality of anti-aliasing and longer the render time. The parameters Min subdivs and Max subdivs determine the minimum and maximum number of each pixel subdivisions, depending on the required amount of adaptability.
Adaptive DMC sampler may be applied in the same cases as Fixed, but when the scene has less problematic areas. This will save time rendering at the same level of quality, as that is with a fixed number of subpixels. In some cases, the Adaptive DMC sampler turns out to be even faster than the more technologically sophisticated Adaptive subdivision sampler, which will be discussed a bit further. For example, that is in some scenes with Motion blur. However, is not true for all scenes and finding of its benefits can only be done experimentally. Such experiments on changing the filter and selection of best option would be justified only by the multiframe animation setup, where each additional minute of rendering of each frame can result hours or even days in result.
Adaptive subdivision is the most advanced adaptive anti-aliasing algorithm in V-Ray. Its main difference from the Adaptive DMC algorithm is a possible to use not only the supersampling, but also the undersampling on unimportant parts of the generated images, thus saving the lion's share of antialiasing computing time. Min. rate and Max. rate parameters determine the minimum and maximum values of undersampling and supersampling. These values determine the number of samples, i.e. color samples used to determine the color of produced pixels. In particular, if the rate setting is -1, it means that to calculate the color of the four (!) neighboring pixels the one sample is used. A value of 0 means that each pixel uses one sample, and the value of rate, equal to 1, means that for determining the color of one pixel, the four samples are used, etc. Mathematically speaking, the rate value is the power of the number 4 in the final number of subpixel samples of a particular pixel color of the rasterized vector shape. The Clr thresh: parameter is responsible for automatic selection of the desired Min. rate and Max. rate, as in the Adaptive DMC sampler.
Another feature of the Adaptive subdivision sampler is the presence of additional parameters that control the automatic selection of the needed Min. rate and Max. rate. These are the Object outline and Nrm thresh:. Where Object outline controls the quality of antialiasing on the borders of the object - namely, using the maximum Max. rate supersampling value, and Nrm thresh: enhances the quality of sampling within objects, depending on variations in the direction of adjacent normals, that is, small and sharp details on the object.
Randomize samples function allows you to randomly change the location of anti-aliasing samples. Nominally they are on a strict grid-like pattern. While smoothing the horizontal or nearly horizontal, and vertical or nearly vertical lines on the visualization, the strict periodic arrangement of samples may lead to parasitic straight or step-like bands. To avoid these artifacts, it is sometimes useful to do color sampling slightly chaotic; it is for this purpose Randomize samples setting is needed for.
The Randomize samples option in universal V-Ray settings should be left active.
Adaptive subdivision sampler is the most flexible, most technologically advanced algorithm of antialiasing used in V-Ray. It gives the greatest computing speed with the best quality of the image. That is it should be used as AA (AntiAliasing) default algorithm in universal settings of V-Ray. Only if there are artifacts on the fine details, and they are not removable by other ways, the less adaptive and less flexible Adaptive DMC or even a rough *Fixed *algorithm should be used.
Despite the existence of special algorithms that reduce the effect of aliasing, in practice, the most preferred and rational choice is NOT to increase the number of subpixels by banal raising high the AA settings. But to decrease an aliasing by increasing the resolution of the final image while using the slight AA. The essence of this trick is that when the resolution is decreasing, the relative aliasing jags are also getting smaller, and a slight AA removes them. High resolution and a small amount of AA give excellent results, far surpassing the ones, which can be obtained by simply overstating the parameters of AA. But the most interesting thing is that the calculation in high resolution, at least a half times greater than required, would take less time than rendering the image of the same quality, but initially with the required resolution and high AA settings.
It is so appropriate values of Adaptive subdivision sampler are the ones that are set in it by default. That is why in the universal V-Ray starting configuration they should not be changed by overstating or understating. They must be left as they are initially.
Antialiasing filters
Another important parameter is the Image Sampler antialiasing filter, it can be chosen from the Antialiasing filter section, in the V-Ray:: Image sampler (Antialiasing) rollout.
V-Ray renderer supports almost all standard filters of 3ds Max.
When the Image Sampler calculated the required amount of sub-pixels, the next process is the conversion of information to pixels. Color of the pixels can be formed immediately by averaging the color of all samples, belonging to a particular pixel, or filtered by a special algorithm that makes a certain adjustment in the formation of pixel colors from the subpixels. These algorithms are the antialiasing filters.
To select one of the filters is sufficient to mark the checkbox On and select from the drop down list the desired AA filter.
3ds Max has many filters with different algorithms. The most popular, and even causing "holy wars" among beginners and even experienced visualizers, are the Catmull-Rom and the Mitchell-Netravali, named after the developers of current algorithms.
These wars do not cease to this day, stirring up the violent disputes about which filter is better and which of them should be used for their renderings.
With the application of Catmull-Rom or Mitchell-Netravali filter, the received image becomes little sharper, as if view focuses a little on it.
For example, Catmull-Rom filter makes very sharp edges of objects, sometimes thus improving the general form of rendering, but it is not significantly affecting their internal parts.
So, if you want to raise up the sharpness, for example in Photoshop, to the entire image including the inside of objects and not just at its edges, the unwanted defects in the form of ultra-sharp boundaries of objects may appear, what will look unnatural and ugly.
Another very significant problem of AA filters is that they work in RGB space only, unable to perform properly rasterization with HDR-rendering. Performing the calculation of pixel color from the sub-pixel floating-point information, the computation errors arise and they seen as awful artifacts. They are distinctly visible on the borders of bright objects, for example on objects with VRayLightMtl materials or visible light sources, such as VRayLight. Moreover, another defects, which even more depressing - the reflections of those bright lights on the reflecting materials in the form of evident black borders around reflection spots.
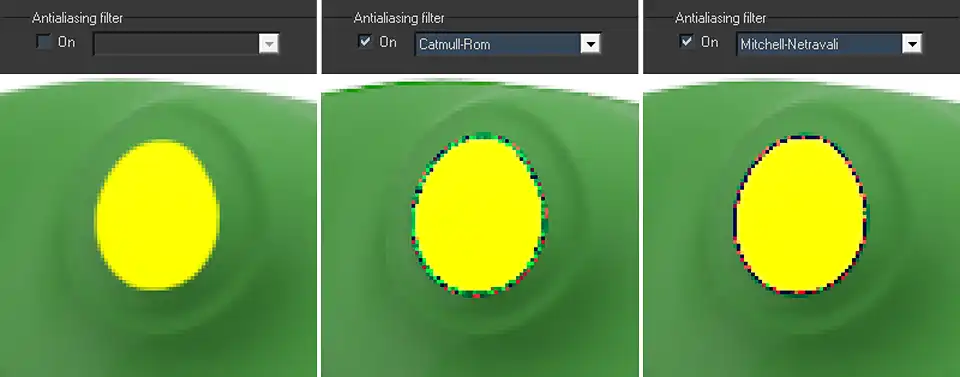
Two key antialiasing filtration methods in V-Ray. They are Catmull-Rom & Mitchell-Netravali. Comparison rendering with them and without AA filter at all.
Look closely at the image of an eye of this frog (yeah, it's a frog :) ). To the left is the rendering, performed without the use of AA filter, in the middle the rendering with the AA filter Catmull-Rom and on the right the rendering with the AA filter Mitchell-Netravali. The green part of the object is an ordinary VRayMtl, yellow is a bright VRayLightMtl. The left image looks slightly blurred, but without any unwanted artifacts. Easy blurring of the left image is elementary solved by sharpening in Photoshop. At the same time, the middle and right images clearly show the sharp boundary in the form of a terrible multi-colored line between green and yellow materials. This disadvantage cannot be eliminated, unless by long and tedious retouching in a 2d editor, but ... What for?
Applying the AA filters greatly reduces the freedom of post-processing of the image, making it impossible to have high quality sharpness of desired extent manually.
In addition, the filters that add sharpness on the edges of objects, very amplify the spurious moiré effect, even at high settings of an Image sampler.
It is for these reasons we should not use AA filters at all. Only in some cases, such as animation, where there is no possibility of adding sharpness to each of hundreds of frames by your hand, the use of AA filters is justified.
In the universal V-ray settings, the anti-aliasing filter should be completely disabled.
V-Ray Environment Rollout
Next in line is the V-Ray:: Environment rollout.
This rollout has important for rendering options that allow us to substitute GI glow of the environment, the reflection/refraction, and the refraction separately. These are the GI Environment (skylight) override, Reflection/refraction environment override and Refraction environment override parameters respectively.
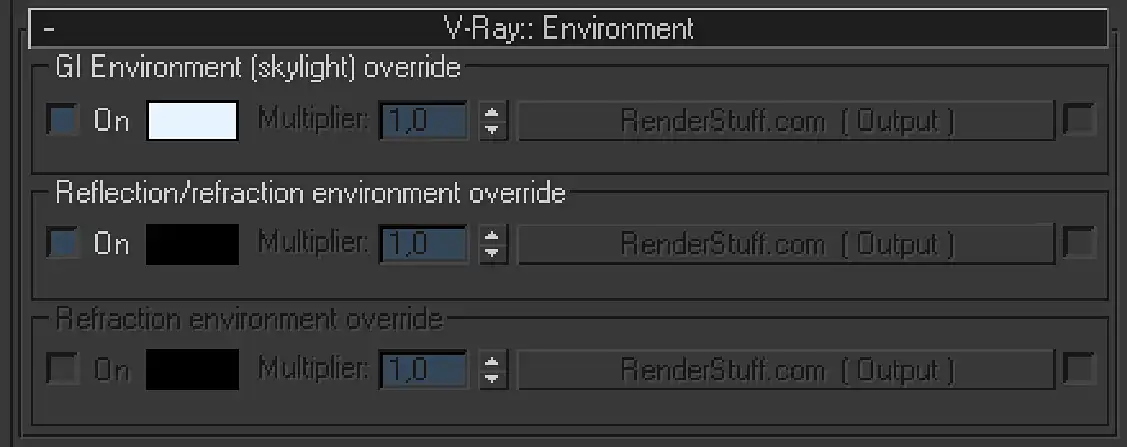
The screenshot of the V-Ray:: Environment rollout of V-Ray tab that is in the 3ds Max Render Scene window. Here present the GI Environment (skylight) override, Reflection/refraction environment override and Reflection environment override sections.
The essence of these parameters is that, if necessary, we can put the right map to the appropriate slot, or specify the desired color, thereby replacing the map or color that is in the standard 3ds Max Environment and Effects (8 key) dialog.
Suppose we want to render a car in the exterior scene, and we want its body to mirror the clouds and surrounding buildings. All we need is to put into the Reflection/refraction environment override slot the corresponding spherical or cube map with the desired image and it will be reflected on the body, or rather on all reflecting materials, of the car. For more information on the panoramic and cubic maps, see the Rendering 360° Panorama Complete Guide.
The same can be done with global illumination of the scene.
Global light may be a simple fill lighting of one solid color,* bitmap RGB* or HDR map.
Anyway, it is the feature of the some particular scene and the goals that its creator, so all the parameters of this rollout in universal V-Ray settings should be left intact, and changes needed only in special cases.
V-Ray Color mapping Rollout
The next V-Ray:: Color mapping rollout is a very important tool, which work got to know and understand each professional 3d rendering artist.
There are the parameters responsible for the rendering exposure and gamma correction in this rollout.
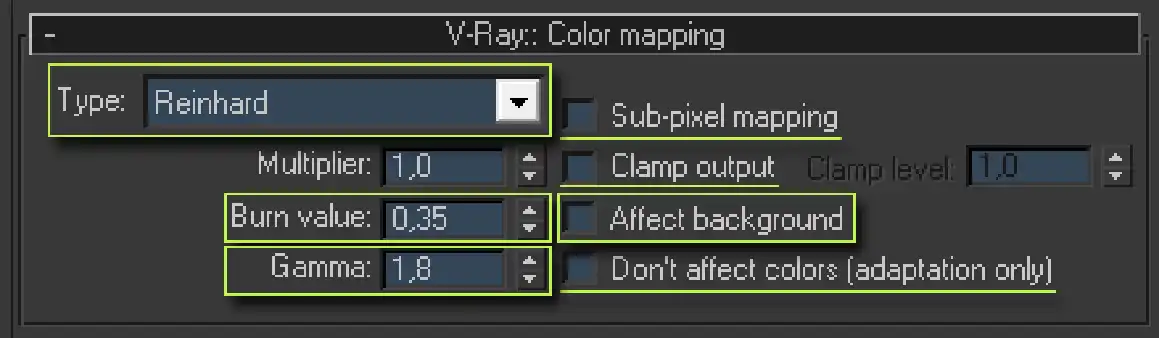
The screenshot of the V-Ray:: Color mapping rollout of V-Ray tab that is in the 3ds Max Render Scene dialog. Here present the color mapping Type drop-down list, Multiplier, Burn value and Gamma spinners, Sub-pixel mapping, Clamp output with the Clamp level tune, Affect Background and Don't affect colors (adaptation only) checkboxes.
Exposure is a term that came to computer graphics from photography. The exposure means the amount of light, which fell on the film during the shooting of photo. Photo can be well exposed, i.e. look good, underexposed - to be too dark and dull, and overexposed - to be overly bright. In computer graphics exposure means roughly the same thing - namely, the brightness and color saturation of generated images.
Gamma correction is a necessary correction and rendering images with a certain degree of nonlinearity of the gradient tones from dark to light. This feature is inherent to modern color information transmitting and displaying systems. This aspect can be controlled in the Color mapping of the render-engine V-Ray.
V-Ray has many exposure control algorithms. They are Linear multiply, Exponential, HSV exponential, Intensity exponential, Gamma correction, Intensity gamma, and Reinhard.
The most popular of these are the Exponential and Linear multiply.
Exponential Color mapping algorithm outputs the brightness values of all image pixels exponentially. Its essence is that the illumination of the scene appears nonlinear, with a little brighten of dark areas and darken very bright ones, so averaging the overall result, trying to display all levels of brightness in the limit of RGB colors. This algorithm allows to get rid of darkness and, at the same time, to eliminate overexposure of very bright areas, such as visible light sources or flashes on the scene geometry from them.
Another feature of an Exponential algorithm is that the color saturation of pixels is calculated based on their brightness.
In practice, this algorithm results very faded and unsaturated images, satisfying the necessary level of photorealism and presentable only in rare cases.
As a rule, Exponential Color mapping can be suitable only for some interior renderings, where undertones are more important, rather than specific colors of individual objects.
It is because of dullness and desaturation of the image, Exponential Color mapping completely unsuitable for presentable product rendering, where the representing for each color of the object, bright and saturated as much as possible, is important. For such rendering, the Linear multiply Color mapping algorithm is much better.
Linear multiply Color mapping algorithm is a linear algorithm that multiplies the each pixel color on its brightness. Thus, we obtain a linear, bright and vivid picture.
However, because of its linearity, the use of this algorithm leads to strong and sometimes horrible overexposure in bright areas of the generated images, making it very unsuitable for middle-tone interior visualizations.
Theoretically, to correct the defect of Exponential Color mapping algorithm, namely the colorlessness of an image, and to approach saturation of the Linear multiply Color mapping algorithm, the HSV exponential algorithm was designed. However, in practice, it remains just as uncomfortable as the Exponential or Linear multiply Color mapping ones.
There is another, not very popular, especially among beginner 3d artists, yet the most powerful and flexible algorithm for exposure control in the V-Ray, called Reinhard Color mapping.
Reinhard Color mapping is a hybrid algorithm, ideally combining in itself the other two basic algorithms: the Exponential and Linear multiply. It is this algorithm is able to give not overexposed, without the "nuclear" overbrights, and at the same time rich and vibrant presentable images, making renderings truly photo-realistic and tasty :)
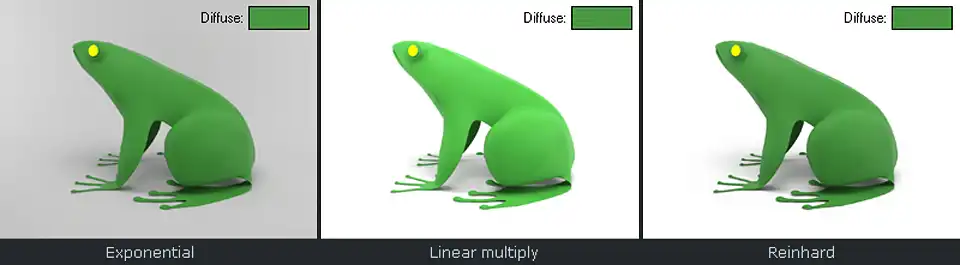
The comparison test of the three 3ds Max V-Ray color mapping algorithms. They are Exponential, Linear multiply and Reinhard. Each test sample has the original diffuse color rectangle.
By the way, you can download frog 3d model from these examples for free.
You can see the three images, created with the use of different color mapping algorithms.
On the left is the Exponential, in the center is the Linear multiply, and to the right is Reinhard color mapping. Green rectangle on top of each example shows a sample of desired colors, which are in the Diffuse slot of a frog’s green VRayMtl material.
It is easy to see that the left image is dim and pale, and even specially backlit scene background looks gray instead of white, despite the fact, that in the Diffuse slot of its material is pure white RGB 255.255.255 color.
The middle image has a more lively appearance, the frog is bright and juicy, and the white background looks clean and white. However, compare the bright and oversaturated frog color with a rectangle sample. The disadvantage of this color mapping method is also obvious. Despite its richness, the picture turned out very overexposed.
Quite another thing is the right visualization. It looks nor dull, nor overexposed. The white background is really white. Look at the color sample; it exactly coincides with the color of the frog. This is precisely the result, which must be obtained. It is presentable and lively. Absolutely the same situation will occur at interior or exterior 3d rendering. This is thanks to the use of a good and adaptive Reinhard algorithm.
To work with this algorithm, it is necessary to find Type section in V-Ray:: Color mapping rollout, and select Reinhard from the drop-down list. This will make the control parameters of algorithm to appear.
Multiplier is a parameter that controls the overall brightness of the image. More about applying it, you can learn from the Replacement VRayPhysicalCamera by a Standard tutorial.
Burn value is the most interesting parameter of this algorithm. As mentioned earlier, Reinhard is a hybrid of two other algorithms. Exactly the Burn value determines how Reinhard will behave. If this parameter is zero, then Reinhard will give a result quite similar to Exponential color mapping, if unity – similar to Linear multiply color mapping. Intermediate values move the direction of the work of Reinhard closer to Exponential or to Linear.
Thus, by adjusting Burn value, you can achieve excellent bright and intense visualizations, which Exponential cannot boast, at the same time to get rid of Linear’s overbrights.
In practice, the most suitable is the value of Burn value equal to 0.35. This value will be an excellent choice for most interior and exterior scenes, as well as for product renderings. That value should be used in universal settings of V-Ray.
Gamma is the parameter that allows us to perform gamma correction of the image.
Nominally, the correct value of gamma correction is 2.2, but there is one trick. Despite the theoretical correctness of the concept of rendering with gamma 2.2, even more interesting and beautiful results can be achieved by slightly shifting the gradient of gray on rendering to the black. This will make the shadows more juicy and dense. It is enough to lower the value of the gamma correction from 2.2 to 1.8 - 1.6. Then the rendering becomes even more contrast and realistic.
The nominally universal value, suitable for any scene is the value of color mapping gamma equal to 1.8. That is it should be used in universal V-Ray settings.
Parameter Sub-pixel mapping determines where exactly color mapping will be applied, directly to the final pixels of the image or at the level of sub-pixels that are only after color mapping will be converted into pixels. This feature is recommended to be disabled even by developers of V-Ray, as in this case a more correct result can be achieved. However, this parameter is very useful when we want to render not to HDRI, but to RGB space. Its activation lets to get the satisfactory smoothed edges on the bright image areas, which come beyond the RGB space. Still, this parameter may be disabled for correct HDR rendering.
Clamp output allows clipping of the high values of brightness outside the RGB space. Sometimes it can be useful, for example, to get rid of artifacts of AA filter (see the example of the frog’s eye above) that may appear because of an incorrect work of the AA filter with HDRI. Also is to obviate the problems of AA smoothing when rendering images with dynamic RGB range.
Nominally correct is a rendering and saving the image to the HDR (High Dynamic Range) format, so in universal settings Clamp output option must be turned off, or else when image stored in HDRI, the complete information about the actual brightness of the pixels irreversible loses.
Clamp level parameter determines the level of the cut-off of the information by Clamp output function.
Affect background determines whether to apply color mapping to the Environment map or color. As a rule, if the override background image is set, it is rarely a need to apply to color mapping on it. Therefore, in the universal V-Ray settings, the Affect background function must be switched off.
There is a misconception that there is no any need to configure color mapping at all; that it is sufficient to render HDRI in a linear space and save it in the appropriate format of HDR; after that, using compositing in 2d editor, brush up the image to the desired gamma with the desired exposure. Unfortunately, it is not so.
Firstly, to render one exposure, and then tune it up to another is a blind work. To make a beautiful photo-realistic visualization, not seeing it, its details, colors, illumination, but focusing only on a rough preview with the unfair color mapping it is necessary to be at least a seer or prodigy, who can produce the desired exposure correction in own mind :)
Secondly, the adaptive V-Ray engine, based on the principle of the sampling the most important to the overall result values and cutting off the less important, will simply incorrectly calculate what image area is important and what is not. V-Ray, to save time and computing resources, produces less accurate calculations in dark places with low light energy, in consequence of what they will have a lot of noise. However, since they are still visually dark on the supposed image, then the noise is little or even not noticeable on that image, even when we closely look at it. At that time, the bright spots with high light energy are always in sight and V-Ray produces the most accurate calculations on them, so in bright places there are less of noise and artifacts.
Therefore, if the rendering calculated in gamma correction lower that it would later be observed in, e.g., with a linear gamma 1.0, the picture, after further correction to the bright 2.2 side, will be very noisy and contain many artifacts, as V-Ray considered that image initially as dark.
Nevertheless, the Don't affect colors (adaptation only) function exists for such unusual requirements. The essence of this function is that it allows one to get an image in linear gamma of 1.0, but all the effects and GI are calculated as if they were in gamma 2.2. Thus, we obtain a linear image ready for further correction, but without the presence of the aforementioned artifacts inherent to the dark areas of rendering.
However, this method is more exotic than practically necessary, so in the universal V-Ray configuration the Don't affect colors (adaptation only) feature should be turned off.
V-Ray Camera Rollout
The last rollout of the V-Ray tab of a Render Scene dialog, is a rollout named V-Ray:: Camera.
This rollout holds the camera settings, namely, the additional features that enhance the standard 3ds Max camera. Such as depth of field or motion blur, switching types of cameras to standard, spherical, cylindrical, etc.
Of course, the universal configuration of V-Ray has no relation to this rollout and there is nothing should be changed in it without very specific need.
Conclusion
Now you are a little more familiar with some important aspects of how to configuring V-Ray renderer.
We hope that reading this tutorial makes you see that the previously seemed unfriendly or even challenging interface of V-Ray tab not so hard in reality. Understanding these basic features will make your work at V-Ray much easier and more professional.
See you in the next chapters of this tutorials series!
Thank you for your question, we have made the changes to the tutorial, so there is a little more information regarding Sub-pixel mapping already.
The rendering engine performs the calculation of the pixels brightness in the High Dynamic Range (floating-point values, not integers) and thus the brightness values may significantly exceed the RGB colors range (in which you observe the image on the screen). From the monitor, the human vision percept the colors that are in the so-called Low Dynamic Range (LDR), which the RGB color space is in. Let suppose, that some obtained pixel value is 1000 brightness units, but the RGB can carry only 256 gradations, where the last 255 value (starting from the 0) is the maximum brightness level that we can see as white color on the monitor. The result is so that the 1000 value is represented as the same white color. But… there are the 745 units of actual difference between the 255 and 1000 values.
Though, if we render and save the 3d randered image in a HDRI format, that holds much more gradations of the brightness data, we would be able to see that even the brightest white-appearing in RGB areas have the smooth gradient and no ugly sharp aliasing jags on the edges.
As the tutorial says, the enabling of the Clamp output function cuts off the pixel brightness values, which exceed the 256 gradations limit. That way we can get the right average value of the pixel, if it should represent. If one pixel part’s brightness is 1000 that is white in final and other’s is 0 that is black, then their average is 500, which is still white in result. But, after clamping, the 1000 becomes 255, thus the average of 255 and 0 is 128 that is the correct middle gray color.
So you get a situation where a pixel that needs to be 'gray' on a high-range gradient is clamped to 'white' on an image with a low gradient range. Then instead of a smooth transition between colors, such as between adjacent dark gray and light gray pixels, the visualization will have a sharp transition from dark gray to literally white. And this is exactly the jaggedness you are talking about - a sharp and contrasting color change.
Again, when the renderer does supersampling, it computes a scene with a higher resolution than the final image resolution. This means that, for example, four pixels (subpixels) in the oversampling phase will become one pixel in the final render. To calculate the final pixel color, the render calculator takes the average of the four subpixel colors [(subpixel_1 + subpixel_2 + subpixel_3 + subpixel_4) / 4 = pixel], and obtains the final pixel color. If one of these sub-pixels has a very bright value, then the average value will be much higher than expected, as a result, the final pixel on the final render will be too bright.
VRaySun and VRaySky are HDR color sources. It generates a very bright colors. Not surprisingly, you see artifacts on visualizations by looking directly at them or at their reflections.
What to do? Sometimes there is nothing you can do to avoid overbrights on a render. The ultimate remedy is to render an HDR image, without clamping. If you still want to render to LDR, disabling 'Sup-pixel mapping' may make things even worse, because with 'Sup-pixel mapping', colors is being clamped on suppixel level and the final pixel color will be less bright, but with 'Sup-pixel mapping' off, you will get the just described situation, then one 'unclampel' suppixel with a very bright value can make the final pixel color an excessively bright even if other 3 subpixels is dark.
Demystifying V-Ray DMC Sampler
According to it, 'Adaptive DMC' works better than 'Adaptive subdivision'. But your advice is the opposite. Where is the truth, man?!
This article is great and contain a lot of theory, but we are practitioners, and our advice is focused on practice only. You need to make an desidion not by 'what is best in an ideal world', but on the basis of daily results. As we wrote, somtimes 'Adaptive DMC' can give a better results. However, as practice shows, these cases are exceptions rather than regularities, so we still advise you to nominally use the 'Adaptive subdivision' sampler, aand only if you have some problems with it, use different image sampler.
Share
Please share if you like it!